background image

p 5

authorized user, who should be granted access to the system, is denied on the basis
that the system did not recognize him.
• You can set match threshold levels on a per-use basis. For the fingerprint verification

is difficult, you can adopt ID & Fingerprint verification (match one to one).

• Raising the threshold increases security, while lowering it increases throughout. The

correct balance is essential.

• For users with worn or damaged fingers, match threshold levels can (and should) be

reduced.

• Different sites have different requirements.

Table 1—1 Suggested Match Threshold Settings

1.1.4 User

ID Numbers

Before beginning fingerprint enrollment, a user is assigned User ID Number. This ID
number is used to call up the fingerprint template each time that verification is
requested.ID numbers are normally called up via the keypad, but they can be called up
through other means such as RF Card.

1.1.5 Authority (status) Levels

XD401 has four authority or status levels:
• Users are people whose identity must be verified, such to gain access to a facility or

to have their attendance recorded.

• Enrollers are Users who are authorized to enroll new users or delete on to the

system.

• Managers can do other operations, except set advanced option and enroll manager’s

authority.

• Supervisors are Users who access to all functions and change all setup in the system.

Note: Without Manager and Supervisor status in the system, the Enroller will enroll
them. And if there isn’t a Supervisor in the system, the Manager will enroll him.

FRR    FAR          One-to-many    One-to-one

High

Low

45 

25

Middle  Middle            35            15

Low

High 

25 

10

Summary of Contents for XD401

Page 1: ...XD401 1000 User Digital Biometric Fingerprint Access Control Time Attendance Unit OPERATION MANUAL...

Page 2: ...esting an Enrollment 11 2 3 Enrolling a fingerprint for backup 12 2 4 Verifying Your Identity 12 2 4 1 Fingerprint Verification 12 2 4 2 Password Verification 13 2 4 3 ID Fingerprint 14 2 5 Hints for...

Page 3: ...your present operation MENU Menu key Press down the key for seconds to enter the management interface in the initial status Cancel key Cancel your present operation Scrolling up key Scrolling up the...

Page 4: ...olled for the same ID number so the user may have more verifications way Ideally everyone finger on each hand should be enrolled so that if the user injures the enrolled finger had an alternate finger...

Page 5: ...sed to call up the fingerprint template each time that verification is requested ID numbers are normally called up via the keypad but they can be called up through other means such as RF Card 1 1 5 Au...

Page 6: ...way is Place a finger flat on the sensor surface Place it to the center of the sensor surface 2 The wrong way is Vertical Offset Inclined Lower Note Please adopt the correct way to place the finger Xv...

Page 7: ...r in the system you will have Manager status to enroll a new user There are three ways of enrollment fingerprint enrollment password enrollment fingerprint password are suitable for three differences...

Page 8: ...nroll Fingerprint to press OK the following display 2 Press OK the following appears 3 Input the enrolling number the range is 1 to 65534 press OK the following appears User Manage Enroll User Enroll...

Page 9: ...rified you are prompted to try again And you must restart the verification procedure step 3 2 Password Enrollment 1 Access the password enrollment press OK the following appears 2 Press OK the followi...

Page 10: ...be displayed while the template is created 3 Fingerprint Password 1 Access the Fingerprint Password press OK the following appears 2 Press OK the following appears 3 Input the password range is 1 to 6...

Page 11: ...tter P means password Press OK the previous message continues to be displayed while the template is created 2 2 Testing an Enrollment Ask the users to place their finger to perform a test verification...

Page 12: ...rify their identity the system defaults to three ways of verification Fingerprint verification Password verification ID number Fingerprint The following appears 2 4 1 Fingerprint Verification Place th...

Page 13: ...To start the enrollment process enter your ID number the following appears Press OK the following appears Input correct password press OK the following appears If the password cannot be verified the...

Page 14: ...the sensor surface How to select the finger Recommend to left or right index or middle finger Use fingerprints of good quality without worn or hurt The user usually selects the forefinger if it was of...

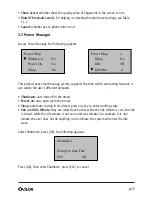
Page 15: ...ics included System Options Power Manage Communication Options Log Options Auto Test 3 1 System Options Access System Opt the following appears The setup facility covers four areas System Options Lang...

Page 16: ...s to close the lock signal output in the system If you use access control feature you will change No to Yes press OK to confirm and then press ESC to return the Options The system will ask for confirm...

Page 17: ...auto shut off in the timed Power on auto open up in the timed Sleep automatic resting in the timed press any key to enter working state Idle and Idle Minute they are related each other while the idle...

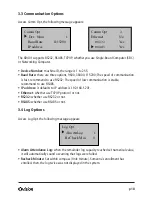
Page 18: ...it defaults to IP address is 192 168 1 201 Ethernet whether use TCP IP protocol or not RS232 whether use RS232 or not RS485 whether use RS485 or not 3 4 Log Options Access Log Opt the following messa...

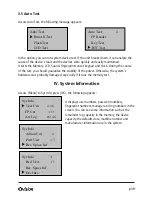
Page 19: ...System Information Access Menu to Sys Info press OK the following appears It displays user numbers password numbers fingerprint numbers manager and log numbers in the screen You can see some informat...

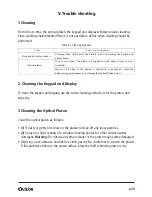
Page 20: ...articles 2 Spray on a light coating of a window cleaning product or other similar neutral detergent Warning Do not use any other cleaner or the platen may become damaged 3 Using a non abrasive and lin...

Reviews: