XtremepowerUS 75025 Owner'S Manual And Safety Instructions Download Page 8

4. Pump Run Under MODE1/MODE2

MODE


1/MODE2 Introduction

MODE 1

MODE 2

16 hours running cycle

24 hours running cycle

Stage

Start
Time

Running

Hour

Default

Speed

Quick

Start

Button

Stage

Start
Time

Running

Hour

Default

Speed

Quick

Start

Button

S1

6:00

AM

3

(adjustable)

2400RPM

(adjustable)

CLEAN

S1

12:00

PM

6 (adjustable)

1500RPM

(adjustable)

ECO

S2

9:00

AM

5

(adjustable)

1500RPM

(adjustable)

ECO

S2

6:00

AM

3 (adjustable)

2400RPM

(adjustable)

CLEAN

S3

6:00

PM

3

(adjustable)

2400RPM

(adjustable)

CLEAN

S3

9:00

AM

9 (adjustable)

1500RPM

(adjustable)

ECO

S4

9:00

PM

5

(adjustable)

1500RPM

(adjustable)

ECO

S4

6:00

PM

6 (adjustable)

2400RPM

(adjustable)

CLEAN

ECO

CLEAN

BOOST

8

Indicator Light

ECO

CLEAN

BOOST

1000-2400RPM   

DEFAULT:1500

2400-2850RPM   

DEFAULT:2400

2850-3450RPM   

DEFAULT:3250

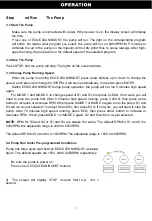
4.2 How to Set and Change Specification of MODE1/MODE2

1)

Make


sure


STOP


button


is


pressed


before


set


up,


and


pump


is


not


working.


Press


MENU,


LED


screen


will


display


the


current


time


(time


will


not


count


during


set-up),


use


arrow


buttons


to


adjust


the


time.


LEFT


and


RIGHT to


move the


cursor


one


digit,


and


UP


and


DOWN


to


increase


or


decrease


one


digit.

(Remarks:


0:00-11:59


is


one


cycle).


For


example,


the


current time


is


6:00


and


AM


light


is


shining,


when


change


the time


after


11:59, the time


change to


0:00,


PM


light


will


shine.

2)

After time


set-up,


press ENTER


to


save


and


quit.


Don't


press ENTER


if


you


would


like to


continue


to


change


the


specification


of

 MODE1 and MODE 2. Press MENU again, the light of 

MODE 1 and S1 will shine, screen display 6:00, and AM light is shine. Use arrow buttons to 

adjust the time. When the time is over 11:59, PM light will shine, AM light extinguished.

3)

Press


ENTER


to


save


and


quit


after


start


time


set-up.


To


continue


and


adjust


the


running


hour,


press


MENU, then


use


arrow


buttons to


increase


and


decrease


running


hours.


Each


press


is


for


1


hour. Press ENTER


to


save


and


quit. Or


press


MENU to


adjust


S2/S3/S4, the


same


adjustment


method


as


S1.

4)

Follow


MODE 1's


adjustment


methods to


adjust


MODE


2.

5)

Could


not


change


speed


using


arrow


buttons


when


running

MODE1/MODE2

.


Can


only


change the


speed


of


MODE


1


and


MODE 2 by


pressing


CLEAN/ECO/

BOOST,


and then


use


arrow


button


UP


and


DOWN to


change


the


RPM.


When


it


is


done, the


corresponding


speed


in


MODE 1/MODE


2


will


also


be


changed.

You


could


do the


changes


in the


right


categories.


For


example,


in


MODE 1,


S1


and


S3


is


CLEAN,


S2


and


S4


is


ECO;


in


MODE 2, S1


and


S3


is


ECO, S2


and


S4


is


CLEAN.

5.


How


to


Operate


The


Pump?

Totally three


pre-programmed


schedules:


Regular


Mode


(


including ECO;


CLEAN;


BOOST)


and


MODE


1/MODE 2.

 You c

an


change the


speed


in the


mode


of ECO/CLEAN/BOOST


freely.

Summary of Contents for 75025

Page 1: ......

Page 2: ...at the circuit breaker before servicing the pump Failure to do so could result in death or serious injury to service person pool users or others due to electric shock Pumps improperly sized or installed or used in applications other than for which the pump was intended can result in serious personal injury or death These risks may include but not be limited to electric shock fire flooding suction ...

Page 3: ...tion of the pump requires the prior consent of the manufacturer Original replacement parts and accessories authorized by the manufacturer ensure a high level of safety The manufacturer of the pump assumes no liability for the damage and injuries caused by un authorized replacement parts and accessories 6 During operation some parts of the pump are subject to dangerous electric voltage Work may onl...

Page 4: ...4 ...

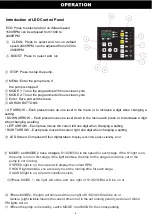
Page 5: ...lso has LED indicators for speed as well as alarm indicator and error code to warn the user on the voltage problems excessive temperature over current and freeze protection etc 1 Features of LED Control Panel 1 Display and change time 2 Display and change running speed 3 Quick start button of ECO CLEAN BOOST to run on different speeds 4 MODE1 MODE2 for scheduled programs 16 hours or 24 hours clean...

Page 6: ... Composed of four digital tubes Display current time when standby And display the current and running speed back and forth in operation AM PM Designed for 12 hour system If pump run on 0 00 11 59 AM light on if pump run on 12 00 23 59 PM light on MODE1 and MODE 2 have 4 stages S1 S2 S3 S4 is the speed for each stage If the S1 light is on the pump is run on first stage if the light twinkles the tim...

Page 7: ...nd S3 first press CLEAN if not work you will need to stop the pump first After 5 minutes high speed running press CLEAN then press arrow button to increase or decrease RPM When press MODE 1 or MODE 2 again to run the pump S1 and S3 will run as just selected To adjust S2 and S4 first press ECO if not work you will need to stop the pump After 10 minutes high speed running press ECO then press arrow ...

Page 8: ...ning when change the time after 11 59 the time change to 0 00 PM light will shine 2 After time set up press ENTER to save and quit Don t press ENTER if you would like to continue to change the specification of MODE1 and MODE 2 Press MENU again the light of MODE 1 and S1 will shine screen display 6 00 and AM light is shine Use arrow buttons to adjust the time When the time is over 11 59 PM light wi...

Page 9: ...10 ...

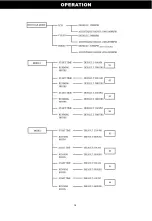
Page 10: ...Control Panel Menu Structure 11 ...

Page 11: ...29080 Strainer Housing O Ring 1 7 5212016000 Screw ST5 5 25 8 8 47252702080 Diffuser 1 9 64727297130 Impeller 1 10 5431040080 Housing O Ring 1 11 5028003000 Seal Assembly 1 12 47252701080 Pump Housing 1 13 47252708080 Motor Mounting Plate 1 14 5023410000 Motor 1 15 41038005 Mounting Foot 1 16 5224025000 Screw M5 14 4 17 5432002080 O Ring 1 18 48860105080 Drain Plug 1 12 ...

Page 12: ... 1 Locked rotor short circuit of motor wire or excessive temperature rise of the driver 2 Input voltage is too high 4 6 8 Input voltage is too low When the power is turned off the pump still can work for a while as the remaining electricity in its energy storage elements and then the alarm code 8 will be displayed which is normal At this time if you want to restart please wait until the screen is ...

Page 13: ...024 0 4001 4002 4096 After power off it will takes more than ten seconds to restart as the internal energy storage elements need to be discharged The pump may work abnormally if the circuit board is restarted before the power is discharged If it occurs power off and wait for a while to power on again 14 ...

Page 14: ......

Reviews: