background image

OF  NOTE 

PLEASE READ THE FOLLOWING CAREFULLY 

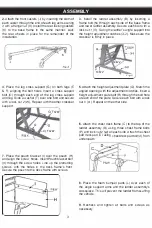
THE MANUFACTURER AND/OR  DISTRIBUTOR HAS  PROVIDED  THE  PARTS  LIST AND ASSEMBLY 

DIAGRAM IN  THIS  MANUAL AS A REFERENCE  TOOL  ONLY.  NEITHER  THE  MANUFACTURER OR 

DISTRIBUTOR MAKES ANY REPRESENTATION OR WARRANTY OF ANY KIND TO THE BUYER THAT 

HE  OR SHE  IS  QUALIFIED TO MAKE ANY REPAIRS TO THE PRODUCT, OR THAT  HE  OR  SHE IS 

QUALIFIED TO REPLACE ANY PARTS OF THE PRODUCT. IN FACT,  THE MANUFACTURER AND/OR 

DISTRIBUTOR EXPRESSLY STATES THAT ALL REPAIRS AND PARTS REPLACEMENTS SHOULD BE 

UNDERTAKEN BYCERTIFIEDAND LICENSED TECHNICIANS,AND NOT BY THE BUYER. THE BUYER 

ASSUMES ALL  RISK AND LIABILITY ARISING  OUT OF  HIS OR  HER  REPAIRS  TO  THE  ORIGINAL 

PRODUCT OR REPLACEMENT PARTS THERETO, OR ARISING OUT OF HIS OR HER INSTALLATION 

OF REPLACEMENT PARTS THERETO. 

Record Product's Serial  Number Here: _________________ _ 

Note: 

If product has no serial number, record month and year of purchase instead. 

Note: 

Some parts are listed and shown for illustration purposes only and are not available 

individually as replacement parts. 

PRODUCT MADE IN CHINA 

Summary of Contents for 26508

Page 1: ...UAL FOR SAFETY WARNINGS PRECAUTIONS ASSEMBLY OPERATING INSPECTION MAINTENANCE AND CLEANING PROCEDURES WRITE THE PRODUCT S SERIAL NUMBER ON THE BACK OF THE MANUAL NEAR THE ASSEMBLYDIAGRAM OR MONTH AND...

Page 2: ...bject to fainting spells or disorientation DO NOT USE THE PRODUCT if you are taking medication that could impair judgement or are under the influence of drugs or alcohol DO NOT overload the product Th...

Page 3: ...all items in the contents are included A BASE FRAME I POUCH BRACKET Q HEIGHT ADJUSTMENT PLATEX2 B LADDER ASSEMBLY J FRONT CASTER WITH NUTX2 R HEIGHT ADJUSTMENT PLATEBOLTX4 C CHEST DECK FRAME K REARCA...

Page 4: ...with screws H 3 3 Install the ladder assembly B by inserting a frame bolt N through each side of the base frame and lower ladder assembly Secure each bolt with a lock nut 1 V Swing the ladder s angle...

Page 5: ...Remove two looking pins from the assembled base section Push the Angle Adjustment Bar forward to the first setting of the notched Angle Adjustment Keeper 4 Grasp each of the two legs M1 and M2 and rai...

Page 6: ...stic to clean the chest deck pad as needed LUBRICATION DO NOT lubricate the casters This can damage the mechanism STORAGE 1 Remove the leg lock pins from each leg Hold the ladder when removing the sec...

Page 7: ...R DISTRIBUTOR EXPRESSLYSTATES THAT ALL REPAIRS AND PARTS REPLACEMENTS SHOULD BE UNDERTAKENBYCERTIFIEDAND LICENSED TECHNICIANS AND NOT BY THE BUYER THE BUYER ASSUMES ALL RISK AND LIABILITY ARISING OUT...

Reviews: