background image

ADPRO

®

 VM22E Audio Switcher 


Technical Manual 

29541_03 


13 

3.3 

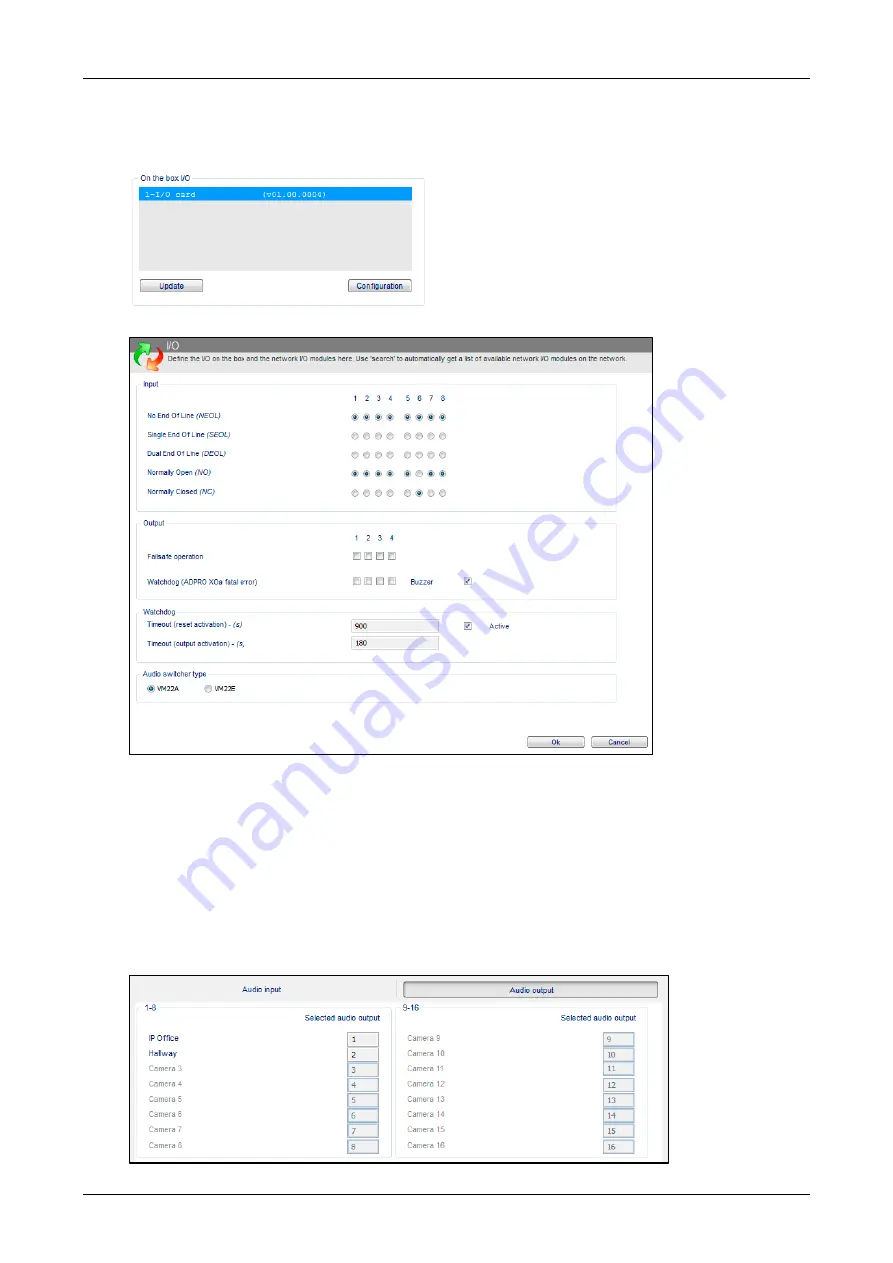
Activating the VM22E Audio Switcher 

To activate the VM22E audio switcher, proceed as follows: 

1. 

Open the XO client software, and choose 

System > Connections > I/O


2. 

Click 

Configuration


3. 

Under 

Audio switcher type

, click 

VM22E

4. 

Click 

OK

5. 

Click 

Save

3.4 

Assigning Audio Channels to Cameras 

To assign audio output channels to the cameras, proceed as follows: 

1. 

Choose 

System > Connections > Audio

2. 

Click the 

Audio output

 tab. 

For software versions below XOa 3.01, the following screen appears: 


Summary of Contents for ADPRO VM22E

Page 1: ...ADPRO VM22E Audio Switcher Technical Manual November 2017 Doc 29541_03 ...

Page 2: ......

Page 3: ... including without limitation loss of business loss of profits or loss of data arising out of your use of the products Without limiting this general disclaimer the following specific warnings and disclaimers also apply Fitness for Purpose You agree that you have been provided with a reasonable opportunity to appraise the products and have made your own independent assessment of the fitness or suit...

Page 4: ...r any other right to use the name and or trademark and or label Contact Us UK and Europe 44 1442 242 330 D A CH 49 431 23284 1 The Americas 1 781 740 2223 Middle East 962 6 588 5622 Asia 86 21 5240 0077 Australia and New Zealand 61 3 9936 7000 www xtralis com Environmental Information The crossed out wheeled bin means that within the European Union the product must be taken to separate collection ...

Page 5: ...mary 8 2 2 Required Material 8 2 3 Connection Scheme 9 2 4 Connection to the MIO Card 10 2 5 Ground GND Connection 10 2 6 Cascading Multiple VM22E Units 10 2 7 Addressing 10 2 8 Output Channel Numbering 11 2 9 Forcing Output to Channel 1 11 3 Setup in the XO Client Software 12 3 1 Summary 12 3 2 Checking and Updating the MIO Card Firmware 12 3 3 Activating the VM22E Audio Switcher 13 3 4 Assigning...

Page 6: ... card firmware version v01 00 0004 or above 1 3 Scope This manual covers The hardware installation of the VM22E the connection to the ADPRO device and the cascade connection The software configuration in the XO client This manual does not cover the detailed setup and installation of amplifiers and speakers 1 4 Specifications Power supply 10 14 VDC via external power adapter first unit only Current...

Page 7: ...scription 5 12 VDC power plug 6 Flat cable connector for cascading units 7 Screw terminal connector for wiring to ADPRO device s MIO card 8 Audio input from ADPRO device 3 5 mm jack 9 Audio outputs 1 4 to amplifier RCA cinch 1 7 Ordering Information Use the following reference numbers to place your order with Xtralis Item Reference number VM22E unit including 4 socket flat cable and mini jack audi...

Page 8: ...er 4 required audio output channels Yes 12 VDC power supply No Cable for connecting the VM22E to the MIO card No Audio cable 2 x 3 5 mm jack for connecting the VM22E to the ADPRO device s audio output Yes Audio amplifiers and speakers No RCA cables cinch for connecting the VM22E to the amplifier No Flat cable for cascading units Yes for cascading 4 units If you need to cascade more than 4 VM22E un...

Page 9: ...o the MIO Card on page 10 F Optional ADPRO device casing ground screw connected to ground terminal on VM22E For details see Ground GND Connection on page 10 G Amplifier back panel H Single speaker connection example I VM22E audio output channel 1 to amplifier s audio input RCA cable J Amplifier back panel K Distributed parallel speaker connection example for broadcasting L VM22E audio output chann...

Page 10: ...he power supply to the first VM22E unit It is not necessary to power the other units separately they will receive power via the interconnecting flat cable 2 Set up the connections to the ADPRO device on the first VM22E unit MIO card and audio line out You do not need to connect the other units to the ADPRO device they will receive the audio and control signals via the interconnecting flat cable 3 ...

Page 11: ... 2 3 4 0 1 2 3 4 1 5 6 7 8 2 9 10 11 12 3 13 14 15 16 4 17 18 19 20 5 21 22 23 24 6 25 26 27 28 7 29 30 31 32 For example audio output 11 in the XO client corresponds with audio channel 3 on the VM22E with address 2 2 9 Forcing Output to Channel 1 If you want to force the audio input from the ADPRO device to output channel 1 on the VM22E unit set the unit s address to 8 or 9 The system then transm...

Page 12: ...ng the MIO Card Firmware To check and update the MIO card firmware proceed as follows 1 Open the XO client software and choose System Connections I O 2 Check if the firmware version of the MIO card is minimum v01 00 0004 If yes you can skip all following steps and proceed with Activating the VM22E Audio Switcher on page 13 If no continue with the next step 3 Download and unzip the MIO card firmwar...

Page 13: ...lient software and choose System Connections I O 2 Click Configuration 3 Under Audio switcher type click VM22E 4 Click OK 5 Click Save 3 4 Assigning Audio Channels to Cameras To assign audio output channels to the cameras proceed as follows 1 Choose System Connections Audio 2 Click the Audio output tab For software versions below XOa 3 01 the following screen appears ...

Page 14: ...s below XOa 3 01 type the number of the desired audio output 1 32 in the Selected audio output column For software version XOa 3 01 and above click in the Selected VM22 output column and type the number of the desired audio output 1 32 4 Click Save 3 5 Volume Control The VM22E unit has an input volume indicator on the front panel If the input volume from the ADPRO device is too high the yellow and...

Page 15: ......

Page 16: ...3 Middle East 962 6 588 5622 Asia 86 21 5240 0077 Australia and New Zealand 61 3 9936 7000 A Disclaimer about this document statements about Intellectual Property Copyrights and Liability as well as a General Warning are available in an earlier section of this document Doc 29541_03 P N 19532160 ...

Reviews: