background image


48 

Appendix E: FAQ 

1.  Forget Password 

Solution: There is a [RESET] button on the back panel of the DVS, press it 

to retrieve all default parameters (Factory Setting), user name and password are 
both “admin”. 

Note: 

Please don’t press RESET if you are not a professional operator. After 

reset, all parameters will restore factory settings (except for the physical network 
address). 

2.  DVS audio/video function fails after abnormalities or abnormal power 

cut occur during upgrade, core edition is V4.0.0.0 (Backup file) 

Solution: Connect the power cord and network cable of DVS, press on 

RESET button and release it after 10 seconds, system will run the back-up 
programme automatically. After enter into the back-up programme, upgrade 
system. The back-up programme offers only upgrade and parameter setup 
functions, audio and video functions are not available. 

3.  No video image displayed in IE browser 

Possible reason: ActiveX not installed 

Solution: ActiveX must be installed when visiting DVS for the first time via 

Internet Explore. 

How to install: Visit DVS, click [Download Address], file download dialog will 

pop up, select [Run] or [Save] to download. After download finishes, installation 
interface will pop up, click “install”,    the installation of ActiveX will start 
automatically, “Register OCX success” dialog box will pop up to remind the 
completion of installation process. 

4.  Failed to visit DVS via IE after upgrade 

Solution: Delete the caching of Browser. 

Steps: Open IE

—click “Tools”—select “Internet Options”—click “delete files” 

button in “Internet temporary files”, select “delete all offline contents”, then click 
“OK” and re-log in DVS. 

5.  The images do not flow 

Possible reason 1: The frame rate of DVS is too low. 

Solution: Improve the video frame rate 

Possible reason 2: Too many users are viewing the image. 

Solution: Block some clients or reduce the video frame rate. 

Possible reason 3: The bandwidth is low. 

Solution: Reduce video frame rate or video compression bitrate. 

6.  Cannot visit DVS via IE browser 

Possible Reason 1: Network is disconnected. 

Summary of Contents for IVS-184CPW

Page 1: ...I IVS 184CPW IP video server User s Guide ...

Page 2: ...aying at home The product applies to enterprises banks security checkpoints highways and other places that need network video transmission and monitoring capability This product is easy to install and operate Notes DVS in this manual refers to all Digital Video servers including HDD storage and SD card storage DVS Statement Contents in this manual may be different from the edition that you are usi...

Page 3: ...ion 10 2 4 1 Alarm input connection mode 10 2 4 2 Alarm output connection mode 11 2 5 Network Connection 12 2 5 1 Connect DVS to network with IP share switch 12 2 5 2 Connect DVS to PC with crossover cable 12 Chapter3 Search Device 14 3 1 Search Device and Modify Network Parameters 14 3 1 1 Run SearchNVS software 14 3 1 2 Set IP address 14 3 2 Check Connection 15 Chapter4 Introduction of IE 17 4 1...

Page 4: ...4 4 6 1 Device Management 34 4 6 2 Record Schedule 36 4 6 3 Snap Schedule 36 4 7 Front end Settings 37 4 8 Local Settings 37 Appendix A Network Interface for DVS 39 Appendix B Default Network Parameters 40 Appendix C Application for DDNS 41 IP Camera DDNS Introduction 41 DDNS function 41 The DDNS process of IP camera 41 Application for DDNS 41 Appendix D Visit DVS under Different Network Environme...

Page 5: ...ximum capacity is 32GB Adopt optimized G 726 audio compression algorithm to make the sound clearer Support PAL NTSC composite video D1 High Definition real time digital video server fully compatible with Half D1 CIF and QCIF Video bitrate can be adjusted continuously between 32Kbps and 16Mbps frame rate can be adjusted from1 to 30 NTSC Support LAN WAN and IEEE802 11a b g n wireless network transmi...

Page 6: ...echnical Parameters Video Video input 1 2 4channel composite video PAL or NTSC BNC 1 0Vp p 75Ω Video Compression H 264 Video Definition PAL 176 144 QCIF 352 288 CIF 704x288 2CIF 704 576 D1 NTSC 176 128 QCIF 352 240 CIF 704x288 2CIF 704 480 D1 Video Parameters Brightness Hue Contrast Saturation Streaming Format Video Streaming or Audio Video composite Streaming Video Frame Rate PAL 1 25fps NTSC 1 3...

Page 7: ...close mode Alarm Output 4 channel on off output 120VAC 1A 24VDC 1A Management User Authentication Account number password encryption authentication Remote Monitoring PTZ remote control allows multiple users to visit one channel at the same time Remote Configuration Remote configuration of system through network control Remote upgrade Remote upgrade of system through network control Remote Reset Re...

Page 8: ...2003 WindowsXP Windows Vista 64 bit Simplified Chinese English editions of Windows2003 WindowsXP Windows Vista Software Environment IE 6 0 edition or above DirectX8 0 edition or above TCP IP Other requirements The PC installed with this software requires a graphics card that supports the color change and zoom of image now the graphics card that has been tested are Nvidia Tnt Tnt2 Geforce Mx200 400...

Page 9: ...rt USB portable hard drive Pilot lamp panel labels Pilot lamp status Description PWR Red light Always on DVS normal power on Always off DVS normal power off LINK Green light Always on Network OK Always off No network network cable disconnected or network blocked ACT Orange light Always flash Transmitting network data Always off Network disconnected ALARM Red light Always on System alarm Always off...

Page 10: ...lled in LAN Vin1 Vin4 1 4 channel video input interface to access video source Ain1 Ain4 1 4 channel audio input interface linear input 1KΩ impedance ANT Wireless antenna for wireless network access MIC Microphone input used for talkback Aout Audio output interface RESET System parameters reset button used to restore factory default settings Lightning protection nut Note Make sure it is connected ...

Page 11: ...cording to the following Picture Then connect the power and data lines of the HDD and fix the HDD on the housing with screws after that See below pictures Note that one side should face to the front panel the other side faces to the back panel of the housing See below pictures Generally HDD panel faces up and the panel with circuit board faces down Open the screw on the top face Open the screw on ...

Page 12: ... off signal Note The output power of relay A must be lower than the on off input rated power of DVS 120VAC 1A or 24VDC 1A 2 4 2 Alarm output connection mode 1 User load is lower than the on off output rated power 2 User load is higher than the on off output rated power ...

Page 13: ...tion 2 5 1 Connect DVS to network with IP share switch See below picture for the connection mode DVS is connected to network via share switch Step 1 Connect network cable to the LAN port of DVS Step 2 Connect power adapter to the power supply port of DVS and switch on the utility power Step 3 Connect the other end of the network cable to switch router or hub Step 4 After the connection completes e...

Page 14: ...13 Connect to PC via crossover cable Connection Indicator Light Orange will flash in five seconds under normal condition indicating the physical connection of DVS has been finished successfully ...

Page 15: ... SearchNVS software to search and modify IP Camera network parameters It is multicast protocol But the firewall forbids the multicast data packet So please close the firewall first Local IP Display the local PC IP If your PC is NIC or multi addressed local IP please select one IP address to connect NVS The main window indicates that your PC has found the IP camera in LAN If there are several IP ca...

Page 16: ...C IP address For example 192 168 1 100 Please make sure the Default Gateway and Subnet Mask should be the same as your PC And its IP should not be conflict with other PC or IP devices Click Set to get the following window Modify related network parameters and click OK then the IP camera will save the parameters and restart 3 2 Check Connection Check to see whether the IP camera is running and prop...

Page 17: ...d is connected to network correctly If not please confirm the IP address and gateway settings and check the network cables Then use SearchNVS software to search and modify network parameters such as IP address subnet mask and gateway etc according to clients local IP information ...

Page 18: ...oad the ActiveX A new dialogue box appears click Run or Save to download ActiveX and then double click the downloaded file xdview exe to install it see below picture Close current Internet Explorer click Install button the ActiveX will be automatically installed After installation finishes a dialog box with the message Register OCX success will pop up Open Internet Explorer and input the IP addres...

Page 19: ...y in the storage directory of snapped images The status displayed Record Manual image recording automatically record current images and save them in the storage directory of recorded images after the recording function turned on The status displayed Playback Click Playback the playback page will pop up for searching and playback of recorded files or snapped images Talkback After switch on the audi...

Page 20: ...play area to realize partial zoom in For 2 channel and 4 channel DVS the partial zoom in function can only be valid when one channel is displayed in single screen Full Screen Allows full screen video display right click to exit full screen mode Video Parameters Adjust the lightness contrast hue saturation of video see the picture at the left below Lens Control Allows PTZ operations like Zoom Focus...

Page 21: ...lay the current default date please choose Close to close the calendar page Local Users can select certain date to perform recorded image file or snapped picture searching Device Users can select certain date to search for recorded image files or snapped pictures in storage device File List Shows the recorded image files or snapped pictures searched in the File List The way to search for recorded ...

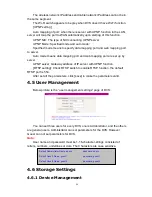
Page 22: ...elow picture Click Pause to pause download manually click Start to continue to download the unfinished files click Delete to delete the downloaded files click Close to close the download information interface 4 4 Set System Parameters 4 4 1 System Settings Below picture is the system settings page of DVS System Clock Set date and time for DVS Click synchronize with PC to synchronize the date and t...

Page 23: ...r into system settings page and check to see whether the kernel edition is the upgraded edition For example Kernel edition of the current DVS is V2 2 1 2 and the latest edition obtained from supplier is V2 2 1 3 Then the kernel edition after upgrade should be V2 2 1 3 Note Don t cut off the power and internet connection when upgrading 4 4 2 Video Settings Below picture is the Video settings page o...

Page 24: ...itrate The range of preferred and alternate stream is 30 16384Kbps Higher bitrate setting can generate better image quality but it occupies more bandwidth please adjust the setting according to your actual bandwidth Under CBR setting Bitrate is the constant bitrate of encoding Under VBR setting Bitrate is the variable bitrate of encoding Image quality Under CBR setting bitrate range is set via Ima...

Page 25: ...ls 2 or 1 channel DVS has 2 or 1 channel Copy to all channels copy the parameter settings of current channel to all other channels Audio on off open or close the audio of DVS After switch on this switch PC can monitor the sound at the device end Note 1 When there is no need for audio close audio input to save network resource 2 Audio is disabled by default After set all the parameters click save t...

Page 26: ...for alarm output E mail sending Send motion detection alarm information to users via E mail details about E mail setting please refer to Network Settings Linkage Snapping Drive device snapping after alarm has been triggered and save pictures to device HDD For snapping parameters if the number of pictures snapped at one time is set as 5 and the snapping interval is 1 second that means when there is...

Page 27: ...sers via E mail details about E mail setting please refer to Network Settings Linkage Snapping Drive device snapping after alarm has been triggered and save pictures to device HDD For snapping parameters if the number of pictures snapped at one time is set as 5 and the snapping interval is 1 second that means when there is an alarm 5 pictures will be snapped and the interval between each picture i...

Page 28: ...lays will be driven to output alarm Alarm Output Duration Set the duration of the linkage alarm output after being triggered in seconds the range of the duration is 0 86400s 0 means that there is no limit for alarm output E mail Sending Send video loss detection alarm information to users via E mail details about E mail setting please refer to Network Settings Linkage Snapping Drive device snappin...

Page 29: ...lt in relays will be driven to output alarm Alarm Output Duration Set the duration of the linkage alarm output after being triggered in seconds the range of the duration is 0 86400s 0 means that there is no limit for alarm output E mail Sending Send video loss detection alarm information to users via E mail details about E mail setting please refer to Network Settings Linkage Snapping Drive device...

Page 30: ...ubnet mask Default value is 255 255 255 0 users are recommended not to change it Gateway Set the gateway IP of DVS for example when the device is connected to WAN via a router the gateway IP is the router IP Physical address The MAC address of DVS users are recommended not to change it Data port Default value is 5000 users are recommended not to change it Web port Default value is 80 users are rec...

Page 31: ...n DDNS server DDNS Password User password registered in DDNS server DDNS Domain Name The Domain Name set for long distance access after user log in DDNS Address DDNS server address When DDNS address is the domain Name please set the DNS address in Basic Parameters correctly DDNS Port Default port is 30000 Data Mapping Port When DVS is mapped to public network via router fill in the public data por...

Page 32: ...he mailbox that sends mails SMTP password The login password of the mailbox that sends mails Mail title Title of mails SMTP Port Port of SMTP port Different mail servers have different ports For example the server port of Gmail is 465 Commonly used mail server configuration Gmail mail server SMTP server smtp gmail com SMTP user name username gmail com SMTP port 465 SSL enabled Yahoo mail server SM...

Page 33: ...or disable public IP mail notification function Interval Select the interval of public IP mail notifications After enable this function when DVS starts or detects public IP changed it will send notification mail to the mail address set in mail setting Wi Fi setting Note Applie to models with Wi Fi function only A wireless router needs to be deployed in order to use the Wi Fi function of DVS e g TP...

Page 34: ...ll enable Wi Fi function of DVS 2 IP address Set the wireless IP address of DVS e g 192 168 1 160 3 Gateway Set the IP address of current wireless gateway e g 192 168 1 1 4 SSID number It is the login name of Wi Fi for identity authentication it must be the same as the SSID number of the wireless router e g zhangl 5 Password It is the login name of Wi Fi for identity authentication it must be the ...

Page 35: ... server with UPNP function RTSP setting Check RTSP switch to enable RTSP function the default RTSP port is 554 After set all the parameters click save to make the parameters valid 4 5 User Management Below picture is the user management settings page of DVS You can set three users for every DVS one is Administrator and the others are general users Administrator can set parameters for the DVS Howev...

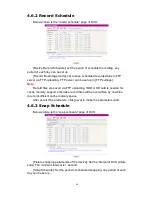
Page 36: ...space is still not enough then delete the files of the earliest date but one Then go on like this if necessary If the record files are taken on the current date it will delete the files of the earliest hour first The files of the current hour cannot be deleted If the disk gets full in one hour the device will stop recording and capturing images After the one hour session ends system will delete th...

Page 37: ...rd files are saved via FTP uploading HDD or SD card is needed for cache memory support otherwise record files will be overwritten by new files due to insufficient cache memory space After set all the parameters click save to make the parameters valid 4 6 3 Snap Schedule Below picture is the snap schedule page of DVS Picture snapping parameters of the device Set the interval of DVS picture snap The...

Page 38: ...tion control device address protocol baud rate and the corresponding protocol need to be downloaded Note Only when the parameters and protocol are correctly set that the control of add on communication control device can be implemented PTZ decoder protocol Decoder address 1 255 Built in protocol echo the built in protocol name of current DVS PTZ decoder protocol files uploading to upload the decod...

Page 39: ... mode users can choose real time priority or fluency priority mode according to their needs Anti crack select this option to make image quality better but CPU usage rate will be higher at the same time PC record storage settings Record files packing time set packing time of record file for local PC when recording Record snapped files storage directory Set the storage directory for local records an...

Page 40: ...The default network ports of DVS are TCP 80 Web port 5000 Communication port audio video data transmission port talkback data transmission port UDP 5000 Audio video data transmission port Multi cast port Multicast original port channel number ...

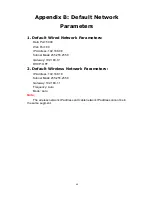
Page 41: ...IP Address 192 168 0 8 Subnet Mask 255 255 255 0 Gateway 192 168 0 1 DHCP OFF 2 Default Wireless Network Parameters IP Address 192 168 1 8 Subnet Mask 255 255 255 0 Gateway 192 168 1 1 Frequency Auto Mode Auto Note The wireless network IP address and cable network IP address cannot be in the same segment ...

Page 42: ...era With this function all Internet users can visit the IP camera via a fixed domain name The DDNS process of IP camera The DDNS process flow diagram of IP camera Application for DDNS Step 1 Sign up Users need to sign up to manage and inquire about domain name status when using this dynamic domain name management system for the first time Visit DDNS server e g http www mvddns net to sign up See th...

Page 43: ... user name and password and click login to enter into domain name management interface as follow Step 3 Domain name registration A domain name must be registered first then put into use Click Domain name management a page appears as follow ...

Page 44: ...43 Register and submit the domain name to be used For example test mvddns net ...

Page 45: ...up steps Step 1 Log in DVS via IE browser the default IP is 192 168 55 160 Step 2 Switch to the page network settings fill in the device IP address assigned by network administrator in to Basic Parameters e g 192 168 55 160 Step 3 Fill in subnet mask default value is 255 255 255 0 Step 4 Fill in gateway address default value is 255 255 255 0 Click Save to save the parameters Starts the device ente...

Page 46: ...to Basic Parameters e g 218 84 31 168 Step 3 enter correct subnet mask e g 255 255 255 192 Step 4 enter correct gateway e g 218 84 31 131 After setup completes click Save and restart the device then connect it to public network so that all Internet users can visit the DVS remotely via entering http 218 84 31 168 to IE browser Broadband and router sharing Internet access mode dynamic obtainment of ...

Page 47: ...e port of DDNS server default value is 30000 users are recommended not to change it Step 9 fill in the port number of public network data after mapping the default port is 5000 If several storage video servers are connected to one router different data ports need to be specified for each device and port mapping needs to be done for every specified port Step 10 fill in the port number of public net...

Page 48: ... http test mvddns net 85 into IE browser PPPoE dial up access For DVS dial up access see below picture for the network topology Setup steps Step 1 Log in DVS via crossover cable direct connection For details please refer to Hardware Installation Step 2 Set PPPoE parameters for details please refer to PPPOE settings Step 3 Connect DVS to Internet Step 4 If DDNS service is successfully set for the d...

Page 49: ...not installed Solution ActiveX must be installed when visiting DVS for the first time via Internet Explore How to install Visit DVS click Download Address file download dialog will pop up select Run or Save to download After download finishes installation interface will pop up click install the installation of ActiveX will start automatically Register OCX success dialog box will pop up to remind t...

Page 50: ...lors Solution Sometimes DVS images cannot display properly for the difference between Graphics Cards the images appears to be green or other colors then you should run Config exe or run C windows system32 Config exe to set the following parameters of display buffer auto detection used display card memory or system memory then reopen IE and connect DVS 8 There is no sound while monitoring Possible ...

Page 51: ...50 Note Enable DirectDraw speedup Direct3D speedup AGP veins speedup in DirectX function If they can not be enabled that means DirectX installation fails or hardware not supportive ...

Reviews: