background image

5

3.1  Installing the SIM Card and Battery

A SIM card carries information, including your mobile phone number, PIN 
(Personal Identification Number), PIN2, PUK (PIN Unlocking Key), PUK2 
(PIN2 Unlocking Key), IMSI (International Mobile Subscriber Identity), 
network information, contacts data, and short messages data.

Note: After powering off your mobile phone, wait for a few seconds before 
removing or inserting a SIM card. Take care when handling a SIM card, as 
friction or bending will damage the SIM card. Keep your mobile phone and 
SIM card out of children’s reach.

Installation

>  Hold the 

power key

 and select power off to turn your mobile phone off.

>  Remove the back cover, and if installed, remove the battery.
>  Carefully insert the SIM Card into the SIM Card slot. The corner cutting  

of the SIM card should be aligned with the notch of the slot with the gold 
terminal plate of the SIM card facing downward. When correctly installed 
the SIM Card cannot be pushed in any further.

>  To install the battery, the metallic contacts of the battery should face the 

metallic contacts in the battery slot.

Note: Where supplied, keep the SD card out of the reach of children. 

3.2  Charging the Battery

>  The remaining battery charge is indicated by the 

battery level icon

 at the 

upper right corner of the display screen.

>  When the battery is low, your mobile phone will display “Battery low”. 
>  During charging, the battery level indicators on the 

battery icon


blink until the battery is fully charged, indicating the charging process 
has ended.

Note: Before charging, ensure that the standard voltage and frequency of the local power supply 
match the rated voltage and power of the charger.

Optimising battery life

You can extend your batteries life between charges by turning off features 
that you don’t need. You can also monitor how applications and system 
resources consume battery power.

To guarantee the optimal performance of your battery, please try  
the following:

>  Switch off functions you aren’t using such as Wi-Fi, Bluetooth,  

or GPRS. Use the Settings Application to turn them off (

Settings> 

Wireless & networks

).

>  Turn down your mobile phones screen brightness and set a shorter 

screen timeout.

>  If you don’t require them, turn off automatic syncing for Gmail, Calendar, 

Contacts, and other applications.

Note: On the Home screen, press the 

Menu Icon

 and select 

Settings > About phone > Battery use

The Battery Use screen lists the applications that have been using the battery, from greatest to  
least battery use. The top of the screen displays the time since you were last connected to a charger 
or, if you are currently connected to one, and how long you were running on battery power for 
before you connected to a charger. Each application or service that used battery power during that 
time is displayed in order of the amount of power they used. Go to an application in the Battery Use 
screen to learn details about its power consumption. Different applications offer different kinds  
of information.

3.0

Getting 

started

Summary of Contents for GO Series

Page 1: ...User Guide go phone GO Series...

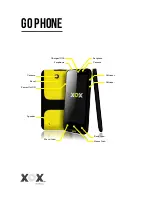
Page 2: ...GO Phone Earphone Camera Power On Off Camera Volume Volume Menu Icon Back icon Speaker Earpiece Charger USB Reset Home Icon...

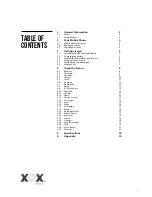
Page 3: ...the onscreen keypad 7 3 6 Making Calls 7 4 Using the Menus 8 4 1 Browser 8 4 2 Calculator 9 4 3 Calendar 9 4 4 Camera 10 4 5 Clock 11 4 6 Contacts 11 4 7 Downloads 11 4 8 Email 12 4 9 ES File Manger 1...

Page 4: ...CH OFF YOUR MOBILE PHONE BEFORE ENTERING HIGH RISK AREAS Strictly observe the relevant laws codes and regulations on the use of mobile phones in high risk areas Turn off your mobile phone before enter...

Page 5: ...posure to high temperatures will shorten the life of electronic circuits damage the battery and some plastic parts Cold temperatures may cause condensation and moisture build up Please take care of yo...

Page 6: ...ou can adjust your mobile phone to silent mode airplane mode or power off your phone using the Power key Volume Key The volume key is on the right side of your mobile phone You can adjust the ringer v...

Page 7: ...l indicators on the battery icon blink until the battery is fully charged indicating the charging process has ended Note Before charging ensure that the standard voltage and frequency of the local pow...

Page 8: ...ed to confirm that you want to connect to that network by touching Connect If the network is secured you are prompted to enter a password or other credentials Connecting to Bluetooth devices To activa...

Page 9: ...The characters you have entered appear in the text field with suggestions for the word you are typing below Use the Delete icon to erase characters to the left of the cursor After you have finishing...

Page 10: ...the Menu icon and select More Select text Use your finger to drag across the text you want to copy Touch the text you selected and the text will be copied to the clipboard To navigate among webpages Y...

Page 11: ...anced screen select Clear to delete the last number or operator you entered Select and hold Clear to delete everything on the display On the calculator screen you can touch menu icon to clear the hist...

Page 12: ...You can change the settings for how your Calendar displays an event and how your Calendar notifies you of upcoming events Open a Calendar view select menu icon and select more settings Hide declined...

Page 13: ...ions New contact Select this function to add a new contact to contacts list Display options You can select the display options and choose contacts to display Contacts Groups You can assign contacts to...

Page 14: ...one account you can view all messages sent to all accounts in your Combined Inbox Open the Accounts screen and then select the Combined Inbox Reading your messages You can read messages in your Combi...

Page 15: ...onal accounts To add an email account Open the Accounts screen Select the menu icon and select Add account In the Setup Email screen enter your email address and password Select Next If you need to en...

Page 16: ...n the Messaging screen select Compose new message Enter a mobile phone number in the To field Select the composition text box to start editing your message During editing you can select the menu icon...

Page 17: ...dset or speaker Select a song in your library to listen to it The Playback screen opens and the song you selected starts to play The Playback screen contains several icons that you can select to contr...

Page 18: ...ur mobile phone so that it can place outgoing calls only to a fixed set of mobile phone numbers User profiles You can activate the profiles according to different conditions Display You can use the Di...

Page 19: ...te time You can use Date Time settings to set your preferences for how dates are displayed You can also use these settings to set your own time and time zone rather than obtaining the current time fro...

Page 20: ...nal Micro SD up to 32GB Bluetooth BT 3 0 Battery 2000mAh USB Charging WLAN IEEE 802 11 b g Wireless GSM GPRS EDGE 900 1800 1900MHz WCDMA 850 1900 2100MHz can be modified based on MOQ over 20k HSPA 7 2...

Page 21: ...Line congestion occurs when you use your mobile phone in high traffic hours Avoid using your mobile phone in high traffic hours Your mobile phone cannot be powered on The battery requires charging Ch...

Reviews: