Xoro HRS 8560 User Manual Download Page 15

English

Connection

A coaxial cable is necessary for the S/PDIF signals for the digital connection to a Hi-Fi system. This
cable is not included in the delivery of this receiver.  Connect the S/PDIF out put with the S/PDIF
input of your Hi– Fi system. Please refer to the manual of the Hi-Fi system to select the audio input.
Notes:
The HRS8560 could out put digital signals in PCM-(stereo) or AC3– Bitstream (Dolby Digital). If your
Hi-Fi system provides no sound for programs with Dolby Digital sound track, please refer to page 34
to change the out put format of the S/PDIF out put.

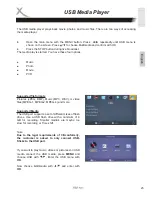
The USB port is on the front side of the HRS8560. It takes the receiver under circumstances some
time to recognize the USB and get ready for further operation.
Please remove the USB storage only after all recording or playback processes are completed.

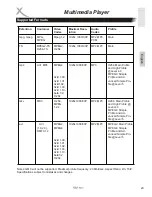
Following USB devices will be supported:

USB storage 
Max. capacity 1024GB 
File system: FAT32, NTFS

Notes:

There are a variety of USB storages on the markt. Not all of them conform the specification of
USB storage. If your USB storage could not be read by HRS8560, please try another USB
storage.
If a USB device could not be read any more, please carry out a data storage medium analysis
with your computer or format the storage again.
USB storages requiring higher electric current than 500mA (0,5A) do not conform the specifi-
cation of USB storage. These USB storages could possibly not work smoothly together with
HRS8560.
USB Storage up to 1024GB will be supported. USB storage of larger capacity could also be
used. However the capatability of these USB storages with HRS8560 could not be guaran-
teed.
Please always save all data on the USB before connection to the HRS8560.
A sufficient writing– and reading speed of the USB storage is necessary for recording HD
programs or use the Time-Shift function. In case of problems in recording or Time-Shift,
please try a USB storage of higher writing– and reading speed. 

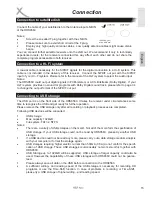
Connection to satellite dish

Connection to a Hi- Fi system

Connect the cable of your satellite dish to the Antenna input LNB IN
of the HRS8560.

Notes:

Screw the so-called F plug together with the LNB IN.
Please make sure to avoid short circuit at the F plug.
Employ only high quality antenna cables . Low quality antenna cables might cause distur-
bance

You can connect further satellite receivers onto the LNB out. We recommend it only to technically
experienced users, for the receivers connected this way affect each other and do not share the
complete program accessable to both receives.

Connecting to USB storage

15

max. 350mA

Summary of Contents for HRS 8560

Page 1: ...User Manual HRS 8560...

Page 2: ......

Page 3: ...connection to a Hi Fi system Connecting to USB storage Initial Installation Initial Installation Dish Setup preparation Dish Setup Procedure Dish Setup explanation of the parameters Channel Search Da...

Page 4: ...iles Delete recorded files USB Media Player Supported file formats Supported Media Photos Music Movie Supported Formats Settings Main Menu Program Picture Channel Search Time Option System USB Trouble...

Page 5: ...All the safety and operating instructions should be read before the product is operated 2 Retain Instructions The safety and operating instructions should be retained for future refer ence 3 All oper...

Page 6: ...while in operation 7 Never place the machine on the power cable while it is being oper ated 8 Only use extension cables that are designed for the power consump tion level of the machine 9 Only operate...

Page 7: ...passages starts all of a sudden after the quiet section 7 Switch the player off by the Off On switch if it is not going to used for a longer period of time 8 Disconnect the main plug during thunderst...

Page 8: ...e work by a quali fied technician to restore the product to its normal operation e If the product has been dropped or damaged in any way and 3 When the product exhibits a distinct change in performanc...

Page 9: ...vironment we live in Recycling of paper and carton The material recycling symbol on the carton and user manual denotes that they are recyclable Dispose them not with the normal household waste Recycli...

Page 10: ...ing please contact directly the shop where you bought this product High Definition DVB S2 Receiver HDMI Port SCART output Electronic program guide EPG and videotext USB 2 0 High Speed connection PVR R...

Page 11: ...ing the program number with the power on 4 To previous channel CH 5 To next channel CH 6 Power button 1 Aerial Input LNB IN 2 Aerial Output LNB OUT 3 Digital audio output S PDIF coaxial 4 HDMI output...

Page 12: ...e Notes 1 Remove and exchange old batteries Leaking out battery acid can damage your health and the remote control 2 Clean leaking out battery acid with a cloth 3 In case of skin contact immediately w...

Page 13: ...access program list Numerical buttons 0 9 INFO to access information page fast rewind fast forward I I previous next file start play back Pause start Time Shift Stopp playback access Media player rec...

Page 14: ...ART connection Please employ high quality cables Low quality cables especially up 1 5 m length might cause picture failure or make an image transmission impossible Poorly shielded cables might result...

Page 15: ...data storage medium analysis with your computer or format the storage again USB storages requiring higher electric current than 500mA 0 5A do not conform the specifi cation of USB storage These USB st...

Page 16: ...electing load the pre inst Load the Pre inst A program list of the satellite ASTRA 19 2 is saved in the factory firmware German TV programs top this list In most cases the installation is completed wi...

Page 17: ...wn If you live in a rental house or apart ment please ask the renter Example for Germany If you would not like to use the pre programmed list the common setup for ASTRA 19 2 is as follow ing Satellite...

Page 18: ...select a further satel lite with CH Press OK and define the parameter on the right side Repeat this procedure for all satellites availabe for your receiver Notes Dish Setup Procedure After a correct...

Page 19: ...t one of the both connec tions A or B for the satellite chosen on the left side DiSEqC DiSEqC switcher has up to 16 input ports enabling the connection of multiple anten nas or LNB to the receiver If...

Page 20: ...bit longer but will result in a complete program list If you have added a new satellite on the menu of Satellite Setting please employ Blind scan for there is no transponder list available for the ne...

Page 21: ...Exit the program list Favourite If you have defined favourite groups you can access this list by pressing the FAV button The op eration on the favourite list is as following FAV display favourite lis...

Page 22: ...me To increase or decrease the volume press the VOL VOL button If you output Dolby Digital or other surround sound formats as Bitstream through HDMI the volume is not regulated by the receiver Volume...

Page 23: ...ngs on this window are Repeat and Mode The option Repeat defines whether the pro gram will be recorded once or regularly The option Mode will have to be set for recording as RECORD Press OK to save th...

Page 24: ...e chosen recorded file in preview window RED Switch full screen preview GREEN Rename the recorded file YELLOW Delete the recorded file Playback fast forward fast rewind II Pause press again to resume...

Page 25: ...Supported file formats Pictures JPEG BMP Music MP3 WAV or video files MPEG 1 MPEG 2 MPEG 4 and more Supported Media The USB port supports a set of different sizes of flash drives Use a USB flash drive...

Page 26: ...s picture OK Start Slide show EXIT quit the preview window Display Photos Start the slide show with PLAY or OK The slide show will proceed according to the settings in the USB menu Next picture Previo...

Page 27: ...The file name should not contain more than 15 letters If a character is not recognized correctly for example special characters there appears at the place of this character an underline _ Following vi...

Page 28: ...reso lution picture frequency AUDIO Switch audio track SUB T 1x display subtitle alternatives 2x change subtitle setting MENU back to file browser the movie continues in preview window back to file br...

Page 29: ...2 MP3 Main mp4 AVI MP4 MPEG4 Xvid 1 00 Xvid 1 01 Xvid1 02 Xvid 1 03 Xvid 1 10 beta 1 2 H 264 1920x1080 30P MP3 H264 Main Profile and High Profile Level 4 0 MPEG4 Simple Profile and Ad vanced Simple Pr...

Page 30: ...RED button to mark the program Choose a position for the marked program with Press OK to move the program to the chosen place Notes You can mark multiple programs with the RED button Move the program...

Page 31: ...categorize a channel as any favourite group and a channel may belong to multiple groups Select a program with to be categorized Press FAV to access the favourite menu Select a favourite group with Pre...

Page 32: ...lar box for 16 9 TV Content with different Aspect Ratio will be displayed with out distortion but with black bar 16 9 Pan scan for 16 9 TV 16 9 Broadcast will be full screen displayed without distor t...

Page 33: ...TABASE_X_Y DBM X suggests the month Y suggests the date The receiver sets the time automatically as soon as a satellite program is received The Time Zone will have to be set correctly so that the rece...

Page 34: ...f you get no tone please choose PCM Attention The receiver could only decode Dolby Digital surround sound and out put it as analogue or PCM stereo Other surround sound could be outputted under circums...

Page 35: ...8 8 8 Restore Factory Default You can cancel all settings and changes by restoring the factory default Choose this option and input the password Note All settings will be cancelled You will have to g...

Page 36: ...ee page 25 Photo Configure Configure the playback and Slideshow of picture files Slide Time Define the duration for every picture in the slide mode Aspect Ratio Keep display without distortion Discard...

Page 37: ...ro DVD SUB Subrip SRT Sami SMI Please note the notation of subtitles Name of the subtitle and the movie will have to be the same For example Film avi Film srt It is also possible to use 2 languages Mo...

Page 38: ...g the formatting process Please do not format a storage with important information Notes The file system FAT 32 is fast compatible with all computer and home entertainment products However the maximal...

Page 39: ...pictures Control the connection to the TV set Control the video output mode in the setup TV channel or program is scrambled Remote control does not work Change the batteries Operate within normal ran...

Page 40: ...ns B G R S B V C T R A C S I M D H o e d i V l a i x a o C F I D P S o i d u A 2 9 6 1 C E I t r o p F a n n e t n A d e e p S h g i H 0 2 B S U a t a D Media Player S F T N 2 3 T A F h t i w e g a r...

Page 41: ...etc This limited warranty covers the warranty requirements set by authorities in your country This limited warranty only is valid in the country the product was purchased This limited warranty does n...

Page 42: ......

Page 43: ......

Page 44: ...XORO by MAS Elektronik AG Weidegrund 3 21614 Buxtehude Deutschland Telefon 04161 800 24 24 Mo Fr 11 00Uhr bis 17 00 Uhr Fax 04161 800 24 61 xoro mas de www xoro de DE V1 ENG V1 FS 12537...

Reviews: