background image

Page 4

DISPL AY OPERATION

1

2

3

4

6

5

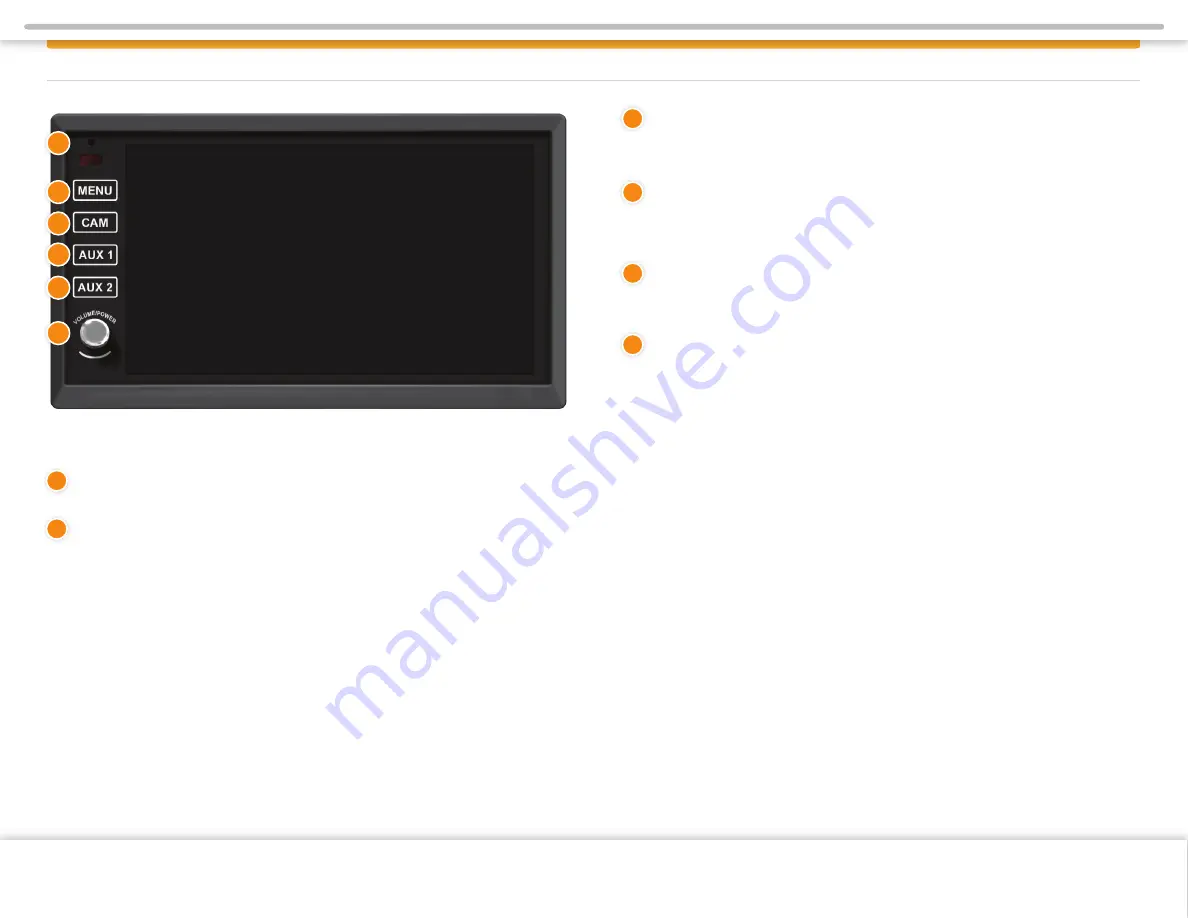
CAM

1. 

Press for instant access to Camera Interface.

AUX 1

1.

 Press for instant access to Radio Interface.

AUX 2

1.

 Press for instant access to Bluetooth Interface.

Rotary button VOLUME/MUTE/POWER

1.

 Turn on the ignition to power up the Infotainment Center. When powered up, it 

will immediately go to the last mode (memory on playback) before it was turned off.

2. 

Turn the rotary button left/right to adjust the volume to the desired level.

3.


Press the rotary button once to MUTE the volume. Press it again to UNMUTE.

4.

 In order to put the unit in standby mode, press and hold the rotary button. 

During standby, your vehicles graphics together with date, time and temperature 
will be displayed.

5. 

Press and hold the rotary button again to turn the unit on.

Note:

 When in standby mode, The system will consume power. To completely 

turn the system of, remove the ignition key and / or ensure any auxiliary battery 
power to the system is turned off.

Functions:

Bluetooth Microphone

MENU

1.

 Tap MENU button once to go to the Main Menu (or Home Page).

2. 

When in the Main Menu, you can either use the touch screen to select the 

desired icon (source) or you can keep tapping the Menu button to select different 
icons on the screen. When icon is highlighted for more than 1 second, the system 
will automatically open that icon.

3. 

You can also access the Main Menu from any screen by tapping the function 

icon in the top left corner of the current screen.

Note: 

When viewing camera video in full screen, touch the screen once to bring 

up the icon header which will display the function icon. Tap the icon to return to 
the Main Menu.

1

3

4

5

6

2

Copyright © 2018 Xite Solutions North America. All Rights Reserved  |  User Manual Version 18042019.01

Summary of Contents for CT GENERAL

Page 1: ...tification purposes only CT GENERAL USER MANUAL VERSION 18042019 01 Copyright 2018 Xite Solutions North America All Rights Reserved User Manual Version 18042019 01 G e n e r a l I n f o r m a t i o n S e t u p G u i d e Before using this product please read this manual fully to ensure correct operation Keep the manual at hand for future reference ...

Page 2: ...r vehicle in which it is installed It is up to you to minimize or prevent such distraction Learn how to use this system before placing the vehicle in operation Minimize the amount of time spent viewing the screen of the unit while driving and use voice prompts whenever possible Do not attempt to adjust settings of the system or resolve any malfunction with it while driving Instead pull off the roa...

Page 3: ...s subject to the following two conditions 1 this device may not cause harmful interference and 2 this device must accept any interference received including interference that may cause undesired operation This equipment has been tested and found to comply with the limits for a Class B digital device pursuant to Part 15 of FCC Rules These limits are designed to provide reasonable protection against...

Page 4: ...lt the panel may not work properly Do not use the unit while these symptoms are in evidence but leave the unit standing for about an hour and then resume or start use To clean the monitor wipe only with a dry silicone cloth or soft cloth Do not use a stiff cloth or volatile solvents such as paint thinner and alcohol 2018 All rights reserved No part of this manual may be reproduced copied transmitt...

Page 5: ...the unit on Note When in standby mode The system will consume power To completely turn the system of remove the ignition key and or ensure any auxiliary battery power to the system is turned off Functions Bluetooth Microphone MENU 1 Tap MENU button once to go to the Main Menu or Home Page 2 When in the Main Menu you can either use the touch screen to select the desired icon source or you can keep ...

Page 6: ...n status Note One needs to select a source to be able to see all the information mentioned above Main Menu 1 Infotainment Center is designed for simple maneuvering The screen shown on the left is the MAIN MENU screen From here you can choose what source to access by tapping the appropriate icon on the touch screen 1 Copyright 2018 Xite Solutions North America All Rights Reserved User Manual Versio...

Page 7: ...em Settings Temperature Select units Fahrenheit or Celsius to display temperature in the Information Bar Temperature display can be turned off only on select systems Time Set This selection is used to manually set the Time of the system Version This selection will allow you to see what version of firmware is currently running on the device Upgrade Service Only Selecting this option will allow you ...

Page 8: ... contrast level 10 to 10 Tint Sets the tint level 10 to 10 Sharpness Sets the sharpness level 0 to 8 Note The system has a factory default for optimal LCD settings however the level can be adjusted to set the display according to individual preference Page 7 VIDEO SETTINGS Copyright 2018 Xite Solutions North America All Rights Reserved User Manual Version 18042019 01 ...

Page 9: ... are available FLAT normal level POP JAZZ CLASSIC LIVE and ROCK Fader Sets the fader level between rear and front R10 F10 0 is the center level Balance Sets the balance level between left and right L10 R10 0 is the center level Center Woofer Volume Sets the volume level for an optional center speaker when connected 10 to 10 0 is the center Loudness Sets the volume level of speaker when connected 0...

Page 10: ...elects previous WB station in the list arrow selects next WB station in the list WB LO DX Selects Tuner sensitivity from Local to Distant Stations Use LO for strong clear station If a clear station is not available DX may bring in weaker signals Radio Operation Radio can be selected from the Main Menu by pressing the RADIO icon on the LCD display The Radio can be left at any time by pressing the R...

Page 11: ...er way to access the Bluetooth settings is by going to the Main Menu from the Bluetooth source and selecting Setup In addition to standard buttons System Video and Audio there will also be a Bluetooth button Bluetooth Settings Connecting Role This is the profile setting for the connection role between the Infotainment Center and the mobile phone HF HS Connecting Hands Free or Headset Default setti...

Page 12: ...e pairing procedure 5 Once the Bluetooth pairing is completed between your mobile phone and the Infotainment Center both will be automatically recognized and the connection can be made automatically from that moment on 6 If there are more mobile phones paired to the Infotainment Center and within range the connecting priority is given to the last paired mobile phone 7 In case that pairing fails af...

Page 13: ...y call lists available when system and mobile phone are paired 4 Number of paired devices max 4 sets 5 Number of phonebook lists names max 500 phone numbers max 1900 6 Incoming call list outgoing call list missed call list max 20 numbers per category 7 Length of name max 26 letters English 8 Length of numbers max 20 numbers Note Performance of Bluetooth is highly dependent on the capabilities of t...

Page 14: ...otainment Center will switch back to its last mode This will be done automatically after 5 seconds or can be done manually by tapping the NOW button If CANCEL is pressed the Bluetooth mode will remain active Outgoing Calls Direct Dialing To place an outgoing call the screen will show a numeric pad where the phone number can be entered manually Tap the Backspace button if you have made a dialing er...

Page 15: ...ou wish to call bottom left picture 3 Tap the number you wish to call 4 Tap the green phone icon Note Outgoing calls can also be made on the mobile phone itself The Infotainment System will still take over the outgoing call and switch to hands free mode BLUETOOTH OPERATION Copyright 2018 Xite Solutions North America All Rights Reserved User Manual Version 18042019 01 ...

Page 16: ...SINGLE CAMERA OPERATION Page 15 Camera Operation Rear Camera is availible Copyright 2018 Xite Solutions North America All Rights Reserved User Manual Version 18042019 01 ...

Reviews: