background image

16

www.xilinx.com

ML40x Getting Started Tutorial

UG083 (v5.0) June 30, 2006

ML40x Demonstrations in System ACE CF

R

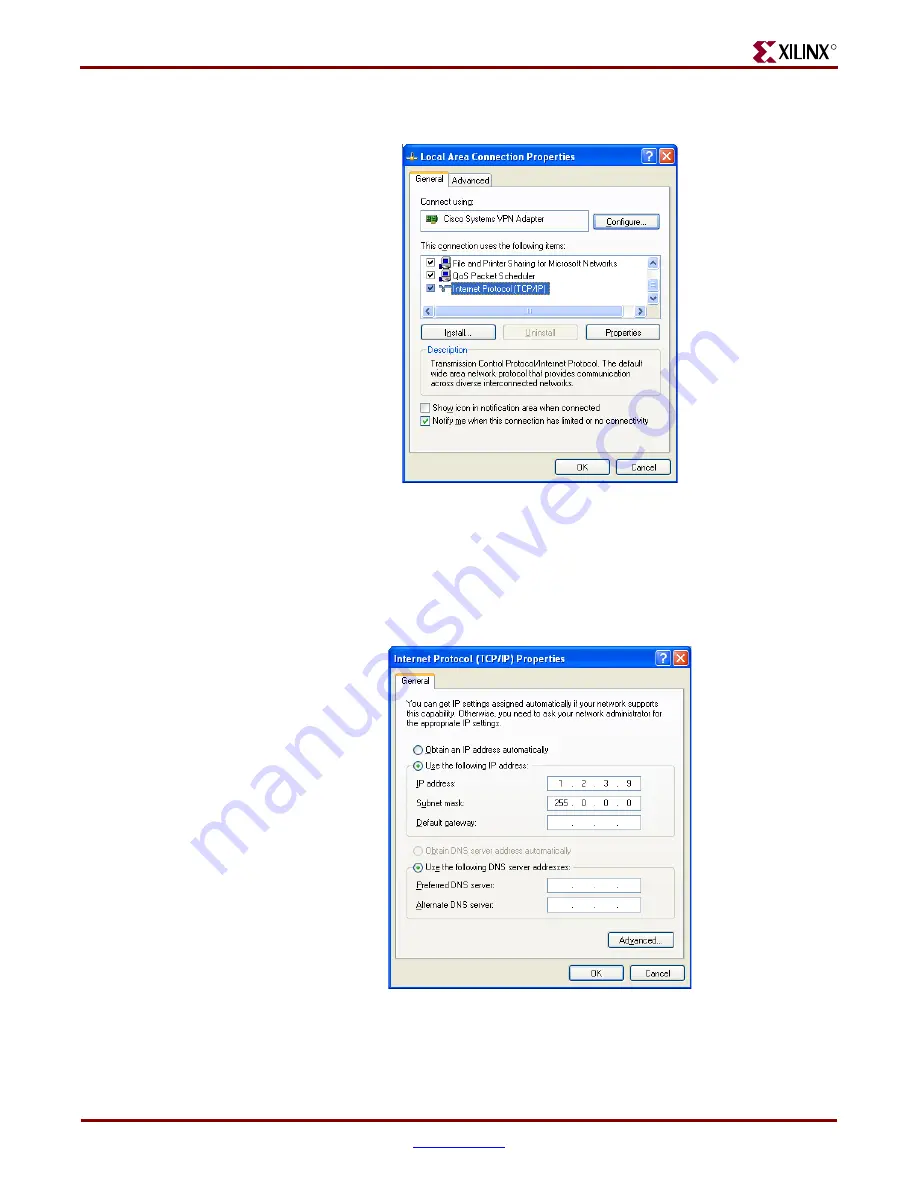
Select 

Internet Protocol (TCP/IP),

 and click 

Properties

 (see 

Figure 4

)

Select 

Use the following IP address:

 (see 

Figure 5

)

Enter this information: IP address =

 1.2.3.9

 and Subnet mask =

 255.0.0.0

Click 

OK


OK

 to accept settings

Figure 4:

Local Area Connection Properties Setup (ML401/ML402)

Figure 5:

IP Settings (ML401/ML402)

UG083_04_111004

UG083_05_111004

Summary of Contents for ML40 Series

Page 1: ...R ML40x Getting Started Tutorial ForML401 ML402 ML403 ML405 Evaluation Platforms UG083 v5 0 June 30 2006...

Page 2: ...LIED ON ANY ORAL OR WRITTEN INFORMATION OR ADVICE WHETHER GIVEN BY XILINX OR ITS AGENTS OR EMPLOYEES XILINX MAKES NO OTHER WARRANTIES WHETHER EXPRESS IMPLIED OR STATUTORY REGARDING THE DESIGN INCLUDIN...

Page 3: ...m ML401 specific to include ML401 ML402 and ML403 evaluation platforms Added the following sections ChipScope Pro Tools ML403 DSP48 ML403 QNX ML403 ML405 Web Server Using Hard Embedded Tri Mode Ethern...

Page 4: ...ML40x Getting Started Tutorial www xilinx com UG083 v5 0 June 30 2006...

Page 5: ...thernet MAC ML401 ML402 15 Web Server Using Hard Embedded Tri Mode Ethernet MAC ML403 ML405 18 DSP48 ML401 ML402 21 Linux ML403 ML405 22 ChipScope Pro Tools ML401 ML402 23 QNX ML403 ML405 24 USB 25 My...

Page 6: ...6 www xilinx com ML40x Getting Started Tutorial UG083 v5 0 June 30 2006 R...

Page 7: ...etting Started Tutorial page 9 Additional Resources To search the database of silicon and software questions and answers or to create a technical support case in WebCase see the Xilinx website at http...

Page 8: ..._name design_name Braces A list of items from which you must choose one or more lowpwr on off Vertical bar Separates items in a list of choices lowpwr on off Vertical ellipsis Repetitive material that...

Page 9: ...tions interact with a PC or an external device For these demonstrations use a computer installed with ISE software version 8 1i ChipScope Pro software version 8 1i The following additional equipment i...

Page 10: ...e back side of the board with the CF card properly inserted Note The CF card provided with your board might differ Caution Be careful when inserting or removing the CF card from the slot Do not force...

Page 11: ...ram Select Start Programs Accessories Communications HyperTerminal In the Connection Description window type 9600 in the Name box then click OK In the Connect To window click Cancel In the 9600 HyperT...

Page 12: ...the System ACE RST button After the FPGA has been programmed the LEDs in the lower left corner should be Bus Error 1 and 2 off FPGA INIT green FPGA DONE green System ACE Err off System ACE Stat green...

Page 13: ...r button GPIO_SW_C to start the demonstration Alternatively you can select a demonstration by entering its number into the serial terminal The demonstrations are Virtex 4 Slide Show page 14 Web Server...

Page 14: ...How to Change or Customize the Slide Show Setup To change the side show follow these instructions 1 Place the picture files in the root directory 2 Name the picture files image XX bmp where XX is a nu...

Page 15: ...IP switches or to set the LEDs on the board Refreshing or reloading the remote PC s Web browser causes the background color to change and the current DIP switch values to be re read By default the IP...

Page 16: ...et Protocol TCP IP and click Properties see Figure 4 Select Use the following IP address see Figure 5 Enter this information IP address 1 2 3 9 and Subnet mask 255 0 0 0 Click OK OK to accept settings...

Page 17: ...ght need to force your PC to link in 10 or 100 Mb s duplex mode If so then Right click Local Area Connection Properties Configure Advanced tab Speed 4 On the remote PC host open a Web browser connecti...

Page 18: ...CP GPIO_SW_E button and continue to Step 3 If you are using a static IP address for the board select Static IP GPIO_SW_W button and follow the instructions below The default static IP address is set t...

Page 19: ...nstrations in System ACE CF R Select Use the following IP address see Figure 7 Enter this information IP address 192 168 0 1 and Subnet mask 255 0 0 0 Click OK OK to accept settings Figure 6 Local Are...

Page 20: ...p 192 168 0 101 and follow the instructions on the loaded Web page You might need to turn off your browser s proxy use direct Internet connection mode especially if you have multiple networking device...

Page 21: ...in a 4 1 over sampled mode to reduce the size of the design by 4 1 Both the color space converter and 2D filter are designed to meet timing and run at 450 MHz to meet HDTV s 75 to 112 MHz pixel clock...

Page 22: ...using the System ACE CF controller Linux console input out is available using the UART On the VGA output a web browser is displayed The PS 2 mouse and keyboard can be used to interact with the X Wind...

Page 23: ...so shown in the ChipScope Pro logic analyzer mode Setup 1 Connect the PC4 Cable from the PC to the ML40x board 2 Open the ChipScope Analyzer 3 Open the ML40x_chipscope_demo cpj file using File Open Pr...

Page 24: ...monstration shows the QNX operating system running on the PowerPC 405 processor QNX includes support for the peripherals such as PS 2 mouse VGA X Window UART and 10 100 Ethernet QNX console input out...

Page 25: ...the software for the internal microprocessor inside the USB controller Cypress CY7C76300 The FPGA s processor reads this file and writes the data to the memory inside the USB controller through its HP...

Page 26: ...remove the System ACE CF card from the ML40x board preferably with the power off Open the CF card on your PC This requires either a PC card adapter or a USB CompactFlash reader not included with ML40x...

Page 27: ...the CPLD to read the linear flash and program the FPGA with the bitstream specified by the configuration address DIP switches Setup The directory and name of the bitstreams to be loaded are specified...

Page 28: ...bing how the bitstream was loaded The LCD also displays a message indicating that the design was loaded from linear flash 3 Now try to program a different bitstream into linear flash Copy the hello_ch...

Page 29: ...stored in the flash Figure 9 shows step 2 of the configuration process where the FPGA is configured In this step the CPLD 95144XL reads the flash and configures the FPGA DIP switches on the ML40x boa...

Page 30: ...ML405 page 40 Setup 1 Set the configuration address and mode DIP switch 6 position DIP switch to 000111 2 Set the configuration source selector switch 3 position slide switch to Plat Flash Menu of Co...

Page 31: ...1 ML402 ML405 Not present Description The demonstration highlights the use of the XtremeDSP slice also known as the DSP48 in image processing See DSP48 ML401 ML402 page 21 under ML40x Demonstrations i...

Page 32: ...haracter LCD Setup 1 Set the three leftmost configuration address DIP switches to the binary value 001 2 Press the Prog button to run the demonstration Instructions At the beginning of the game all th...

Page 33: ...present Description This demonstration contains a loadable 32 bit binary counter that can be read and controlled using the ChipScope Pro Virtual I O VIO feature See ChipScope Pro Tools ML401 ML402 pag...

Page 34: ...s to the binary value 010 2 Press the Prog button to run the demonstration Caution This exercise might overwrite all the contents of the Platform Flash Preparing PROM Files Load your own bitstreams in...

Page 35: ...ML40x Getting Started Tutorial www xilinx com 35 UG083 v5 0 June 30 2006 ML40x Demonstrations in Platform Flash R Figure 10 Prepare PROM Files UG083_15_022406...

Page 36: ...directory and click Open 8 Under Add Device Would you like to add to Revision 0 click No 9 Under Add Device File click Add File then browse for hello_char_lcd_hw1 bit in your LAB_DIR directory and cl...

Page 37: ...ard 1 Start iMPACT or Select File New from the menu At start up iMPACT asks for an iMPACT Project file Select Create a new project and enter a project name and directory 2 Under Welcome to iMPACT sele...

Page 38: ...erties click Advanced PROM Programming Properties under the Category section Under During Configuration select PROM is Configuration Master Inside the sub box select the Internal Clock radio button an...

Page 39: ...atform Flash which is slave serial mode for the FPGA The mode DIP switches on the board are set to 111 Slave Serial 11 When the PROM is finished programming press the Prog button on the board Revision...

Page 40: ...onfiguration address 1 Description The XROM program presents a menu over the serial port offering various diagnostic tests of the ML40x board features Setup 1 Set the three leftmost configuration addr...

Reviews: