www.arrl.org
QST
February 2023 47
this portal, I connected to VBand and started prac-
ticing my code in the “Practice Channel,” a private
channel to practice code. This is nice because I could
practice on my own or practice with QSO bot, an
automated bot that simulates regular contact on CW.
After some practice, I tried to make contact and prac-
tice code in one of the public channels. No one was
on any public channels that morning, but there I
waited, practicing calling CQ and thinking of how I
would respond. To my surprise, someone was on
within a few moments and suggested I slow down my
speed. I located the CW Hotline’s Discord server and
found it full of individuals willing to offer suggestions.
One tip was to use the pushbutton for the speed
adjustment. This easy tip had me coding at a speed I
was far more comfortable with. Then, I went back into
the Practice Channel to practice keying with the new
speed. I found the speed to be acceptable, not only
for sending but also for receiving. I chose 12 words
per minute, knowing this is below the recommended
standard when starting with code.
Linking Two Units for Remote Operations
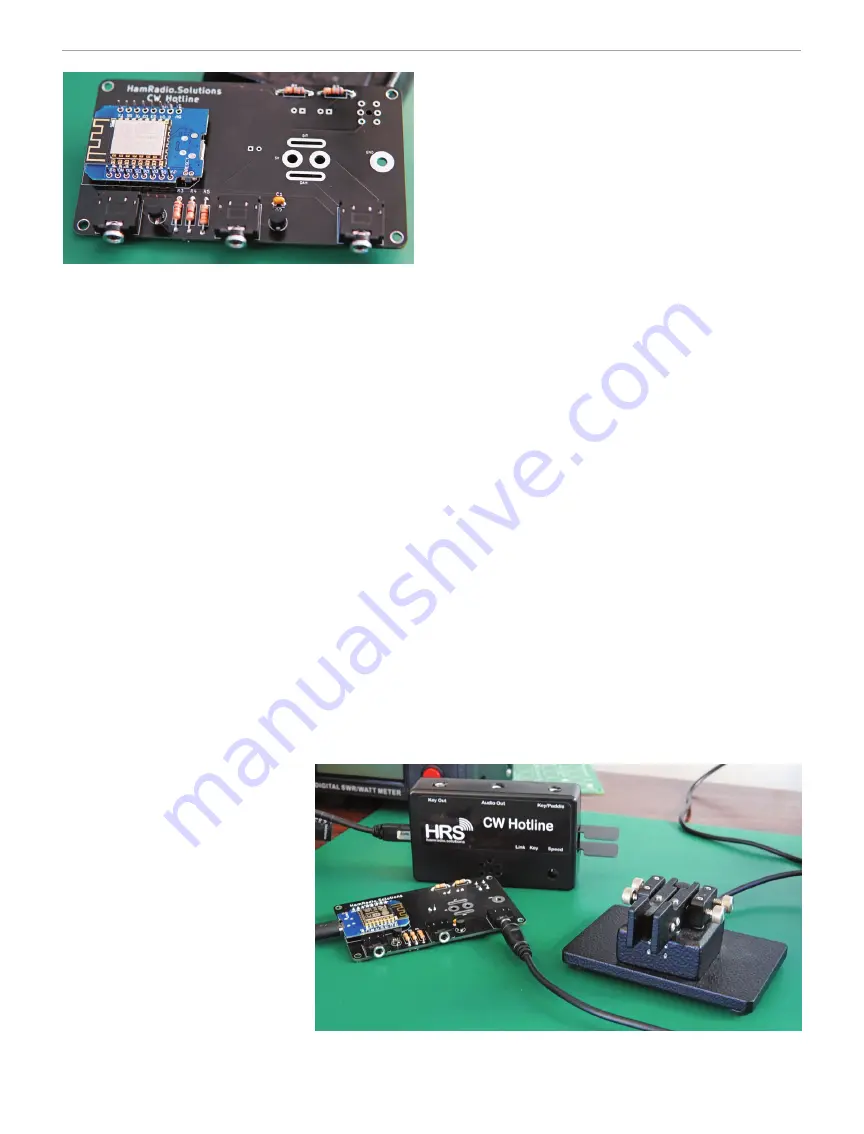
The real fun began when I built a second kit (see
Figure 7). I chose not to solder in a straight key or
iambic paddle. This works fine if you plan on using
your key or not using the critical portion of that kit.
The second kit allows for multiple options. I can now
go through the device configuration and set a “link
key.” This link key allows for multiple devices to con-
nect directly with each other without the need for a
computer. It is meant to be unique so that no one
unauthorized is keying up your other devices. This is
important if you use the CW Hotline as a remote key
to your ham radio transceiver. I practiced sending
Morse code between units and noticed a slight delay
people discussing the CW Hotline, it is usually to
practice code over the internet. However, having the
ability to operate CW remotely with a key is intriguing.
To operate remotely and drive a connected computer,
two CW Hotline kits are required (more on this later).
CW Hotline Connections
After building the kit, I plugged the device in to see if I
let the smoke out. The CW Hotline plugs into a micro-
USB connection, which needs to have data-passing
capabilities. Not all micro-USB cables are the same. I
plugged my CW Hotline device into the computer and
navigated through the brief configuration of settings
on the CW Hotline portal (under the
CONNECT
tab at
www.hamradio.solutions/cwhotline
). You can
also update the unit firmware from this web page.
Although I thought I had done everything correctly, I
heard “dah dit - dah dit dah dit,” or NC. This error
code means the device could not connect to Wi-Fi
with the settings I provided. For me, the issue was the
Wi-Fi name not being case-sensitive. With a quick
correction, a save of the locations,
and a device reboot, there it was
again: “dah dah dah - dah dit dah,”
or OK. This means the Wi-Fi is
synced correctly.
The CW Hotline user manual lists
all error codes and their meanings.
After a brief skim through the user
manual, I was able to correct the
error.
Using the CW Hotline
The next step is to go on the CW
Hotline website and access their
VBand (
www.hamradio.solu
tions/vband
), a different portal
from the settings configuration. At
Figure 7 —
Two CW Hotline kits working together. For my second kit, I chose not to install a
straight key or paddle, as it will be used with an external key.
Figure 6 —
A nearly assembled board ready to be soldered into
place. But wait! The ESP8266 shown here is placed incorrectly.
Always double-check that you have the electronics part in the cor
-
rect orientation prior to soldering the components in place.


