50 February 2023
QST
www.arrl.org
will find VNC software for free on any platform,
including Windows, macOS, Linux, iOS, and Android,
so you can remotely control the ARCO on any smart
device. In my opinion, the VNC solution is the best for
remote operations, as it doesn’t require any propri-
etary software. Note that all the screen captures used
in this review were taken from my MacBook using
free VNC software. With the VNC software, you see
the same thing as the ARCO touchscreen simultane-
ously with the unit.
The last tab is
SYSTEM
, with six sub-tabs. The first
one is
SYSTEM
(see Figure 13), and the five others are
to set up the optional accessories (not tested in this
review). In the
SYSTEM
sub-tab, you can upgrade the
ARCO firmware directly if the unit is connected to the
internet. From there you touch the
LOAD
button to see
if there’s new firmware available. A pop-up screen will
open and show you the currently running and latest
available versions. To upgrade, there will be another
LOAD
button beside the version. Touching it will auto-
matically download the new version and upgrade the
device.
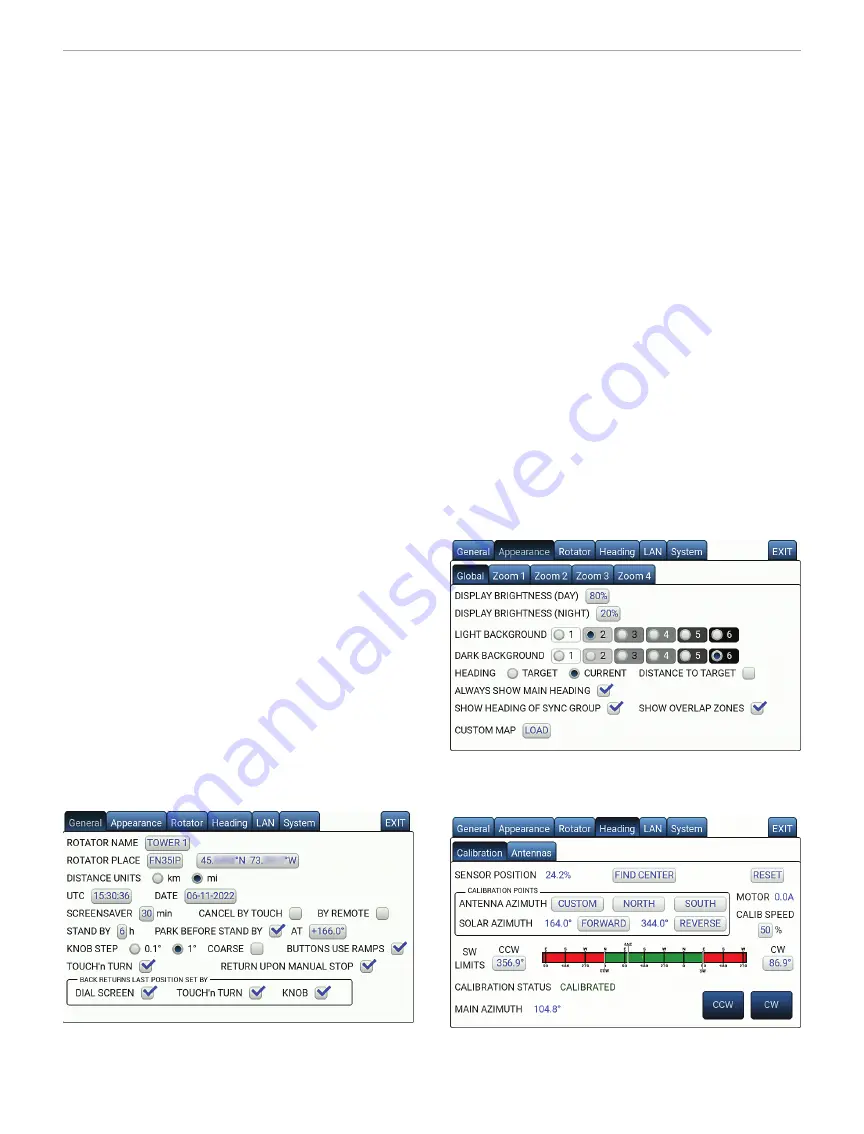
Figure 10
— The ARCO
GENERAL
settings menu tab.
Figure 11
— The ARCO
APPEARANCE
settings menu tab.
Before connecting your rotator to the controller,
ensure you have the correct pinout for your specific
model. If you’ve just installed a new rotator, you will
need to do a rotator centering. Everything is well
explained in the manual. If you’re just swapping a
controller of an existing rotator, you can skip the cen-
tering procedure. The next step is the calibration pro-
cedure. This is to ensure that the controller knows
where the limits are for each direction.
After turning on the ARCO, it may take a few moments
to boot. It’s less than 10 seconds when a rotator is
connected. At the bottom left of the screen, there’s a
gear logo that you just touch to enter the settings
menu. To set up your rotator, you will need to go to the
ROTATOR
tab. You can see my settings in Figure 9.
The settings menu has six tabs. The first one
(
GENERAL
) is for setting up your location with your
grid square, the distance unit (kilometers or miles),
time and date, the screensaver, the park position, and
a few control options (see Figure 10).
The second tab is
APPEARANCE
, which has five sub-
tabs (see Figure 11). In the first sub-tab (
GLOBAL
), you
can set your preferred look of the display. You have a
day and night brightness adjustment, two background
settings (light and dark — I prefer the dark look), and
a few heading settings. The four other sub-tabs are
for the map customizable presets (more on this later).
In the
HEADING
tab, you will find two sub-tabs, one
for the calibration and the other to define three indi-
vidual antennas installed on the same rotator (see
Figure 12). You can also set the mounting offset of
the additional antennas versus the main antenna
(antenna #1).
The
LAN
tab is for setting your IP network. You can
remotely control this unit via any VNC software. You
Figure 12
— The ARCO
HEADING
(calibration) settings menu tab.


