background image

3.  Removing the back cover 


Squeeze the left and right bottom grooves and slide the cover up. 
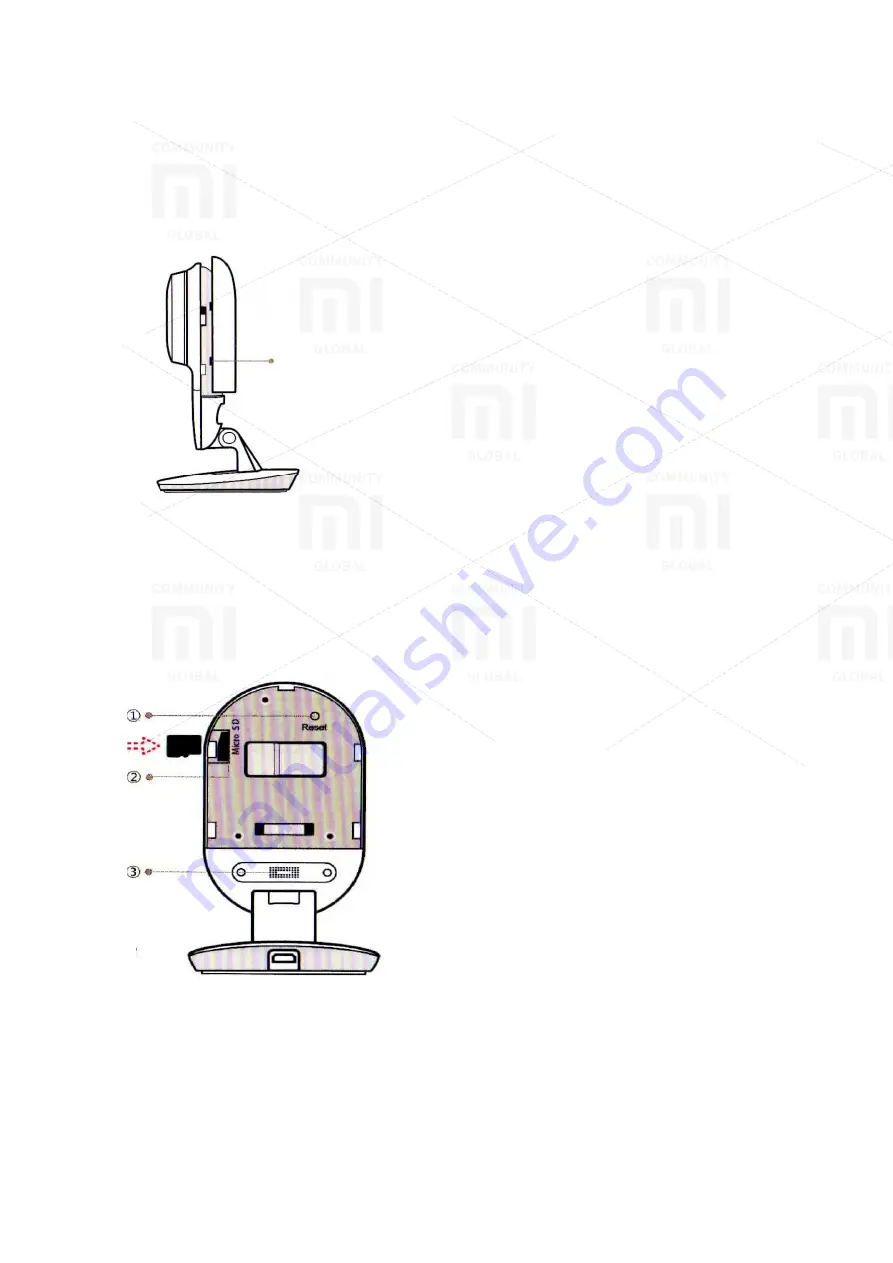
 

Side view: 


To remove the back 
cover, squeeze a left and 
right bottom grooves and 
slide the cover up. 

4.  Installing MicroSD card


Remove the back cover and insert a Micro-SD card to slot on the side, as shown 
below. 
 

Back view: 


Detail Name / Description 

 
Micro-SD Card Slot 
 
To enable local video recording, insert a 
Micro-SD card to slot as shown in the 
picture. 
* Support Class 4 or higher of Micro-SD 
card, format 8GB-64GB, file system 
FAT32. 


Reset button 
To launch the camera, press and hold 
the start button until the indicator lights 
yellow. 


Dynamic 
The speaker is used for 2-way audio. 
For best results, do not cover. 

 
1. Reset button 

2. Micro-SD card slot 

3. Dynamic 


Summary of Contents for Yi Home Camera

Page 1: ...amera settings remove the back cover see Next section press and hold the start button until yellow light Front View Description of the status of the indicator lights Yellow light Power On Flashing yellow WiFi search Flashing blue WiFi connection Blue light Connection succeed Slow flashing yellow firmware updating 1 Light indicator 2 Microphone ...

Page 2: ...slot on the side as shown below Back view Detail Name Description Micro SD Card Slot To enable local video recording insert a Micro SD card to slot as shown in the picture Support Class 4 or higher of Micro SD card format 8GB 64GB file system FAT32 Reset button To launch the camera press and hold the start button until the indicator lights yellow Dynamic The speaker is used for 2 way audio For bes...

Page 3: ...ow to install the application YІ Home App QR code 6 Registration and login 1 Open Yl Home App and select North America as a point of entry into the system 2 Enter your login credentials If you do not have a private page you can create one by clicking Register and follow the instructions in the application to create an YI account Also in order to log you can use your Facebook page ...

Page 4: ...onnect a cable to Micro USB port on back of the camera to a power outlet as shown on the picture 8 Connecting the camera to a phone 1 To connect the camera to home screen touch adding badge in the upper right corner 2 Follow simple instructions to configure the application You can set up multiple cameras one at a time ...

Page 5: ...laws 1 Hold to talk 2 Video Recording 3 Silent 4 Show Timeline 5 Take photos 6 Full Screen 7 Play history 8 Warning 10 Switching WiFi network When you need to switch a WiFi network or update your WiFi password follow the instructions below 1 Use a clamp to press the start button on a back of the camera and wait until the LED turns yellow 2 Open YI Home App on your phone and then go to step 6 Conne...

Page 6: ... only 4 Use only device accessories specified by the manufacturer 5 Do not forget to switch off the device during lightning storms or when it s not used for a long period of time 6 To achieve the best use of this product please consistently update to the latest version our application and firmware WARNING Open flame sources such as candles should not be placed near or on the product Note Xiaomi an...

Page 7: ...gy and if installed and used in accordance with the instructions may cause interference to radio communications However there is no guarantee that interference will not occur at a particular installation In case of improper installation causes interference to radio or television reception which can be determined by the inclusion and exclusion of equipment the user can try to correct the interferen...

Reviews: