background image

5

Printing 

Xerox PE220

5-25

5.

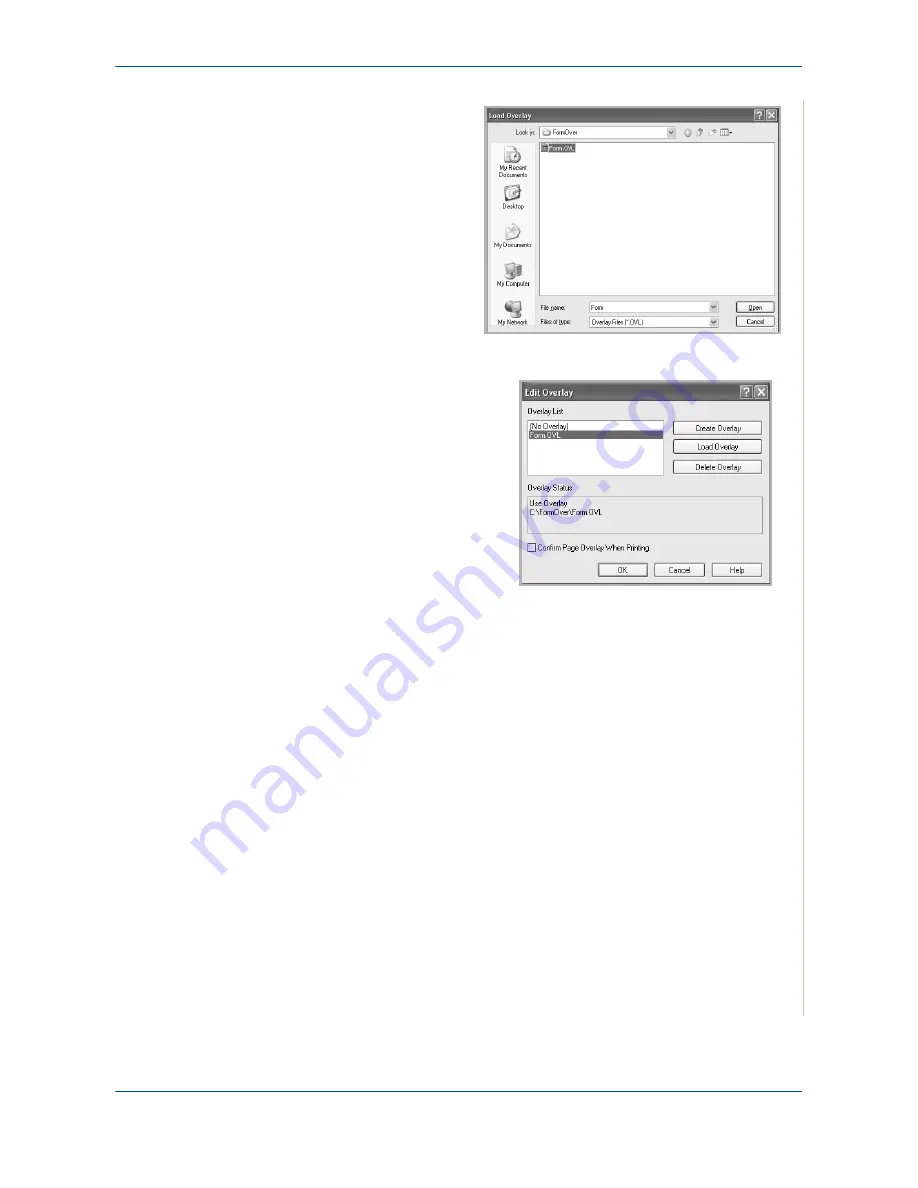
If the overlay file you 
want does not 
appear in the 

Over-

lay

 list, click 

Edit

 but-

ton and 

Load 

Overlay

, and select 

the overlay file. 

If you have stored the 
overlay file in an 
external source, you 
can also load the file 
when you access the 

Load Overlay


window. 

Select the file and click 

Open

. The file appears 

in the 

Overlay List

 box 

and is available for 
printing. Select the 
overlay from the 

Overlay List

 box. 

6.

If necessary, click 

Confirm Page Over-
lay When Printing

. If 

this box is selected, a 
message window 
appears each time you submit a document for printing, asking you to 
confirm your instruction to print an overlay on your document. 

If this box is not selected and an overlay has been selected, the overlay 
automatically prints with your document. 

7.

Click 

OK

 or 

Yes

 until printing begins. 

The selected overlay downloads with your print job and prints on your 
document. 

NOTE: 

The resolution of the overlay document must be the same as the 

document you want to print.

Deleting a Page Overlay

You can delete page overlays that you no longer use. 

1.

In the printer Properties window, click the 

Other Features

 tab. 

2.

Click the 

Edit

 button in the 

Overlay

 section. 

3.

Select the overlay you want to delete from the 

Overlay List

 box. 

4.

Click 

Delete Overlay

5.

When a confirming message window appears, click 

Yes

.

6.

Click 

OK

 to exit the Print window.

Summary of Contents for WORKCENTRE PE 220

Page 1: ...WorkCentre PE220 User Guide 708P88184...

Page 2: ...l generated from the software programs which are displayed on the screen such as icons screen displays looks etc All Xerox products mentioned in this publication are trademarks of Xerox Corporation Pr...

Page 3: ...roduct Recycling and Disposal 1 22 2 Getting Started Unpacking the machine 2 2 Selecting a Location 2 3 Clearance Space 2 3 Installing the Smart Kit Print Cartridge 2 4 Loading Paper 2 6 Making Connec...

Page 4: ...s 5 9 Advanced Printing 5 17 Printing Multiple Pages on One Sheet of Paper N Up Printing 5 17 Printing Posters 5 18 Printing a Reduced or Enlarged Document 5 19 Fitting Your Document to a Selected Pap...

Page 5: ...xes 7 10 Receiving Automatically in Fax Mode 7 11 Receiving Manually in Tel Mode 7 11 Receiving Automatically in Ans Fax Mode 7 11 Receiving Manually Using an Extension Telephone 7 12 Receiving Faxes...

Page 6: ...a or Around the Print Cartridge 9 5 In the Paper Exit Area 9 6 Tips for Avoiding Paper Jams 9 7 Clearing LCD Error Messages 9 8 Solving Other Problems 9 12 Paper Feeding Problems 9 12 Printing Problem...

Page 7: ...s been designed for ease of use but to use your machine to its fullest potential take some time to read this User Guide About This Guide page 1 2 Getting to know your machine page 1 3 Special Features...

Page 8: ...oducts consists of This User Guide The Quick Set Up Guide The Xerox website http www xerox com Convention Description Example Italic Typeface Used to emphasise a word or phrase In addition references...

Page 9: ...the main components of your machine Front View Document Guides Document Input Tray Document Cover Automatic Document Feeder Paper Output Extension Document Output Tray Manual Tray Control Panel Docume...

Page 10: ...Xerox PE220 Rear View EXT Jack USB Connector Parallel Connector NOTE If your country has a different telephone connection system this socket may be blocked Power Switch AC Power Cord Connector Line Ja...

Page 11: ...Copy 2 4 Up multiple pages on a sheet and Poster copying after assigning it For details see Setting the Favorite Copy Option on page 4 12 Resolution Adjusts the resolution of the documents for the cur...

Page 12: ...ts a pause into a fax number 7 Number Keypad Dials a number or enters alphanumeric characters for Fax and Copy functions 8 Stop Clear Stops an operation at any time In Standby mode clears cancels the...

Page 13: ...ermarks You can customize your documents with words such as Confidential For details see Chapter 5 Printing Print Posters The text and pictures of each page of your document are enlarged and printed a...

Page 14: ...erial number Use the space below to make a note of the machine serial number ____________________________________________ The Xerox Welcome Center or local representative telephone number is provided...

Page 15: ...Markings All warning instructions marked on or supplied with the product should be followed WARNING This WARNING alerts users to areas of the product where there is the possibility of personal injury...

Page 16: ...e only power cord supplied with this equipment Plug the power cord directly into a grounded electrical outlet Do not use an extension cord If you do not know whether or not an outlet is grounded consu...

Page 17: ...tlet checked by a qualified electrician This equipment must be connected to a protective earth circuit This equipment is supplied with a plug that has a protective earth pin This plug will fit only in...

Page 18: ...ot specifically described in the documentation that is supplied with your copier printer Do not use aerosol cleaners The use of cleaners that are not approved may cause poor performance of the equipme...

Page 19: ...d used in accordance with the instruction manual may cause harmful interference to radio communications Operation of this equipment a residential area is likely to cause harmful interference in which...

Page 20: ...ment the external radiation from the ISM equipment may have to be limited or special mitigation measures taken WARNING This is a Class A product In a domestic environment the product may cause radio f...

Page 21: ...To be certain of the number of devices that may be connected to a line as determined by the total RENs contact the local Telephone Company For products approved after July 23 2001 the REN for this pr...

Page 22: ...ompany The equipment must also be installed using an acceptable method of connection The customer should be aware that compliance with the above conditions may not prevent degradation of service in so...

Page 23: ...erminal equipment for use on analogue switched telephone networks in the European Economic Area The product may be configured to be compatible with other country networks Please contact your Xerox rep...

Page 24: ...nd or shut off completely after a specified period of use These energy saving features can reduce product energy consumption in half when compared to conventional equipment Canada Environmental Choice...

Page 25: ...photographed Certificates of Indebtedness National Bank Currency Coupons from Bonds Federal Reserve Bank Notes Silver Certificates Gold Certificates United States Bonds Treasury Notes Federal Reserve...

Page 26: ...he reproduction of the following subjects under certain circumstances Penalties of fine or imprisonment may be imposed on those guilty of making such reproductions 1 Current bank notes or current pape...

Page 27: ...iability is assumed for its completeness accuracy In case of doubt consult your solicitor Other countries Copying certain documents may be illegal in your country Penalties of fine or imprisonment may...

Page 28: ...gregated from household waste Private households within EU member states may return used electrical and electronic equipment to designated collection facilities free of charge Please contact your loca...

Page 29: ...machine page 2 2 Selecting a Location page 2 3 Installing the Smart Kit Print Cartridge page 2 4 Loading Paper page 2 6 Making Connections page 2 8 Switching On the Machine page 2 11 Installing Print...

Page 30: ...ine cord may differ depending on your country s specifications The Power Cord must be plugged into a grounded power socket NOTE The CD ROMs contain the Xerox printer driver scan drivers software User...

Page 31: ...space for air circulation around the machine Allow extra space for opening doors and trays The area should be well ventilated and away from direct sunlight or sources of heat cold and humidity Do not...

Page 32: ...re that you get the maximum copies from the cartridge NOTE If toner gets on your clothing wipe it off with a dry cloth and wash clothing in cold water Hot water sets toner into fabric CAUTION To preve...

Page 33: ...art Kit Print Cartridge take care not to scratch it against the machine frame This will damage the cartridge and may produce marks on the copies 5 Close the front door If the door is not firmly closed...

Page 34: ...guide and pull it out to extend the tray 3 Fan the edges of the paper stack to separate the pages Gently tap the stack on a flat surface to even up the edges 4 Load paper into the tray to register at...

Page 35: ...ear guide and side guide and move them so that they just touch the edge of the paper stack NOTE Do not push the guides hard against the paper stack to cause the stack to bend If you do not adjust the...

Page 36: ...o your machine 2 Plug the cord of your extension phone or answering machine into the EXT jack For Users in the UK UK users should plug the cord of the extension phone into the supplied TAM lead and pl...

Page 37: ...the external equipment will fail to ring when receiving an incoming call as the machine is designed to operate with the latest technology To prevent this incompatibility use two wire newer equipment...

Page 38: ...rallel cable and connect it to the parallel connector on your machine Push the metal clips down to fit inside the notches on the cable plug and then to the parallel port on your computer NOTE You only...

Page 39: ...machine on Warming Up Please Wait appears on the display indicating that the machine is now on To view your display text in another language see Changing the Display Language and Country on page 14 W...

Page 40: ...le for scanning documents on your machine ControlCentre Use this program to create phonebook entries and configure the destination of the scan button You can also update the firmware of the machine Ma...

Page 41: ...your printer drivers NOTE For details about installing software and using its features see Chapter 5 Printing Free disk space Windows 98 Me NT 4 0 2000 300 MB or higher 1 GB Windows XP 1 GB or higher...

Page 42: ...ntil Select Country appears on the bottom line of the display 3 Press Enter The current setting appears on the bottom line of the display 4 Press the scroll button or until your country appears on the...

Page 43: ...Number Keypad As you perform various tasks you need to enter names and numbers For example when you set up your machine you enter your name or your company s name and telephone number When you store...

Page 44: ...iate place while entering the telephone number A appears on the display at the corresponding location Setting the Date and Time When you turn the machine on for the first time the display prompts you...

Page 45: ...Changing the Clock Mode on page 17 7 Press Enter when the time and date on the display is correct 8 To return to Standby mode press Stop Clear Changing the Clock Mode You can set your machine to displ...

Page 46: ...mode press Stop Clear Setting Sounds You can control the following sounds Speaker You can turn on or off the sounds from the telephone line through the speaker such as the dial tone or a fax tone Wit...

Page 47: ...he next sound option appears 5 If necessary repeat steps 2 through 4 6 To return to Standby mode press Stop Clear Speaker Volume 1 Press Manual Dial A dial tone sounds from the speaker 2 Press the scr...

Page 48: ...power consumption when it is not in use You can turn this mode on and select a length of time for which the machine waits after a job is printed before it switches to a reduced power state 1 Press Me...

Page 49: ...ox PE220 3 1 3Paper Handling This chapter explains how to select print materials and load them into your machine This chapter includes Selecting Print Materials page 3 2 Loading Paper page 3 5 Copy Ou...

Page 50: ...the manual tray and the tray when feeding a single page Brightness Some papers are whiter than others and produce sharper more vibrant images Surface smoothness The smoothness of the paper affects ho...

Page 51: ...oof wrap such as a plastic container or bag to prevent dust and moisture from contaminating your paper Load special paper types one sheet at a time through the manual tray or the paper tray to avoid p...

Page 52: ...76 x 127 mm and the maximum size is 8 5 x 14 in 216 x 356 mm Always insert the short edge into the tray first If you want to print in landscape mode make this selection through your software Inserting...

Page 53: ...ur PC and want to check the print quality after each page is printed load the paper in the manual tray and select Manual Feed for Source from the print driver 1 Load the print material into the tray I...

Page 54: ...and continuously incoming faxes are stored in memory instead of printing immediately When you press Stop Clear in the Manual Feed mode the print job in progress is canceled Copy Output Tray The machin...

Page 55: ...Copying This chapter gives you step by step instructions for copying documents This chapter includes NOTE You need to press Copy to activate Copy mode Making Copies page 4 2 Selecting Copy Options pag...

Page 56: ...ly one sheet at a time on the document glass When you use the ADF NOTE Do not load documents smaller than 5 6 x 5 8 inches 142 x 148 mm or larger than 8 5 x 14 inches 216 x 356 mm Do not attempt to fe...

Page 57: ...ry If you leave the cover open while copying you may affect copy quality and toner consumption If you are copying a page from a book or magazine leave the cover open 4 Press the Copy button to enter t...

Page 58: ...of the document stack matches the paper size marked on the document tray 2 Adjust the document guides to the document size 3 Select the copy settings including number of copies copy size brightness an...

Page 59: ...owing contrast modes Lighten will make the copies lighter than the original document This works well with dark print Normal will make the copies look the same as the original document This works well...

Page 60: ...r until the copy size you want appears on the display Pressing and holding the button allows you to quickly scroll to the number you want You can also enter the value using the number keypad 4 Press E...

Page 61: ...p Copying on page 4 9 Poster Prints an image onto 9 sheets of paper 3x3 You can paste the printed pages together to make one poster sized document See Poster Copying on page 4 9 NOTE Some features may...

Page 62: ...Press Menu until Copy Feature appears on the top line of the display 3 Press the scroll button or until Auto Fit appears on the bottom line 4 Press Enter to make your selection 5 If necessary customiz...

Page 63: ...for approximately 30 seconds the machine cancels the copy job and returns to Standby mode 2 Up or 4 Up Copying This copy feature is available only when you load documents in the ADF 1 Load the documen...

Page 64: ...ne 4 Press Enter to make your selection 5 If necessary customize the copy settings including Lighten Darken and original type by using the control panel buttons See Selecting Copy Options on page 4 5...

Page 65: ...cess the option 5 Change the setting using the scroll button or Values can be entered using the number keypad 6 Press Enter to save the selection 7 Repeat steps 3 through 6 as needed 8 To return to St...

Page 66: ...display Favorite Copy on the bottom line 3 Press Enter to access the menu item 4 Press the scroll button or until the feature you want appears on the display You can select from Clone Copy Collate Au...

Page 67: ...ument page 5 2 Canceling a Print Job page 5 2 Installing Printer Software in Windows page 5 3 Advanced Printing page 5 17 Sharing the Printer Locally page 5 26 Using ControlCentre page 5 27 Using Your...

Page 68: ...dows delete the job as follows 1 Click the Windows Start button 2 For Windows 98 NT4 0 2000 Me select Settings and then Printers For Windows XP select Printers and Faxes 3 Double click the printer dri...

Page 69: ...ct it to your Personal Computer PC Start your PC and turn on the PE220 2 Insert the Xerox Drivers CD into the CD ROM drive 3 The Found New Hardware Wizard will display Confirm that the radio button In...

Page 70: ...Drivers in Microsoft Windows XP 2000 or Windows 98 ME using the Parallel port 1 Plug the Parallel cable into the PE220 and connect it to your Personal Computer PC Start your PC and turn on the PE220 2...

Page 71: ...ur PC and turn on the PE220 2 Insert the Xerox Drivers CD into the CD ROM drive 3 The Add New Hardware Wizard will display Click Next 4 Confirm that the radio button Search for the best driver for you...

Page 72: ...Next when prompted then click Finish The USB hardware driver for the PE220 is now loaded 7 The Add New Hardware Wizard will display Click Next to install the Scan driver for the PE220 8 Again you must...

Page 73: ...n9x directory and click OK 12 The next screen will display the Xerox WorkCentre PE220 Series driver click Next 13 Click the port that the printer cable is attached to in this case USB and click Next 1...

Page 74: ...Refer to the User Guide of your software application for the exact printing procedure 1 Open the document you want to print 2 Select Print from the File menu The Print window is displayed It may look...

Page 75: ...Windows based tabs refer to your Windows User Guide and the Printer tab see Printer Tab on page 5 15 NOTE Most Windows applications will override settings you specify in the printer driver Change all...

Page 76: ...style Landscape prints across the length of the page spreadsheet style Rotate allows you to rotate the page the selected degrees Layout Options Layout Options allows you to select advanced printing o...

Page 77: ...om Page Size window appears set the paper size and click OK The setting appears in the list so that you can select it Source Make sure that Source is set to the corresponding paper tray Use the Manual...

Page 78: ...for your specific printing needs See Printing a Document on page 5 8 for more information on accessing printer properties Click the Graphics tab to display the properties shown below Resolution The R...

Page 79: ...available only when you use Windows 9x Me Download as Bit Image When this option is selected the driver will download the font data as bitmap images Documents with complicated fonts such as Korean or...

Page 80: ...ptions Print Order You can set the sequence in which the pages print Select the print order from the drop down list Normal Your printer prints all pages from the first page to the last page Reverse Al...

Page 81: ...at a high altitude selecting this option will optimize the print quality for those circumstances Using a Favorite Setting The Favorites option which is visible on each properties tab allows you to sav...

Page 82: ...t can be activated by clicking the Help button in the printer properties window These help screens give detailed information about the printer features provided by the printer driver You can also clic...

Page 83: ...r N Up Printing You can select the number of pages to print on a single sheet of paper To print more than one page per sheet the pages will be reduced in size and arranged in the order you specify You...

Page 84: ...o 4 9 or 16 sheets of paper for the purpose of pasting the sheets together to form one poster size document 1 To change the print settings from your software application access printer properties See...

Page 85: ...cument You can change the size of a page s content to appear larger or smaller on the printed page 1 To change the print settings from your software application access printer properties See Printing...

Page 86: ...tab select Fit to Page in the Type drop down list 3 Select the correct size from the Target Page drop down list 4 Select the paper source size and type in Paper Options 5 Click OK and print the docum...

Page 87: ...age 3 Click OK and start printing NOTE The preview image shows how the page will look when it is printed Creating a Watermark 1 To change the print settings from your software application access print...

Page 88: ...rmark 1 To change the print settings from your software application access printer properties See Printing a Document on page 5 8 2 Click the Other Features tab and click the Edit button in the Waterm...

Page 89: ...hat is currently on your letterhead Creating a New Page Overlay To use a page overlay you must create a new page overlay containing your logo or image 1 Create or open a document containing text or an...

Page 90: ...d on your computer hard disk drive NOTE The overlay document size must be the same as the documents you print with the overlay Do not create an overlay with a watermark Using a Page Overlay After an o...

Page 91: ...rinting asking you to confirm your instruction to print an overlay on your document If this box is not selected and an overlay has been selected the overlay automatically prints with your document 7 C...

Page 92: ...ROM Setting Up a Host Computer 1 Start Windows 2 From the Start menu select Printers and Faxes 3 Double click your printer driver icon 4 From the Printer menu select Sharing 5 Check the Share this pr...

Page 93: ...1 To install the Xerox ControlCentre insert the supplied Xerox Drivers CD 2 From within Windows click Start and then Run Type E Xinstall exe replacing E with the letter of your CD ROM drive 3 When the...

Page 94: ...your printer driver name and then Control Centre The ControlCentre window opens The ControlCentre window provides the following tabs Scan Settings Phonebook only available for the fax model and Firmwa...

Page 95: ...program click Restore Defaults Click to restore the default settings Send Downloads the settings made in the ControlCentre to your machine The Phonebook Tab fax available model only Click the tab to c...

Page 96: ...click Remove Shows the Phonebook entries you can include in the group Select a number and click Add to move it to the Included numbers list OK Click to save the group dial number after adding or remov...

Page 97: ...SB simultaneously The acquired documents can then be edited printed on the same local MFP or network printers sent by e mail uploaded to an FTP site or transferred to an external OCR system The MFP dr...

Page 98: ...computer Turn both the computer and the machine on 2 When the Administrator Login window appears type in root in the Login field and enter the system password NOTE You must log in as a super user root...

Page 99: ...windows applications such as MFP Configurator or Image Editor Uninstalling the MFP Driver 1 When the Administrator Login window appears type in root in the Login field and enter the system password N...

Page 100: ...d scanner the MFP Configurator provides options logically grouped for printer and scanner functions There is also a special MFP port option responsible for the regulation of access to an MFP printer a...

Page 101: ...ers and Classes Printers Tab You can see the current system s printer configuration by clicking on the printer icon button on the left side of the MFP Configurator window You can use the following pri...

Page 102: ...perly Properties allows you to view and change the printer properties For details see Configuring Printer Properties on page 5 38 Classes Tab The Classes tab shows a list of available printer classes...

Page 103: ...ows you to monitor the activity of the scan drivers MFP Ports Configuration In this window you can view the list of available MFP ports check the status of each port and release a port in busy state R...

Page 104: ...to choose I O port for the new device This choice will provide the most suitable configuration for MFP s functionality For MFP scanners I O ports are being chosen by scanner drivers automatically so p...

Page 105: ...click Remove from Class to remove the printer from the selected class 5 Click OK to apply the changes and close the Printer Properties Window Printing a Document Printing from Applications You can pr...

Page 106: ...tion Device allows you to set the print resolution paper source and destination 5 Click OK to apply the changes and close the PE220 Properties window 6 Click OK in the Xerox LPR window to start printi...

Page 107: ...on 3 Select the scanner on the list When you have only one MFP device and it is connected to the computer and turned on your scanner appears on the list and is automatically selected If you have two o...

Page 108: ...ze manually If you want to use one of the preset scan option settings select from the Job Type drop down list For details about the preset Job Type settings see Adding Job Type Settings on page 5 43 Y...

Page 109: ...er Properties window 2 Click Save As 3 Enter the name for your setting 4 Click OK to add your setting to the Saved Settings drop down list To save a Job Type setting for the next scan job 1 Select the...

Page 110: ...e image Crops the selected image area Zooms the image out Zooms the image in Allows you to scale the image size you can enter the size manually or set the rate to scale proportionally vertically or ho...

Page 111: ...Macintosh computer Verify the following before you install the printer software Install the Printer driver 1 Make sure that you connect your printer to the computer Turn on your computer and printer...

Page 112: ...tall and then click Uninstall 8 When the uninstallation is complete click Quit Uninstalling the Scan driver 1 Insert the CD ROM which came with your printer into the CD ROM drive 2 Double click CD ROM...

Page 113: ...ser Guide may differ depending on the printer in use However the composition of the printer properties window is similar NOTE You can check your printer name in the supplied CD ROM Printing a Document...

Page 114: ...dow may differ depending on the printer in use Layout Setting The Layout tab provides options to adjust how the document appears on the printed page You can print multiple pages on one sheet of paper...

Page 115: ...Make sure that Paper Type is set to Printer Default If you load a different type of print material select the corresponding paper type Resolution The Resolution options you can select may vary depend...

Page 116: ...list 5 Click Print and the printer prints the selected number of pages on one side of each page Scanning If you want to scan documents using other software you will need to use TWAIN compliant softwa...

Page 117: ...Scanning Using the WIA Driver page 6 4 NOTE Check the Operating System s that are compatible with your printer Please refer to the OS Compatibility section of Printer Specifications in your Printer Us...

Page 118: ...supports the WIA driver for scanning images For details see Chapter 5 Printing NOTE To scan with your machine you must install the software 1 Insert the Xerox Drivers CD into the CD ROM drive In Micr...

Page 119: ...ime you scan with your machine select it as your TWAIN source in the application you use The basic scanning process involves a number of steps 1 Make sure that your machine and computer are turned on...

Page 120: ...ent s face up into the ADF OR Place a single document face down on the document glass 2 From the Start menu on your desktop window select Settings Control Panel and then Scanners and Cameras 3 Double...

Page 121: ...sing your machine as a fax machine This chapter includes Setting Up the Fax System page 7 2 Sending a Fax page 7 5 Receiving a Fax page 7 10 Automatic Dialing page 7 14 Other Ways to Fax page 7 19 Add...

Page 122: ...lt resolution value Standard for documents with normal sized characters Fine for documents containing small characters or thin lines or for sending documents printed using a dot matrix printer Super F...

Page 123: ...utomatically reduce an incoming page With this feature set to Off the machine cannot reduce the document to fit onto one page The document will be divided and printed in actual size on two or more pag...

Page 124: ...receive code see Receive Code on page 7 3 Alternatively you can press Manual Dial you can hear a fax tone from the remote machine and then press Start on the control panel of your machine In the Fax...

Page 125: ...out preparing a document see Making Copies on page 4 2 To fax a document using the Automatic Document Feeder ADF 1 Load the document face up into the ADF You can insert up to 30 sheets at a time Make...

Page 126: ...t on the document glass 3 Close the document cover Adjusting the Document Resolution The default document settings produce good results when using typical text based documents If you send documents th...

Page 127: ...so press and hold the digit button of the speed dial number if you have assigned one To store the speed dial number see Storing a Number for Speed Dialing on page 7 14 5 Press Start 6 When a document...

Page 128: ...ial You hear a dial tone 5 Enter the receiving fax machine s number using the number keypad You can also press and hold the digit button of the speed dial number if you have assigned one To store the...

Page 129: ...machine to print a confirmation report automatically each time sending a fax is completed For further details see the MSG Confirm item on MSG Confirm on page 7 3 Automatic Redialing When the number yo...

Page 130: ...e Distinctive Ring is a telephone company service which enables a user to use a single telephone line to answer several different telephone numbers For further details see Receiving Faxes Using the DR...

Page 131: ...eted Receiving Automatically in Ans Fax Mode To use this mode you must attach an answering machine to the EXT jack on the back of your machine See Making Connections on page 2 8 If the caller leaves a...

Page 132: ...e Distinctive Ring Pattern Detection feature your fax machine can learn the ring pattern you designate to be answered by the fax machine Unless you change it this ringing pattern will continue to be r...

Page 133: ...our fax number or connect the machine to another telephone line After DRPD has been set up call your fax number again to verify that the machine answers with a fax tone Then have a call placed to a di...

Page 134: ...y stored in the location you chose the display shows the number to allow you to change it To start over with another speed dial number press Exit 6 Enter the number you want to store using the number...

Page 135: ...o display No and press Enter 7 The fax number stored in the speed dial location is automatically dialed The document is sent when the receiving fax machine answers Group Dialing If you frequently send...

Page 136: ...er group press Enter and repeat from step 5 OR To return to Standby mode press Stop Clear NOTE You cannot include one group dial number in another group dial number Editing Group Dial Numbers You can...

Page 137: ...g fax number For a one digit group number press and hold the appropriate digit button For a two digit group number press the first digit button and press and hold the last digit button You can use onl...

Page 138: ...ton labeled with the letter you want to search for A name beginning with the letter displays For example if you want to find the name MOBILE press the number 6 button which is labeled with MNO 5 Press...

Page 139: ...d You can also press and hold the digit button of the speed dial number if you have assigned one To store the speed dial number see Storing a Number for Speed Dialing on page 7 14 6 Press Enter to con...

Page 140: ...ter 5 Enter the number of the receiving machine using the number keypad You can also press and hold the digit button of the speed dial number if you have assigned one To store the speed dial number se...

Page 141: ...t a delayed fax is set NOTE If you want to cancel the delayed transmission see Canceling a Scheduled Fax on page 7 23 Sending a Priority Fax Using the Priority Fax feature a high priority document can...

Page 142: ...u can add documents to a delayed transmission previously reserved in your machine s memory 1 Load the document s face up into the ADF or place a single document face down on the document glass For det...

Page 143: ...s Enter The display shows the last job reserved in memory 3 Press the scroll button or until you see the fax job you want to cancel and press Enter 4 When the display confirms your selection press the...

Page 144: ...nter NOTE You can activate Secure Receiving mode without setting a password but cannot protect your faxes 5 Re enter the password to confirm it and press Enter 6 To return to Standby mode press Stop C...

Page 145: ...port This report shows information on the faxes you have recently sent Received Fax Report This report shows information on the faxes you have recently received System Data List This list shows the st...

Page 146: ...ailure Report This report is printed out automatically when power is restored after a power failure if any data loss occurs due to the power failure NOTE The lists you have set to print out automatica...

Page 147: ...by pressing Stop Clear Advanced Fax Setting Options Option Description Send Forward You can set the machine to send a copy of all outgoing faxes to a specified destination in addition to the fax numbe...

Page 148: ...eople For further details about setting this mode see Using Secure Receiving Mode on page 7 24 Prefix Dial You can set a prefix dial number of up to five digits This number dials before any automatic...

Page 149: ...for maintaining the machine and replacing the print cartridge This chapter includes Clearing the Memory page 8 2 Cleaning Your Machine page 8 3 Maintaining the Smart Kit Print Cartridge page 8 6 Consu...

Page 150: ...er item repeat steps 3 and 4 OR To return to Standby mode press Stop Clear Feature Description Clear All Mem Clears all of the data stored in the memory Paper Setting Restores all of the Paper Setting...

Page 151: ...er located underneath the print cartridge Oil from your fingers can cause print quality problems Cleaning the Outside Clean the covers of the machine with a soft lint free cloth You can dampen the clo...

Page 152: ...it with a piece of paper if necessary CAUTION Do not touch the green underside of the print cartridge Hold the cartridge using the handle on the cartridge to avoid touching this area 4 Pull out and r...

Page 153: ...he scan unit clean helps ensure the best possible scanned images We suggest that you clean the scan unit at the start of each day and during the day as needed 1 Slightly dampen a soft lint free cloth...

Page 154: ...s on the amount of toner that print jobs require When printing text at ISO 19752 5 coverage a new print cartridge lasts an average of 3 000 pages The original print cartridge supplied with the machine...

Page 155: ...ridge When the display on the control panel shows the warning message Toner Empty the print cartridge has run and the machine stops printing At this stage the print cartridges needs to be replaced Rem...

Page 156: ...election 6 To return to Standby mode press Stop Clear Cleaning the Drum You can clean the OPC drum in the print cartridge manually or automatically If there are streaks or spots on your prints the OPC...

Page 157: ...ables and replacement parts contact your Dealer or Service Agent or the Retailer where you bought your machine We strongly recommend that these items are installed by a trained service professional ex...

Page 158: ...ADF Rubber Pad You can purchase an ADF rubber pad from your Service Agent or the Retailer where you bought your machine 1 Open the ADF cover 2 Remove the ADF rubber pad from the ADF as shown 3 Instal...

Page 159: ...l information for what to do if you encounter an error This chapter includes Clearing Document Jams page 9 2 Clearing Paper Jams page 9 4 Clearing LCD Error Messages page 9 8 Solving Other Problems pa...

Page 160: ...Remove Reload appears on the display Input Misfeed 1 Remove any remaining page s from the ADF and input tray 2 Open the ADF cover 3 Pull the document gently out of the ADF 4 Close the ADF cover Then...

Page 161: ...PE220 9 3 Exit Misfeed 1 Remove any remaining page s from the ADF 2 Open the ADF cover 3 Remove the misfed documents from the document output tray 4 Close the ADF cover Then load the removed page s i...

Page 162: ...paper in the tray by gently pulling it straight out If there is any resistance and the paper does not move when you pull or if you cannot see the paper in this area check the fuser area around the pr...

Page 163: ...aper in this area check the fuser area around the print cartridge See In the Fuser Area or Around the Print Cartridge page 9 5 2 Open and close the front door to resume printing In the Fuser Area or A...

Page 164: ...manual tray back into the machine 6 Reinstall the print cartridge and close the front door Printing automatically resumes In the Paper Exit Area 1 Open and close the front door The jammed paper automa...

Page 165: ...ving paper 5 Close the rear cover 6 Open and close the front door to resume printing Tips for Avoiding Paper Jams By selecting the correct paper types most paper jams can be avoided When a paper jam o...

Page 166: ...the remaining pages later when memory is available Comm Error The machine has a communication problem Ask the sender to try again CRU Fuse Error The print cartridge is not installed correctly Install...

Page 167: ...r the line is already engaged Try again after a few minutes Line Error Your machine cannot connect with the remote machine or has lost contact because of a problem with the phone line Try again If the...

Page 168: ...r in the tray has run out Load paper in the tray See Loading Paper on page 2 6 Operation Not Assigned You are doing the Add Cancel operation but there are no jobs waiting Check the display to see if t...

Page 169: ...e power cord and plug it back in Stop Pressed The Stop Clear button has been pressed during a copy or fax operation Try again Toner Empty The print cartridge has run out Replace the print cartridge wi...

Page 170: ...caused a paper jam clear the paper jam See Clearing Paper Jams on page 9 4 Paper does not feed into the machine Remove any obstructions inside the machine Paper has not been loaded correctly Remove pa...

Page 171: ...representative The connection cable between the computer and the machine is not connected properly Disconnect the printer cable and reconnect it The connection cable between the computer and the mach...

Page 172: ...e incorrect Change the page orientation in your application For details refer to Printing chapter on page 5 1 The paper size and the paper size settings do not match Ensure that the paper size in the...

Page 173: ...d may be defective Contact a service representative An error occurs repeatedly when you are printing with the USB connection When the USB mode is set to Fast some PC user may experience poor USB commu...

Page 174: ...irty Clean the LSU Cleaning the Inside on page 8 3 Contact a service representative Toner specks The paper may not meet specifications for example the paper is too moist or too rough Paper Specificati...

Page 175: ...e paper type and quality Paper Specifications on page 10 6 Parts of the machine may have toner on them If defects occur the problem will likely correct itself after running five 5 blank sheets Remove...

Page 176: ...fferent paper Paper Specifications on page 10 6 If characters are improperly formed and producing a wavy effect the scanner unit may need service For service contact a service representative Page skew...

Page 177: ...t Kit Print Cartridge on page 8 7 If the problem persists the machine may require repair Contact a service representative Character Voids Character voids are white areas within parts of characters tha...

Page 178: ...up in the ADF Image rubs off the copy easily Replace the paper in the tray with paper from a new package In high humidity areas do not leave paper in the machine for extended periods of time Frequent...

Page 179: ...inted Graphics are scanned more slowly than text Communication speed slows in scan mode because of the large amount of memory required to analyze and reproduce the scanned image Set your computer to t...

Page 180: ...fax are stretched The fax machine sending you the fax had a temporary document jam There are lines on the documents you send Check your scanning glass for marks and clean it See Cleaning the Scan Uni...

Page 181: ...For instance this could be an attempt to print a document when the MFP port is already used by a scanning application Check the MFP port is not busy Functional components of MFP printer and scanner sh...

Page 182: ...nd so forth sequentially In the Selected port pane you can see if the port is occupied by another component If this is the case you should wait for current job to finish or press the Release port butt...

Page 183: ...if Gimp Front end has Xsane Device dialog on the Acquire menu If not you should install Xsane plug in for Gimp on the your computer You can find Xsane plug in package for Gimp on Linux distribution C...

Page 184: ...ftware See Printing on page 5 1 Make sure that you are using a USB cable Your product is not listed in the Product List Window after you click Add and Select USB Make sure that the cables are connecte...

Page 185: ...E220 10 1 10 Specifications This chapter includes General Specifications page 10 2 Scanner and Copier Specifications page 10 3 Printer Specifications page 10 4 Facsimile Specifications page 10 5 Paper...

Page 186: ...127 VAC 50 60 Hz 4 5 A 220 240 VAC 50 60 Hz 2 5 A Power consumption Sleep mode Under 10 W Average 350 W Noisea a Sound Pressure Level ISO7779 Standby mode Less than 35 dBA Warm up Less than 49 dBA Co...

Page 187: ...56 mm Effective scanning width Max 8 2 inches 208 mm Color bit depth 24 bit Mono bit depth 1 bit for Black White mode 8 bit for Gray mode Copy speeda a Copy Speed is based on Single Document Multiple...

Page 188: ...in Letter First print out time Standby mode 11 seconds Power save mode 41 seconds Paper size Letter Legal A4 Folio Executive A5 A6 card Envelope 10 Envelope DL Envelope C5 Envelope C6 Envelope 7 3 4 M...

Page 189: ...MMR ECM Mode JPEG Modem speed 33 6 Kbps Transmission speed Approx 3 seconds page Transmission time applies to memory transmission of text data with ECM compression using only ITU T No 1 Chart Maximum...

Page 190: ...User Guide can cause the following problems Poor print quality Increased paper jams Premature wear on the machine NOTE Some paper may meet all of the guidelines in this guide and still not produce sat...

Page 191: ...to 43 lb 60 to 165 g m2 for the tray with single page feeding and the manual tray 150 sheets of 20 lb 75 g m2 paper for the tray 1 sheet of paper for the tray or manual tray A4 8 3 x 11 7 in 210 x 29...

Page 192: ...hat any colored paper or preprinted forms use inks that are compatible with this fusing temperature 200 C or 392 F for 0 1 second Paper Specifications Symptom Problem with Paper Solution Poor print qu...

Page 193: ...rchase more paper than can be used in a short time about 3 months Paper stored for long periods may experience heat and moisture extremes which can cause damage Planning is important to prevent damage...

Page 194: ...occur Construction Prior to printing envelopes should lie flat with less than 0 25 inches 6 mm curl and should not contain air Condition Envelopes should not be wrinkled nicked or otherwise damaged Te...

Page 195: ...s typical address margins for a commercial 10 or DL envelope NOTE For the best print quality position margins no closer than 0 6 in 15 mm from the edges of the envelope Avoid printing over the area wh...

Page 196: ...ement Only use labels with no exposed backing between them Labels can peel off sheets with spaces between the labels causing serious jams Curl Prior to printing labels must lie flat with no more than...

Page 197: ...stalling 5 3 tabs 5 29 copying collation 4 8 contrast 4 5 default setting change 4 11 from ADF 4 4 from document glass 4 3 number of pages 4 6 original type 4 5 special features 4 7 time out set 4 11...

Page 198: ...create 5 23 delete 5 25 print 5 24 P paper guidelines 3 3 paper jam clear 9 4 paper load manual tray 3 5 tray 2 6 paper load capacity 3 2 Paper properties set 5 10 paper size set 5 11 paper tray 2 18...

Page 199: ...7 6 printing 5 40 S scanning contol panel 6 2 Linux 5 41 TWAIN 6 3 WIA driver 6 4 scanning from Macintosh 5 50 searching Phonebook 7 17 Secure Receiving mode 7 24 sending a fax automatically 7 7 manu...

Page 200: ...Index 4 Xerox PE220 V volume adjust alarm 2 18 key 2 18 ringer 2 18 speaker 2 19 W watermark create 5 21 delete 5 22 edit 5 22 print 5 20 Welcome Center Canada 1 8 US 1 8 WIA scan 6 4 Z zoom rate cop...

Reviews: