background image

Troubleshooting 


212 

WorkCentre 7500 Series Multifunction Printer 

 User 

Guide 


8.


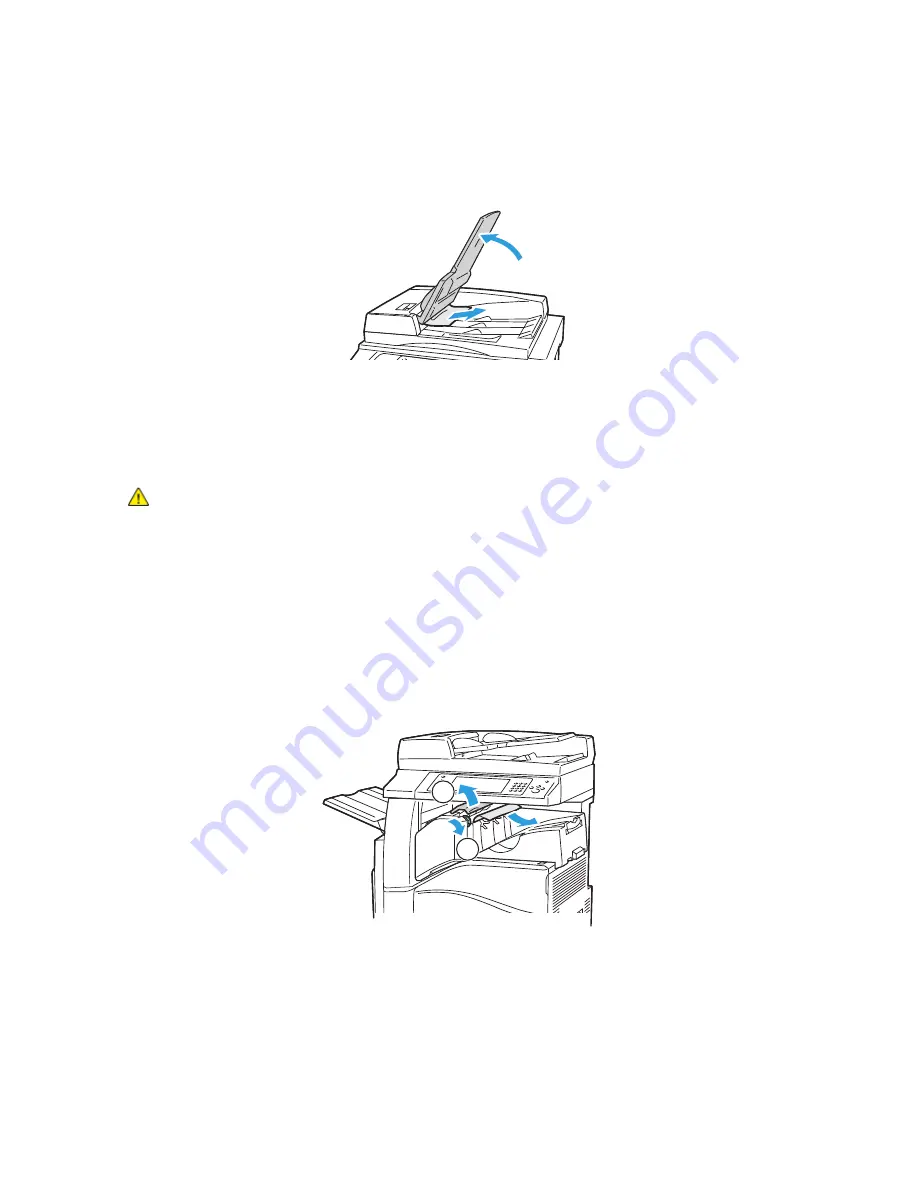
If the original is not visible when the document cover is opened, lift up the document feeder tray, 
then remove the paper. 


9.


Lower the document feeder tray. 

10.


If the original is not wrinkled or torn, load it into the feeder again following the instructions on the 
touch screen. 


Note: 

After clearing a document feeder jam, reload the entire document, including the pages already 

scanned. The printer automatically skips the scanned pages and scans the remaining pages. 


CAUTION: 

Torn, wrinkled, or folded originals can cause jams and damage the printer. To copy torn, 

wrinkled, or folded originals, use the document glass. 


Clearing Jams in the Integrated Finisher 

1.


Locate the Integrated Finisher mounted beneath the Scanner and Control Panel. 

2.


Open the top cover of the finisher (1). 

3.


Turn the green knob in the direction shown to remove the paper (2). 

4.


Remove the paper by pulling it in the direction shown. 


Note: 

If the paper is torn, remove all torn pieces from the printer. 


2

1


5.


Close the top cover of the Integrated Finisher. 


Summary of Contents for WorkCentre 7525

Page 1: ...er 4 If the message instructs you to open the inner cover lift the lever with the green tab to open the inner cover 5 Turn the green wheel in the direction shown to move the original out of the feeder...

Page 2: ...lready scanned The printer automatically skips the scanned pages and scans the remaining pages CAUTION Torn wrinkled or folded originals can cause jams and damage the printer To copy torn wrinkled or...

Page 3: ...ms in the Office Finisher LX Clearing Jams Under the Finisher Top Cover 1 Pull up the lever on the top cover 2 Open the top cover by rotating it to the left 3 Remove the jammed paper Note If the paper...

Page 4: ...2 Lift the handle of the center tray straight up to open the transport cover 3 Remove the jammed paper Note If the paper is torn remove all torn pieces from the finisher 4 Close the transport cover Cl...

Page 5: ...ing WorkCentre 7500 Series Multifunction Printer 215 User Guide 2 Open then close the finisher transport cover Clearing Jams in the Finisher Transport 1 Open the finisher transport cover 2 Remove the...

Page 6: ...e finisher 3 If no paper is visible turn green knob 1 in the direction shown and carefully pull out the jammed paper 4 Close the finisher transport cover Clearing Jams at 2a in the Finisher 1 If the p...

Page 7: ...med paper 5 If the paper is inaccessible or if the control panel displays a message to do so turn knob 2c in the direction shown to release the paper 6 Carefully remove the paper Note If the paper is...

Page 8: ...front door of the finisher 2 Move green lever 2b to the right 3 Remove the jammed paper 4 If the paper is inaccessible or if the control panel displays a message to do so turn knob 2c in the direction...

Page 9: ...Close the front door of the finisher Clearing Jams at 3 in the Finisher 1 Open the front door of the finisher 2 Pull down green lever 3 3 Carefully remove the jammed paper Note If the paper is torn r...

Page 10: ...or of the finisher 2 Using the green handle pull out unit 4 until it stops 3 Turn green knob 4a in the direction shown to release the jammed paper 4 Carefully remove the paper as shown Note If the pap...

Page 11: ...221 User Guide Clearing Jams at 4b in the Finisher 1 Open the front door of the finisher 2 Move green lever 4b to the left 3 If paper is visible remove the jammed paper by pulling in the direction sh...

Page 12: ...aper is torn remove all torn pieces from the finisher 7 Return unit 4 to its original position 8 Return lever 4b to its original position 9 Close the front door of the finisher Clearing Jams at 5 in t...

Page 13: ...he paper is torn remove all torn pieces from the finisher 4 Close the front door of the finisher Minimizing Paper Jams The printer is designed to function with minimal paper jams using Xerox supported...

Page 14: ...an cause poor print quality misfeeds skewed prints and printer damage After loading the trays select the correct paper type and size on the control panel When printing select the correct type and size...

Page 15: ...per Use only Xerox approved paper For details see Supported Paper on page 38 Humidity is too high for coated paper Feed paper one sheet at a time Paper Misfeeds Probable Causes Solutions The paper is...

Page 16: ...wrong size thickness or type Use only Xerox approved paper For details see Supported Paper on page 38 The documents loaded in the document feeder exceed the maximum capacity allowed Place fewer docum...

Page 17: ...Heavyweight Extra heavyweight Preprinted Gloss Heavyweight gloss Extra heavyweight gloss Make sure that the paper type is set correctly in the driver and the paper is loaded in the correct tray For de...

Page 18: ...et Staple Jams in the Office Finisher LX 231 Clearing Main Staple Jams in the Professional Finisher 233 Clearing Booklet Staple Jams in the Professional Finisher 235 Clearing Staple Jams in the Integr...

Page 19: ...ulling firmly in the direction shown 5 Remove the jammed staples 1 then push the clamp in the direction shown until it snaps into the locked position 2 WARNING The points of the jammed staples are sha...

Page 20: ...not perform this procedure while the printer is copying or printing 1 Open the finisher door as shown 2 Reach into the finisher cabinet and pull the stapler toward you until it stops 3 Push the staple...

Page 21: ...until it snaps into the locked position 2 WARNING The points of the jammed staples are sharp Remove the jammed staples carefully 1 2 8 Grip the staple cartridge by the orange handle and insert it int...

Page 22: ...or printing 1 Open the finisher side cover 2 If the staple cartridges are not visible grip the vertical panels at the left and right of the opening and slide them to the center 3 Hold the tabs on bot...

Page 23: ...e cartridge Note The Booklet Maker uses two staple cartridges Booklet stapling requires that both staple cartridges contain staples 6 Starting at Step 2 repeat the procedure for the other staple cartr...

Page 24: ...remove them 4 Open the staple cartridge clamp by pulling firmly in the direction shown 5 Remove the jammed staples 1 then push the clamp in the direction shown until it snaps into the locked position...

Page 25: ...equires that both staple cartridges be free of jammed staples WARNING Do not perform this procedure while the printer is copying or printing 1 Open the front door of the finisher 2 While squeezing ora...

Page 26: ...le cartridge rotate it in the direction shown 5 Lift the staple cartridge out of the staple cartridge unit 6 Remove the jammed staples by pulling them in the direction shown WARNING The points of the...

Page 27: ...he printer stops printing and reports a hole punch jam empty the hole punch waste container For details see Emptying the Hole Punch Waste Container on page 179 After emptying the hole punch waste cont...

Page 28: ...details Notes To enhance print quality the toner print drum cartridges for many models of equipment are designed to cease functioning at a predetermined point Grayscale images printed with the compos...

Page 29: ...ontrol the Print Quality Mode Make sure that the Print Quality Mode is set to the correct mode For example if the print appears too light make sure the Print Quality Mode is not set to Toner Saver mod...

Page 30: ...WorkCentre 7500 Series Multifunction Printer User Guide Select Color Adjustments to adjust particular characteristics of the printed color such as Lightness Contrast Saturation and Color Casts to achi...

Page 31: ...reas Please contact your local representative for details Note To enhance the print quality toner print drum cartridges for many models of equipment are designed to cease functioning at a predetermine...

Page 32: ...a similar document from another application and look for the same print quality problems If the document still has the same print quality problems it is probably a print driver or print server problem...

Page 33: ...3 If the pages are printed with a solid color one or more of the drum cartridges could be defective Correct the problem before continuing 4 If the colors of the pages do not match your expectations ru...

Page 34: ...aken from the document glass There is debris on the document glass When scanning the debris creates a spot on the image Clean all glass surfaces with a lint free cloth The reverse side of the original...

Page 35: ...incorrectly positioned Position the document correctly The document glass is dirty Clean the document glass The text in the document is too light Adjust the resolution Adjust the contrast There is a...

Page 36: ...tored documents and jobs then wait for the existing job to complete This increases available memory The received fax size is reduced The paper supply in the printer does not match the document size se...

Page 37: ...or warning condition occurs the control panel displays a message informing you of the problem In many cases the control panel also displays an animated graphic showing the location of the problem such...

Page 38: ...r jam Current Messages Alert messages regarding the current job status of the printer such as an empty paper tray Fault History The last 20 fault alerts Fault Code The fault code for the error that af...

Page 39: ...Administrator Guide www xerox com office WC75xxdocs Video Tutorials www xerox com office WC75xxdocs Recommended Media List United States www xerox com paper Europe www xerox com europaper Technical su...

Page 40: ......

Page 41: ...includes Printer Configurations and Options 252 Physical Specifications 254 Environmental Specifications 257 Electrical Specifications 258 Performance Specifications 259 Controller Specifications 260...

Page 42: ...matic Document Feeder with 110 sheet capacity Color touch screen display on control panel Tray 1 with 520 sheet capacity Must choose one of the following paper tray options 3 Tray Module with standard...

Page 43: ...Professional Finisher Envelope Tray 3 Tray Module with standard SRA3 12 x 18 in support 1 Tray Module with standard SRA3 12 x 18 in support High Capacity Tandem Tray with standard SRA3 12 x 18 in sup...

Page 44: ...g 335 lb with 3 Tray Module Configuration With Office Finisher LX and Booklet Maker Width 1666 mm 65 6 in Depth 685 mm 27 in 695 mm 27 4 in with Booklet Maker Height 1127 3 mm 44 4 in Weight 177 2 Kg...

Page 45: ...equirements for Base Configuration Note The clearance requirements do not change with the addition of the optional Integrated Finisher 30 7cm 12 1in 10cm 3 9in 177 8cm 70 0in 206 7cm 81 4in Printer Cl...

Page 46: ...inter User Guide Printer Clearance Requirements With Professional Finisher 243cm 96in 10cm 3 9in 206 7cm 81 4in 114 1cm 45in Printer Clearance Requirements With Professional Finisher and High Capacity...

Page 47: ...Specifications WorkCentre 7500 Series Multifunction Printer 257 User Guide Environmental Specifications Temperature 10 28 C 50 82 F Relative Humidity Operating 15 to 85 non condensing...

Page 48: ...quipment The ENERGY STAR and ENERGY STAR mark are registered United States trademarks The ENERGY STAR Imaging Equipment Program is a team effort between United States European Union and Japanese gover...

Page 49: ...210 x 297 mm 8 27 x 11 69 in or Letter 216 x 279 mm 8 5 x 11 in Bond 64 105 g m2 18 28 lb paper from any tray except tray 5 bypass tray Printer Model Color Black and White WorkCentre 7525 Multifuncti...

Page 50: ...ifications System Memory DDR2 non ECC 2 GB 333 MHz 200 pin SODIMM 667 MWords s EPC Memory DDR2 non ECC 1 GB 133 MHz 200 pin SODIMM 267 MWords s 32 b wide Flash Memory EEPROM 32 MB NA Daughter card Der...

Page 51: ...ironment Health and Safety in relation to this Xerox product and supplies contact the following customer help lines United States 1 800 828 6571 Canada 1 800 828 6571 Europe 44 1707 353 434 For produc...

Page 52: ......

Page 53: ...ries Multifunction Printer 263 User Guide This appendix includes Basic Regulations 264 Copy Regulations 266 Fax Regulations 269 Product Safety Certification 273 Material Safety Data Sheets 274 B Regul...

Page 54: ...ence to radio or television reception which can be determined by turning the equipment off and on the user is encouraged to try to correct the interference by one or more of the following measures Reo...

Page 55: ...ter can be obtained from Xerox Turkey RoHS Regulation In compliance with Article 7 d we hereby certify it is in compliance with the EEE regulation EEE y netmeli ine uygundur Ozone Release This printer...

Page 56: ...as FHA and so on Bonds United States Savings Bonds may be photographed only for publicity purposes in connection with the campaign for the sale of such bonds Internal Revenue Stamps If it is necessar...

Page 57: ...ary personnel or by members of the various Federal Departments such as FBI Treasure and so on unless photograph is ordered by the head of such department or bureau Reproducing the following is also pr...

Page 58: ...y purports to be a certified copy thereof Copyrighted material or trademarks of any manner or kind without the consent of the copyright or trademark owner This list is provided for your convenience an...

Page 59: ...d to the Telephone Company A plug and jack used to connect this equipment to the premises wiring and telephone network must comply with the applicable FCC Part 68 rules and requirements adopted by the...

Page 60: ...eshooting section of the User Guide If the equipment is causing harm to the telephone network the Telephone Company may request you to disconnect the equipment until the problem is resolved Only a Xer...

Page 61: ...n analog switched telephone networks in the European Economic Area This product provides a user adjustable setting of the country code The country code should be set prior to connecting this product t...

Page 62: ...ls can be made from this device during a mains power failure 7 This equipment may not provide for the effective hand over of a call to another device connected to the same line 8 Some parameters requi...

Page 63: ...ntre 7500 Series Multifunction Printer 273 User Guide Product Safety Certification The following Agency certified this product using the Safety standards listed Agency Standard TUV UL60950 1 2nd Editi...

Page 64: ...User Guide Material Safety Data Sheets For Material Safety Data information regarding your printer go to North America www xerox com msds European Union www xerox com environment_europe For the Custom...

Page 65: ...WorkCentre 7500 Series Multifunction Printer 275 User Guide This appendix includes All Countries 276 North America 277 European Union 278 Other Countries 280 C Recycling and Disposal...

Page 66: ...may be regulated due to environmental considerations The presence of these materials is fully consistent with global regulations applicable at the time that the product was placed on the market For r...

Page 67: ...equipment take back and reuse recycle program Contact your Xerox representative 1 800 ASK XEROX to determine if this Xerox product is part of the program For more information about Xerox environmental...

Page 68: ...d electrical and electronic equipment to designated collection facilities free of charge Please contact your local disposal authority for information In some member states when you purchase new equipm...

Page 69: ...ing For more information about collection and recycling of old products and batteries please contact your local municipality your waste disposal service or the point of sale where you purchased the it...

Page 70: ...Recycling and Disposal 280 WorkCentre 7500 Series Multifunction Printer User Guide Other Countries Please contact your local waste management authority to request disposal guidance...

Reviews: