background image

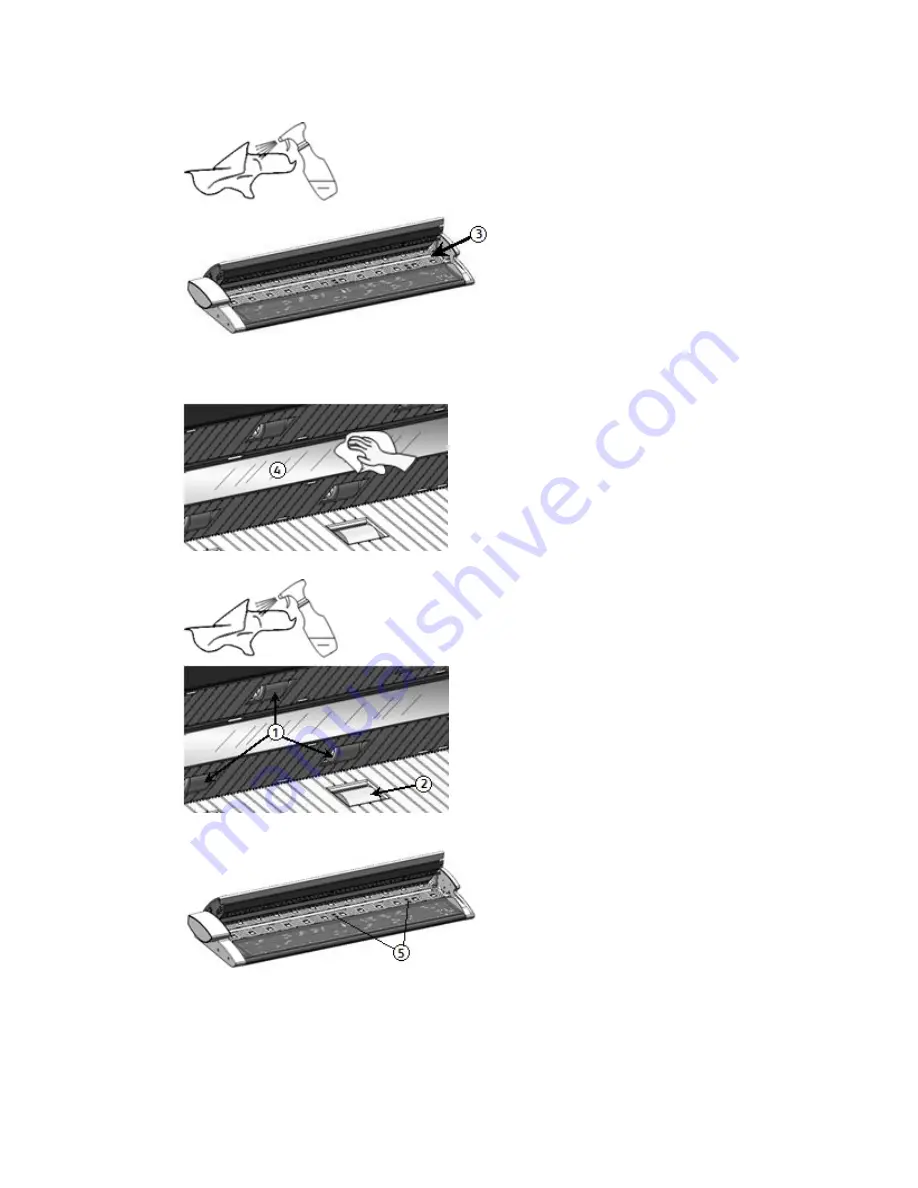
5. Wipe the Main Roller with a clean, water-dampened cloth, turning the roller as you

clean it.

6. Wipe the Contact Image Sensor with a clean, dry, lint-free cloth. If the Scanner

Contact Image Sensor (CIS) becomes dirty, image quality defects such as black lines
or streaks may appear on scanned images.

7. Wipe the Pinch Rollers and Feed Rollers with a water-dampened cloth.

8. Wipe the four Original Sensors with a dry cotton swab.

Xerox

®

 Wide Format 7742 Scan Solution

2-4

User Guide

Maintenance

Summary of Contents for Wide Format 7742

Page 1: ...Xerox Wide Format 7742 Scan Solution User Guide Document version 1 0 May 2014...

Page 2: ...2014 Xerox Corporation All rights reserved Xerox and Xerox and Design are trademarks of Xerox Corporation in the United States and or other countries BR9918...

Page 3: ...and Closing the Scanner 1 4 To Open the Scanner 1 5 To Close the Scanner 1 5 Media Exit Deflectors 1 6 2 Maintenance 2 1 Cleaning the Machine 2 1 Cleaning the Scanner 2 2 Scanner Setup 2 5 Normalizat...

Page 4: ...Xerox Wide Format 7742 Scan Solution ii User Guide Table of Contents...

Page 5: ...located in the appropriate documentation for the tool that is being used to control the scanner Refer to the documentation for the appropriate tool Scanner Components This section describes the main...

Page 6: ...ew Table 2 Machine Components Rear View Function Component Num Switches the scanner power on off Also called the Standby switch Power Switch 1 Connects the scanner to the power outlet Power Cord 2 Con...

Page 7: ...ent forward Forward 5 Press the Back button to rewind a scanned document back toward the user Back 6 Powering On Off The scanner is equipped with a Power Switch on the rear of the machine The Power Sw...

Page 8: ...intenance procedure Width 152 mm Length 152 mm Minimum document size 111 6 cm Maximum document width 2 mm Maximum document thickness 106 7 cm Maximum scan width Depends on file format and software app...

Page 9: ...feed rollers pinch rollers and Contact Image Sensor CIS Refer to the Maintenance chapter for details on cleaning these areas To Close the Scanner With both hands grasp each side of the Scanner Lid an...

Page 10: ...he three Media Exit Deflectors into the corresponding slots along the upper edge of the rear of the scanner Ensure that they are inserted fully into the slots and that they do not block the document e...

Page 11: ...leaning the machine with an excessive amount of water may cause the machine to malfunction and or damage documents during printing 1 Power off the machine as directed in Powering On Off in the Product...

Page 12: ...e The Scanner Setup procedure Normalization and Auto Stitch Alignment should follow cleaning the scanner This is generally done by a System Administrator Refer to the software documentation for these...

Page 13: ...underside of the Scanner Lid 1 Feed Rollers These 12 rollers are located below the Scanner Lid 2 Main Roller This is the long white roller 3 Contact Image Sensor This sensor runs the length of the und...

Page 14: ...lint free cloth If the Scanner Contact Image Sensor CIS becomes dirty image quality defects such as black lines or streaks may appear on scanned images 7 Wipe the Pinch Rollers and Feed Rollers with a...

Page 15: ...est results the scanner should be normalized on a regular basis Normalization should be performed whenever image uniformity is visibly changing across the sensor boundaries This can happen when the sc...

Page 16: ...unction minimizes internal stitch artifacts and is generally performed by a System Administrator The calibration target provided with the scanner is used to perform this task Xerox Wide Format 7742 Sc...

Page 17: ...d the following table Warning The scanner contains precision measuring equipment and uses a high voltage power supply Never open or remove scanner covers that are secured with screws unless specifical...

Page 18: ...ng scanning Also refer to the software documentation Table 7 Problems during Scanning Remedy Symptoms Open and close the scanner Reboot the scanner and rescan Document doesn t feed into the scanner Ma...

Page 19: ...the normalization procedure Refer to Normalization Gray marks show up in the scanned image as stripes Scanner Jam Message The Scanner Panel has a Forward Feed button and Reverse Feed button to assist...

Page 20: ...lf in the fully open position Note Opening the Scanner Lid reveals the white solid main roller feed rollers pinch rollers and Contact Image Sensor CIS See the Maintenance chapter for details on cleani...

Page 21: ...5 Confirm that the document is not torn folded or wrinkled and load the document again correctly 3 5 Xerox Wide Format 7742 Scan Solution User Guide Problem Solving...

Page 22: ...Xerox Wide Format 7742 Scan Solution 3 6 User Guide Problem Solving...

Page 23: ......

Page 24: ......

Reviews: