background image

Xerox Travel Scanner 100 User’s Guide

53

Scanning

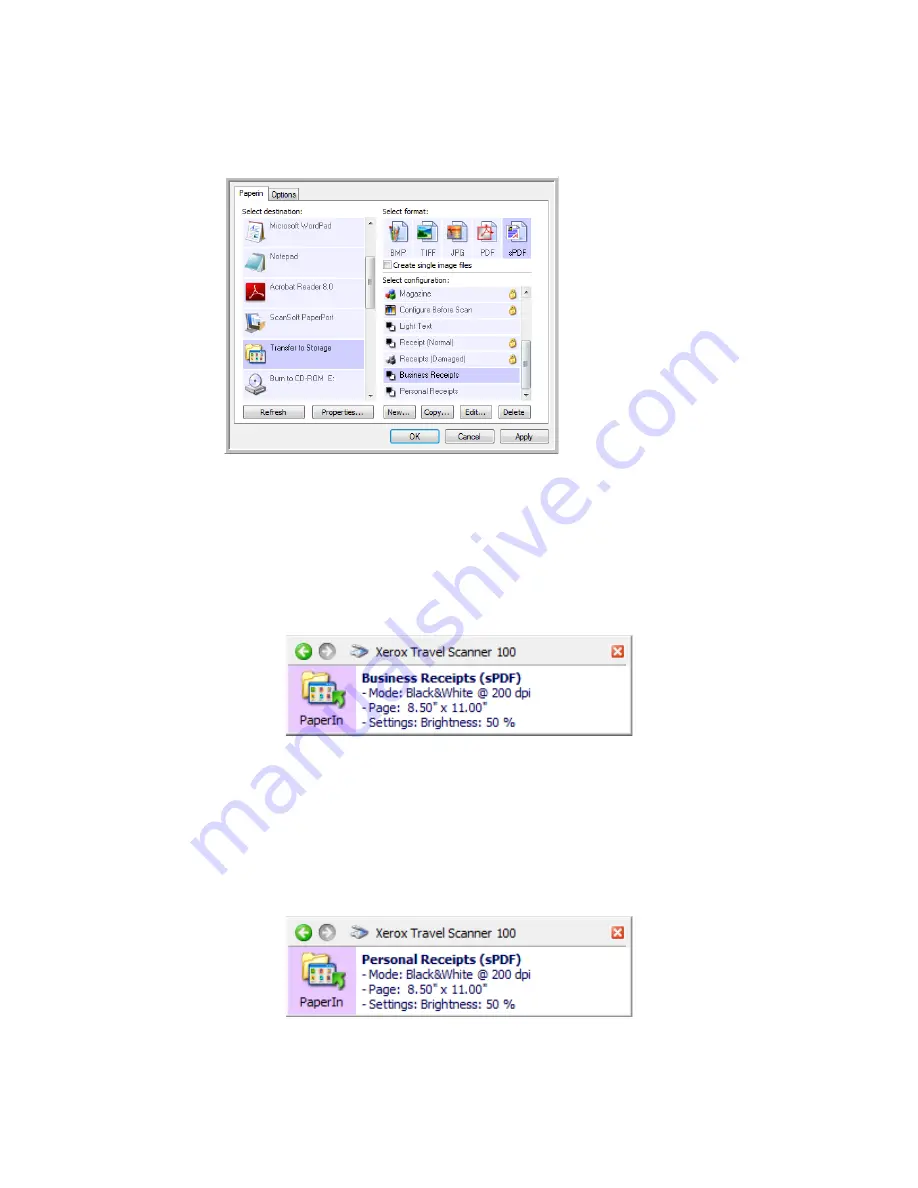
13. Make sure to designate separate folders as the Storage Locations for the new configurations.

You will now have multiple configurations set up for the Transfer to Storage destination, and each 
configuration scans documents to separate folders.

Scan to multiple storage folders:

1. Open the One Touch Properties window.
2. Select one of the configurations you created for storage.
3. Click 

OK

. The One Touch Properties window closes.

The One Touch panel will show the name of the configuration.

4. Scan the documents you want to store.

The documents are scanned to the folder specified for the configuration.

5. When scanning is finished, open the One Touch Properties window again and select the other 

configuration you created for storage.

6. Click 

OK

.

The One Touch panel will show the name of the other configuration.

7. Now scan the next set of documents.
When scanning is finished, the two sets of documents are stored in the two separate folders.

The new configurations 

apply to the Transfer to 

Storage Destination 

Application.

Summary of Contents for Travel Scanner 100

Page 1: ...Travel Scanner 100 User Guide...

Page 2: ...ark of Microsoft Corporation ZyINDEX is a registered trademark of ZyLAB International Inc ZyINDEX toolkit portions Copyright 1990 1998 ZyLAB International Inc All Rights Reserved All other products me...

Page 3: ......

Page 4: ...of the One Touch Button Panel 21 Configuring One Touch AutoLaunch 22 Selecting New Settings 23 Creating a New Scan Configuration 25 Editing or Deleting Scan Configurations 31 Configure Before Scan 32...

Page 5: ...r Reinstalling Your Scanner 76 Uninstalling the Scanner and One Touch Software 76 Uninstalling the PaperPort Software 76 To Install Another Driver 76 Xerox Travel Scanner 100 Specifications 77 Xerox T...

Page 6: ...e an item face down in scanner the page feeds through as it is being scanned Paper sensor Recognizes when an item is inserted in the scanner Alignment arrow Shows where to align the top right corner o...

Page 7: ...e check the contents of the box to make sure that all parts are included If any items are missing or damaged contact the dealer where you purchased the scanner Travel Scanner 100 USB Cable Installatio...

Page 8: ...ol Panel Double click on Display then select the Settings tab Documentation The following documentation is provided with your scanner Quick Install Guide Abbreviated installation instructions Xerox Sc...

Page 9: ...es will differ based on the software your computer is running in each case you should allow the installation to proceed if that option is available Alternatively you can turn off the AntiVirus or Anti...

Page 10: ...K 4 The disc s Main Menu window opens NOTE If the disc does not start check the following Make sure the disc drive s door is completely shut Make sure the disc was inserted in the drive in the proper...

Page 11: ...n begins 1 The Select Language window opens Click the drop down menu arrow and select the language to use Click OK 2 On the PaperPort Welcome window click Next Installing PaperPort will uninstall any...

Page 12: ...On the Product Registration window do one of the following Select Register online click OK then follow the registration instructions Select Print registration form click OK then follow the instruction...

Page 13: ...scanner It also installs the scanning interface for the TWAIN driver Installing this option means that you can use several different methods to scan as explained in this User Guide TWAIN Only The TWA...

Page 14: ...Travel Scanner 100 User s Guide 9 Installation 8 STOP when you see the Complete the installation by connecting your hardware window Do NOT click OK yet Leave the window open and proceed to the next se...

Page 15: ...tion page ready To connect your scanner 1 Remove any tape from the USB cable 2 Plug the USB cable into the USB port on the scanner then into a USB port on the computer Check your computer s manual for...

Page 16: ...e scanner will pull the calibration page through the scanner The page will move back and forth as the scanner calibrates for the difference between dark and light 7 When calibration is complete the sc...

Page 17: ...window To see a quick overview about accessing and navigating the One Touch Button Panel click More When you re finished reading the additional information click OK 9 Click OK to complete the installa...

Page 18: ...es This application is located on the disc in the User Guides section NewSoft Presto BizCard BizCard quickly and easily converts the vital contact information on business cards into a convenient searc...

Page 19: ...a feature in the One Touch 4 0 software to link to Microsoft s SharePoint application This brief Mini Guide explains how to setup the SharePoint link in One Touch The One Touch VRS Mini Guide has inf...

Page 20: ...at the bottom right corner of the screen 2 Choose Check for Online Updates from the pop up menu 3 Follow the instructions on the screen and register your scanner by entering your scanner s serial num...

Page 21: ...screen This scans with the same settings as when using the AutoLaunch scanning feature See Scan from the One Touch Button Panel on page 20 TWAIN Interface The TWAIN interface is also for scanning from...

Page 22: ...d insert it into the scanner face down into the paper feed slot The scanner grabs the top edge of the paper and automatically begins to scan and feed the paper through the scanner 2 A scan progress wi...

Page 23: ...y to initiate the scan you can turn the AutoLaunch feature off This option is in the Device Settings for your scanner s hardware properties To turn AutoLaunch off or on 1 Click on the One Touch icon i...

Page 24: ...es and close the window Click on OK to close the Hardware Properties window The AutoLaunch feature is now turned off Your scanner will not start scanning until you click on the scan button on the One...

Page 25: ...on the scanner will automatically scan when a page is inserted in the scanner 1 Place a page face down in the paper feed slot aligned to the arrow on the right side of the scanner 2 Click on the One...

Page 26: ...through the panel s 2 views Scanner icon click to open the scanner s hardware properties Red X click to close the One Touch panel The Button View Left click on a Destination Application icon to start...

Page 27: ...ging the PaperIn setting 1 Click on an application name in the Select Destination list 2 Select a file format in the Select Format panel 3 Select a scanning configuration in the Select Configuration l...

Page 28: ...ion The list of available scan configurations for the selected button The configuration s basic settings include scanning mode resolution dpi page size brightness Br and contrast Cr To see a selected...

Page 29: ...to the selected Destination Application for the scanned image See Selecting Options for One Touch on page 39 for instructions on configuring the list of available destinations Properties button Displa...

Page 30: ...rayscale and a number of other settings To create a new configuration 1 Scroll through the applications in the Select Destination list and click the application you want for the new scan configuration...

Page 31: ...r dpi settings take longer to scan and produce larger files for the scanned images Brightness and Contrast Drag the sliders to the right or left to adjust the brightness and contrast of the scanned im...

Page 32: ...etermine the size of the item being scanned Reduce Moir Patterns Moir patterns are wavy rippled lines that sometimes appear on the scanned images of photographs or illustrations particularly newspaper...

Page 33: ...Advanced Settings tab 1 Click the Advanced Settings tab The options of the Advanced Settings tab are for the Color or Grayscale scanning mode 2 Drag the sliders to the left and right to change the co...

Page 34: ...e will automatically be cropped around its edges to fit on the page Center image on page The image will be printed in the center of the page instead of at the top right corner Maintain aspect ratio Th...

Page 35: ...ick the Storage Layout options you want All documents are in the root The scanned documents are saved in the root of the folder specified in the Storage Location Documents are put into folders by mont...

Page 36: ...they are not inadvertently deleted That way you will always have the factory settings available If you do delete or edit them and want to get the factory pre sets back again you will need to uninstal...

Page 37: ...Touch Properties window for that button The option Configure Before Scan can be used when you want to scan multiple pages and have them appear in one file To set Configure Before Scan 1 Open the One...

Page 38: ...page formats BMP and JPG Please make sure the page format on the One Touch 4 0 Properties window is set to TIFF PDF or one of the Text formats Make sure the option Create single image files is not se...

Page 39: ...orrect picture type before scanning No Scanning stops but all pages scanned in this batch up to this point are not deleted and the TWAIN interface remains open The current page is fed through the scan...

Page 40: ...a format that only supports single pages such as BMP or JPG This option can be used in conjunction with Configure Before Scan to send multiple single page files to a destination when scanning from wi...

Page 41: ...of image quality Your selection pertains only to the button currently selected on the One Touch Properties window Other buttons that have JPG or PDF selected as the Page Format are not affected so you...

Page 42: ...es and you can right click on the icon to choose the particular file type for that application To select a file type for the text format 1 Select the Destination Application 2 Right click on the text...

Page 43: ...editable text the fields are maintained Excel Spreadsheet The xls file format used by Microsoft Excel HTML Document The htm file format used to create web pages Searchable PDF The pdf file format use...

Page 44: ...nagement includes PaperPort and other applications for processing and keeping track of your scanned documents Image Editors include Microsoft Paint and other drawing and graphics applications Text Edi...

Page 45: ...pies for those types of Destination Applications are already automatically saved in the folder for copies Folder Copy Options This section of the dialog box sets the location for copies of your scanne...

Page 46: ...ur scanned items 1 Select the PaperPort folder where you want the file of the scanned image to be located 2 Click OK Text Documents Properties These properties apply to Microsoft Word Microsoft Excel...

Page 47: ...add to the list When you select the application using the Browse button steps 1 and 2 on the dialog box are automatically filled in and the application icon appears in step 3 4 Select the icon in Step...

Page 48: ...n the computer s screen When a computer screen is set to a lower resolution bitmap images with a higher resolution may be too big to fit on the screen Converting the bitmap image to match the screen r...

Page 49: ...ptions you want All documents are in the root The scanned documents are saved in the root of the folder specified in the Storage Location Documents are put into folders by month week or type Folders a...

Page 50: ...nd find the correct AOL folder Please contact AOL for more information about the folder location in which AOL stores attachments 3 If you need to change your email client or any other internet options...

Page 51: ...r detailed instructions To scan with OCR 1 Open the One Touch Properties window 2 Select a text editing program in the Select Destination list then select a text file format in the Select Format panel...

Page 52: ...ick OK 5 Place a document in the paper feed slot The scanner will start scanning When finished the file will be saved to the Windows location for CD files An information bubble will appear in the Wind...

Page 53: ...estination Application You cannot choose a page format for this option because the actual Destination Application is not selected until after you press the scanner button 3 Choose a Scan Configuration...

Page 54: ...tings for the image on the HTML page 5 Click OK 6 Place a document in the paper feed slot to start scanning When scanning is finished the document is first converted to editable text using the OCR pro...

Page 55: ...OCR process into editable text and numbers before being saved To transfer documents to storage 1 Open the One Touch properties window 2 Select Transfer to Storage as the Destination Application 3 Cho...

Page 56: ...ation with the appropriate storage location for that set Then switch to another scan configuration and scan the next set of documents to store them in their folder NOTE The selections you make using t...

Page 57: ...you created for storing the scanned documents 10 Click OK The selected folder will now be set as the Storage Location such as Business Receipts 11 Click OK The new configuration is now listed as a Tra...

Page 58: ...k OK The One Touch Properties window closes The One Touch panel will show the name of the configuration 4 Scan the documents you want to store The documents are scanned to the folder specified for the...

Page 59: ...and initiate cleaning or calibrating as part of your monthly maintenance Grayed out options on this window are not appropriate for your scanner model To open the device settings window 1 Right click o...

Page 60: ...ning utilities Detailed instructions for calibration and cleaning utilities can be found in the maintenance section of this User s Guide on page 68 1 Click on the Calibrate or Clean button to start th...

Page 61: ...ton panel on screen you need to deselect this option Click on OK to save the changes and close the window Paper pickup delay You can set a delay time for the scanner to wait before feeding the page th...

Page 62: ...from the hardware properties Device Settings tab for your scanner To open the device settings tab 1 Right click on the One Touch icon and choose Show Hardware from the pop up menu 2 The Hardware Prope...

Page 63: ...to open it you can still use the instructions in this User s Guide for scanning with your Xerox Travel Scanner 100 To access the TWAIN interface from other software please refer to their user s guide...

Page 64: ...up the TWAIN interface Open the TWAIN interface from an application Each TWAIN compliant software application has its own specific steps to open the TWAIN interface but the basic process is the same f...

Page 65: ...ttings in the TWAIN interface for the item you are scanning 3 Click the Scan button in the TWAIN interface If you have multiple pages to scan after the current page feeds through place another page in...

Page 66: ...darker Contrast The difference between the lighter and darker portions of the image Increasing the contrast emphasizes the difference between the lighter and darker portions decreasing the contrast d...

Page 67: ...nits inches or mm millimeters to toggle between them Click OK The currently selected page size appears in the middle of the TWAIN interface on the left hand side Filter The Filter is the ability of yo...

Page 68: ...TWAIN interface If you are using Windows 2000 or Windows Vista 64 bit and did not install One Touch with your scanner use these instructions for calibrating and cleaning the scanner 1 On the upper rig...

Page 69: ...h the scanner during calibration If you are cleaning the scanner place the cleaning sheet in the scanner with the long edge leading into the paper feed slot The scanner grabs the sheet and passes it b...

Page 70: ...his section shows how to use Microsoft Paint to scan using the WIA interface but you can use PaperPort and other Windows applications as well To scan using WIA from Microsoft Paint 1 On the Windows ta...

Page 71: ...ill appear in Microsoft Paint or other WIA application you re using NOTE Windows Vista has advanced options available for scanning with the WIA interface Scanning from Microsoft s Paint application us...

Page 72: ...r scanning Brightness and Contrast Drag the sliders to the right or left to adjust the brightness and contrast of the scanned image Resolution DPI Click the up or down arrow to scroll through the dots...

Page 73: ...uality If the scanner is used daily you may need to calibrate the scanner more often If your scanned images have black or colored vertical lines this may be a sign that you need to perform a calibrati...

Page 74: ...to Do not forcefully pull the page out of the scanner the scanner will release the page when it has fully exited out of the scanner Calibrating from the Windows Control Panel If you did not install O...

Page 75: ...ave the scanner s cleaning sheet ready To clean the scanner 1 Right click on the One Touch icon in the Windows notification area at the lower right corner of the screen and choose Show Hardware from t...

Page 76: ...Control Panel 2 Double click on Scanners and Cameras If you do not see Scanners and Cameras open Printers and Other Hardware then you should see this option 3 Your Xerox Travel Scanner 100 should be l...

Page 77: ...ies for your scanner opens 3 Click on the Properties button to open the Device Settings for your scanner 4 Dampen the cleaning sheet with the Isopropyl rubbing alcohol Try to dampen the cleaning sheet...

Page 78: ...ng sheet The scanner will move the cleaning sheet back and forth during cleaning 7 When cleaning is complete the scanner will clear the cleaning sheet out of the scanner Remove the cleaning sheet when...

Page 79: ...talled if you selected a TWAIN Only install the One Touch icon will not be available Please see page page 8 for installation options Problem The scanner won t scan Check for one of these possible prob...

Page 80: ...steps starting on page 5 Problem If the USB cable is disconnected during a scan the scanner does not reconnect when the USB cable is plugged back in Unplug the USB cable from the scanner and then plug...

Page 81: ...want to remove these software programs The One Touch 4 0 software is removed from your computer 5 Unplug the USB cable from the scanner 6 Close all open windows and restart your computer Uninstalling...

Page 82: ...IA Supported Operating Systems Windows 2000 Service Pack 4 Windows XP 32 bit Service Pack 2 or 3 Windows Vista 32 bit or 64 bit Bundled Software PaperPort OmniPage Pro Adobe Acrobat Reader NewSoft Pre...

Page 83: ...re Part List Please use the following part name and number when ordering a replacement USB cable for your scanner Part Name Part Number Calibration page and Cleaning sheet 05 0679 000 High Speed USB 2...

Page 84: ...impact the product certification Please contact your Xerox representative for more information Section 2 EMC This equipment has been tested and found to comply with the limits for a Class B digital de...

Page 85: ...d with an energy saving device to conserve power when the machine is not in use The machine may be left on continuously Do Not Do These Never attempt any maintenance function that is not specifically...

Page 86: ...Garden City Herts AL7 1HE England Telephone 44 0 1707 353434 Section 7 Compliance Information Product Recycling Disposal USA Canada Xerox operates a worldwide equipment take back and reuse recycle pr...

Page 87: ...g devices such as batteries Special handling may apply please see http www dtsc ca gov hazardouswaste perchlorate European Union RoHS and WEEE Compliance This product is compliant with RoHS Regulation...

Page 88: ...iginal Postal Money Orders Bills Checks or Drafts of money drawn by or upon authorized officers of the United States Stamps and other representatives of value of whatever denomination which have been...

Page 89: ...thority in Canada or of a court of law 5 Proclamations orders regulations or appointments or notices thereof with intent to falsely cause same to purport to have been printed by the Queen s Printer fo...

Page 90: ...Copyright material or trademarks without the consent of the owner Postage stamps and other negotiable instruments Note This list is not inclusive and no liability is assumed for either its completene...

Page 91: ...86 Xerox Travel Scanner 100 User s Guide...

Page 92: ...ations 3 Configure Before Scan 24 32 35 58 cancel 34 Contrast 26 61 67 Copy button 24 Create copies of scanned documents 40 Create single image files 35 CSV file format 38 Custom page size 62 D Define...

Page 93: ...ormal 36 Normal PDF nPDF 38 O OCR options One Touch Mini Guide 14 36 38 39 42 46 OmniPage One Touch 14 OmniPage Pro 13 58 One Touch AutoLaunch 16 Button panel 20 21 icon 15 18 20 21 22 68 70 72 Instal...

Page 94: ...l destinations 39 Show Hardware 54 57 68 70 72 Show Progress Window 40 Simple Text 38 Size 27 Skew 27 61 Software 6 13 Software help 3 5 58 Standard page size 62 Sti event forwarding 39 Still Image Cl...

Page 95: ...Index 90 Xerox Travel Scanner 100 User s Guide...

Page 96: ...P N 05 0769 100...

Reviews: