background image

7

Location of the Stacker Serial Number

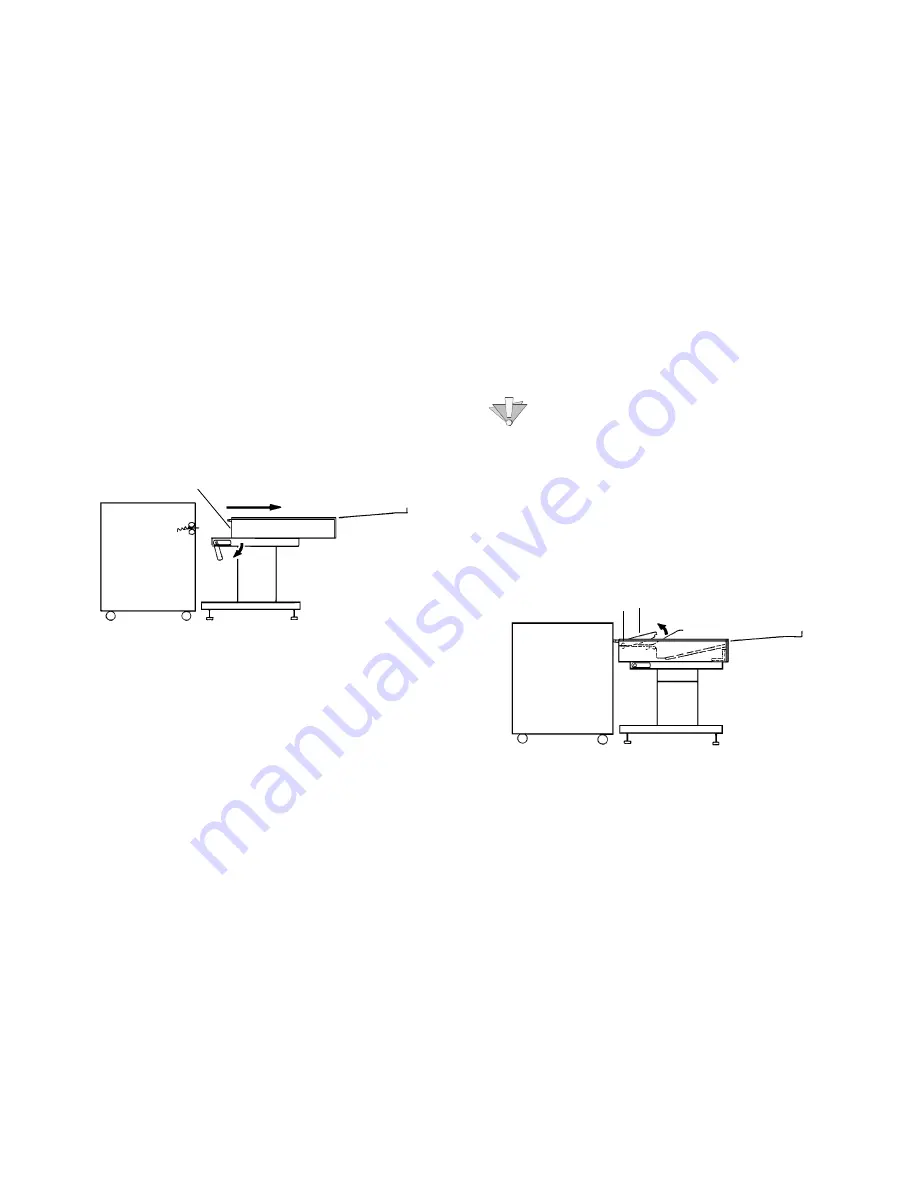
In order to locate the serial number of your stacker, you must first
push down the release lever and slide the stacker away from the
printer.

The serial number plate is located on the left of the front cover facing
the printer.

Stacker Operation

If you are running paper larger than a 24” (610mm) raise the paper
supports.

In order to turn on your stacker, press the power switch to the on
position.  When the stacker is on the green Power Indicator Light is
visible.

NOTE:  There is no start up sequence between the stacker and the
printer (either the stacker or the printer may be turned on first).


If

your stacker does not run, turn off both the printer and the stacker.
Turn on the stacker then turn on the printer.  If the stacker still does
not function, verify power source and then call for service.

Stacker Jam Clearance 

The paper fed from the printer will be either cut or uncut. 

Caution

To ensure the safety of the user, be aware during jam
clearance that the surface will be hot.

Cut

In order to clear a jam in the stacker, lift the Upper Panel Assembly
and clear any paper (Figure 2).  If the jam still exists, push down on
the release lever and move the stacker away from the printer (Figure
1).  Clear any visible paper from the paper path.

Uncut

Cut the paper in the printer (refer to the printer user guide) and follow
the above procedure.

NOTE;  The Transmission PWB and the Reception PWB are infrared
connections (See

 Identifying the Parts on the Stacker

).  To ensure

proper operation of the stacker, these connections must be debris
free.

Serial Number Plate

Caution Hot Label
Jam Clearance Label

Figure 1.  Sliding the Stacker away from the Printer.

Figure 2.  Lifting the Upper Panel Assembly.

Upper Panel Assembly

Summary of Contents for STACKER 8855/721P

Page 1: ...THE DOCUMENT COMPANY XEROX 8855 721P Stacker Operator Manual Xerox Wide Format Solutions 701P39432...

Page 2: ...80 Salt Road Webster New York 14580 Copyright 2003 by Xerox Corporation Allrights reserved XEROX and all product names and number names are trademarks of XEROX CORPORATION Other company trademarks are...

Page 3: ...gal 2 FCC Compliance 2 Introduction to your Stacker 3 Safety Notes 4 Identifying the Parts on the Stacker 6 Location of the Stacker Serial Number 7 Stacker Operation 7 Stacker Jam Clearance 7 Stacker...

Page 4: ...of the FCC rules These limits are designed to provide reasonable protection against harmful interference when the equipment is operated in a commercial environment This equipment generates uses and c...

Page 5: ...cate the Printer Serial Number refer to Printer User Guide Note All service calls should be reported under the printer serial number FOR SERVICE 1 800 822 2979 A Customer Service Support Representativ...

Page 6: ...u are unable to insert the plug into the outlet Never use a ground adapter plug to connect the copier to a power source receptacle that lacks a ground connection terminal THIS STACKER should be operat...

Page 7: ...exposed to rain or water If the stacker is producing unusual noises or odors If the stacker has fallen or the cabinet has been damaged The safety feature has been activated for a second time The stac...

Page 8: ...the Stacker Upper Panel Assembly Stacker Unit Media Supports Frame Assembly Release Handle Thumb Screws Inlet Power Indicator Light Power Switch Printed Wiring Board Transmission Printed Wiring Board...

Page 9: ...does not function verify power source and then call for service Stacker Jam Clearance The paper fed from the printer will be either cut or uncut Caution To ensure the safety of the user be aware durin...

Page 10: ...he weight of the stacker and be reasonably level The new location must be well ventilated and maintain an even temperature Extreme temperature or humidity changes can affect the stacker Power source r...

Page 11: ...49kg Paper Size 36 x 48 914mm x 1219mm Max Stacker Capacity 200 sheets of plain paper with minimal scatter 500 plain paper sheets Max Electrical Data Current service 3 Amps or more Power Supply 110V...

Reviews: