background image

8.4   

<Maintenance>

3

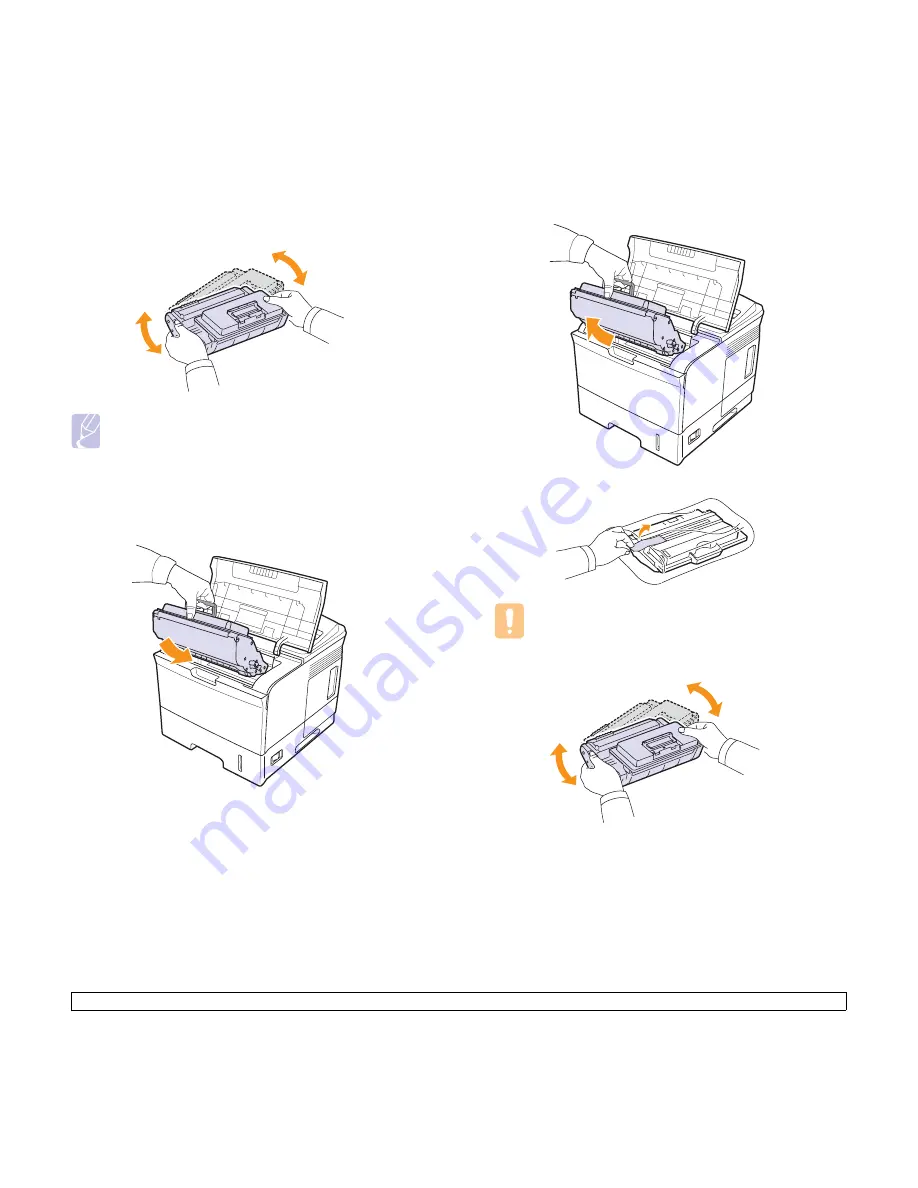
Thoroughly roll the cartridge 5 or 6 times to distribute the toner 
evenly inside the cartridge. 

Note

If toner gets on your clothing, wipe it off with a dry cloth and 
wash clothing in cold water. Hot water sets toner into fabric.

4

Hold the 

print cartridge

 by the handle and slowly insert the 

cartridge into the opening in the printer. 

5

Tabs on the sides of the cartridge and corresponding grooves 
within the printer will guide the cartridge into the correct position 
until it locks into place completely.

6

Close the 

top cover

. Make sure that the cover is securely closed.

Replacing the print cartridge

When the print cartridge is completely empty:

Toner Low


Replace Toner

 appears on the 

display

• The 

Status

 LED lights red.

At this stage, the 

print cartridge

 needs to be replaced. For order 

information for print cartridges, see page 7.1.

1

Open the 

top cover

.

2

Pull the 

print cartridge

 out.

3

Remove the new print cartridge from its bag.

Caution

Do not use sharp objects, such as a knife or scissors, to open 
the 

print cartridge

 package. They might scratch the drum of 

the cartridge.

4

Roll the cartridge 5 or 6 times to distribute the toner.

Thoroughly roll the cartridge to assure maximum copies per 
cartridge. Save the box and the plastic bag for shipping.

Summary of Contents for Phaser 3600

Page 1: ......

Page 2: ...Corporation Centronics is a trademark of Centronics Data Computer Corporation IBM and IBM PC are trademarks of International Business Machines Corporation PCL and PCL 6 are trademarks of Hewlett Packa...

Page 3: ...DN only Introduction 4 1 Supported operating systems 4 1 Configuring TCP IP 4 2 Configuring EtherTalk 4 2 Configuring IPX frame types 4 2 Setting Ethernet speed 4 3 Restoring the network configuratio...

Page 4: ...ting checklist 9 7 Understanding the Status LED 9 7 Understanding display messages 9 8 Print cartridge related messages 9 10 Solving general printing problems 9 11 Solving print quality problems 9 13...

Page 5: ...are no parts behind these covers that you can maintain or service Operational Safety Information Your Xerox equipment and supplies have been designed and tested to meet strict safety requirements Thes...

Page 6: ...interlock devices 9 Do not push objects into slots or openings on the machine Electrical shock or fire may result 10 Do not obstruct ventilation openings These openings are used to provide proper cool...

Page 7: ...r operation and maintenance Ozone Safety Information This product will produce ozone during normal operation The ozone produced is heavier than air and is dependent on copy volume Providing the correc...

Page 8: ...conditions and the following disclaimer 2 Redistributions in binary form must reproduce the above copyright notice this list of conditions and the following disclaimer in the documentation and or othe...

Page 9: ...orm must reproduce the above copyright notice this list of conditions and the following disclaimer in the documentation and or other materials provided with the distribution 3 All advertising material...

Page 10: ...useholds within EU member states may return used electrical and electronic equipment to designated collection facilities free of charge Please contact your local disposal authority for information In...

Page 11: ...ite www eiae org Perchlorate Material This product may contain one or more Perchlorate containing devices such as batteries Special handling may apply please see www dtsc ca gov hazardouswaste perchlo...

Page 12: ...document to create a book Once printed all you have to do is fold and staple the pages See the Software section Print Posters The text and pictures of each page of your document are magnified and prin...

Page 13: ...B 2 0 I I I Network Interface Ethernet 10 100 Base TX NA I I PostScript Emulation I I I Duplex printinga a Printing on both sides of paper O O I Printer overview Front view 1 output tray 7 optional tr...

Page 14: ...any time resume printing 2 Back Sends you back to the upper menu level 3 Status Shows the status of your printer See page 9 7 4 Menu Enters Menu mode and arrows through the available menus 5 LCD Displ...

Page 15: ...the user s guides in other languages from the Manual folder on the printer driver CD Printer Driver Help Provides you with help information on printer driver properties and instructions for setting u...

Page 16: ...tivity no key being pressed the printer automatically returns to Standby mode Note Print settings made from the printer driver on a connected computer override the settings on the control panel Note S...

Page 17: ...hows all of the fonts currently available in the selected language Item Explanation Release To print a protected page enter passcode for the page The page will be printed only when both user name and...

Page 18: ...Edge Long Edge in the Portrait orientation Long Edge in the Landscape orientation 2 5 3 2 5 3 2 5 3 2 5 3 Short Edge in the Landscape orientation Short Edge in the Portrait orientation Image Adjust I...

Page 19: ...3 Available only when optional tray is installed Values 1 999 Values A4 A5 A6 JIS B5 ISO B5 JIS B6 Letter Legal Executive No 10 Env Monarch Env DL Env C5 Env C6 Env US Folio Oficio Statement US Postc...

Page 20: ...that appears on the control panel display and information printing Power Save When the printer does not receive data for an extended period of time power consumption is automatically lowered You can s...

Page 21: ...cleaning sheet with toner debris on it Clean Fuser Cleans the fuser unit inside of the printer and produces a cleaning sheet with toner debris on it Supplies Life This item allows you to check how ma...

Page 22: ...uage Item Explanation Values Release All Delete Values Stop Continue Values cm inches Values Auto PCL PostScript EPSON IBM Values PCL PostScript EPSON IBM PCL This menu sets the PCL emulation configur...

Page 23: ...12 17 14 20 Network menu Phaser 3600 N Phaser 3600 DN only This menu lets you configure the network interface installed in your printer You can reset the network interface and print a configuration p...

Page 24: ...PP Internet Printing Protocol network connection Off You can disable the IPP On You can enable the IPP Item Explanation Values Auto 10M Half 10M Full 100M Half 100M Full Values Off On Values Off On Va...

Page 25: ...Printer software CD Windows Printer driver Use this driver to take full advantage of your printer s features Status Monitor Appears when printing errors occur Printer Settings Utility You can configu...

Page 26: ...tem meets the following requirements Windows Note Users who have administrator rights can install the software Mac OS Item Requirements Recommended Operating system Windows 2000 XP Vista 2003 CPU Wind...

Page 27: ...o remotely configure the printer settings and network parameters necessary for the printer to be connected to various network environments SetIP A utility program allowing you to select your network p...

Page 28: ...Up down arrow buttons until DHCP or BOOTP appears and press OK 4 Press Start Stop to return to Standby mode Configuring EtherTalk EtherTalk is AppleTalk used in an Ethernet network This protocol is wi...

Page 29: ...cures your network against unauthorized access by requiring authentication before network access and data transmission are allowed There are 3 mutually exclusive options for 802 1x authentication To u...

Page 30: ...2 Press the Up down arrow buttons until IPP appears and press OK 3 Press the Up down arrow buttons until On appears and press OK Configuring SLP Your printer can use SLP Service Location Protocol whi...

Page 31: ...should be appropriate for your project Size You can use any size media that fits easily within the paper guides of paper tray Weight Your printer supports print media weights as follows 60 to 105 g m2...

Page 32: ...6 7 mm 7 25 x 10 5 inches A5 148 5 x 210 mm 5 85 x 8 27 inches A6 105 x 148 5 mm 4 13 x 5 85 inches Statement 139 7 x 215 9 mm 5 5 x 8 5 inches US Postcard 88 9 x 139 7 mm 3 5 x 5 5 inches Index Card...

Page 33: ...heet at a time through tray 1 MPT to avoid paper jams To prevent print media such as transparencies and label sheets from sticking together remove them as they print out Guidelines for special print m...

Page 34: ...nents Do not run a sheet of labels through the printer more than once The adhesive backing is designed for only a single pass through the printer Do not use labels that are separating from the backing...

Page 35: ...loading 4 Load paper with the side to be printed on face down You can load letterhead paper with the design side face down The top edge of the sheet with the logo should be placed at the front of tray...

Page 36: ...single page printing on letterhead or colored paper To load paper in multi purpose tray 1 Pull tray1 MPT down towards you and pull tray1 MPT extension to hold longer paper 2 If you are using paper fle...

Page 37: ...ay Always load only the print media specified in page 5 1 to avoid paper jams and print quality problems Flatten any curl on postcards envelopes and labels before loading them into tray1 MPT When you...

Page 38: ...two output locations the rear cover face up and the output tray face down The printer sends output to the output tray by default To use the output tray make sure that the rear cover is closed Notes If...

Page 39: ...inting from tray1 MPT to the rear cover provides a straight paper path Using the rear cover might improve the output quality with special print media To use the rear cover open it by pulling down Caut...

Page 40: ...queue or print spooler such as the printer group in Windows delete the job as follows 1 Click the Windows Start button 2 For Windows 2000 select Settings and then Printers For Windows XP 2003 select P...

Page 41: ...19752 Part number Standard yield Approx 7 000 pages 106R01370 High yield Approx 14 000 pages 106R01371 Accessory Description Part number Optional tray If you are experiencing frequent paper supply pr...

Page 42: ...that can correct and prevent these types of problems Cleaning the outside of the printer Clean the cabinet of the printer with a soft lint free cloth You can dampen the cloth slightly with water but...

Page 43: ...Printing a cleaning sheet If you are experiencing blurred faded or smeared printouts you can clear the problem by printing a cleaning sheet provided by your printer You can print OPC Organic Photo Co...

Page 44: ...lity problems this can help you determine if the problem is caused by low toner 1 Press Menu until System Setup appears on the bottom line of the display press OK 2 Press the Up down arrow buttons unt...

Page 45: ...e top cover Make sure that the cover is securely closed Replacing the print cartridge When the print cartridge is completely empty Toner Low Replace Toner appears on the display The Status LED lights...

Page 46: ...er from the print cartridge 7 Hold the print cartridge by the handle and slowly insert the cartridge into the opening in the printer 8 Tabs on the sides of the cartridge and corresponding grooves with...

Page 47: ...ified number of pages or when the life span of each item has expired Items Yield Average Fuser unit Approx 150 000 pages Pick up roller Approx 150 000 pages Transfer rollera a Xerox highly recommends...

Page 48: ...ll firmly and evenly do not jerk the paper If the paper tears ensure that all fragments of paper are removed otherwise a jam will occur again When a paper jam occurs the Status LED lights red Open and...

Page 49: ...nto place Printing automatically resumes In optional tray 3 1 Pull optional tray 3 open 2 Remove the jammed paper from the printer If the paper does not move when you pull or if you do not see the pap...

Page 50: ...Carefully lift up the guide feed 3 Remove the jammed paper by gently pulling it straight out If you cannot find jammed paper or if there is any resistance removing the paper stop pulling and go to th...

Page 51: ...is caught in the feed rollers Then gently pull the paper straight out 5 Close the rear cover 6 Open and close the top cover The Printer will resume printing In the duplex unit area If the duplex unit...

Page 52: ...rear cover stopper and fully open the rear cover as shown 1 rear cover stopper 1 4 Push the pressure levers upwards 5 While pushing the fuser lever to the right open the fuser door 6 Pull the jammed...

Page 53: ...tly Do not overload the tray Ensure that the paper level is below the paper capacity mark on the inside wall of the tray Do not remove paper from tray while your printer is printing Flex fan and strai...

Page 54: ...ware application to ensure that you are using the proper printer driver and communication port If the page is interrupted during printing see page 9 11 If completing the checklist does not resolve the...

Page 55: ...The fuser door is not securely latched Open the rear cover and close the fuser door until it locks into place For the location of the fuser door see page 9 4 Fuser Fan Locked There is a problem with t...

Page 56: ...mplete your printing Ready The printer is on line and ready to printer Use your printer Remove Jam Open Close Door Paper has jammed in the fuser area Clear the jam Page 9 3 Self Diagnostics Temperatur...

Page 57: ...n temporarily reestablish printing operations Toner Low Replace Toner The toner in the cartridge has run out Install a new genuine print cartridge You can keep printing but the quality cannot be guara...

Page 58: ...indows printer setting to make sure that the print job is sent to the correct port If the computer has more than one port make sure that the printer is attached to the correct one The printer does not...

Page 59: ...Possible cause Suggested solutions The paper keeps jamming There is too much paper in tray Remove excess paper from tray If printing on special materials use tray 1 MPT An incorrect type of paper is...

Page 60: ...the print resolution setting is too light or toner save mode is on Adjust the print resolution and toner save mode in the printer properties See the Software Section A combination of faded or smeared...

Page 61: ...ibuted on the printed page The paper may be too damp Try printing with a different batch of paper Do not open packages of paper until necessary so that the paper does not absorb too much moisture If b...

Page 62: ...Cc AaBbCc Common Windows problems Note Refer to Microsoft Windows 2000 XP Vista 2003 User Guide that came with your PC for further information on Windows error messages Curl If the printed paper is cu...

Page 63: ...and switch to the Printers tab in Printers configuration window to look at the list of available printers Make sure that your machine is displayed on the list If not please invoke Add new printer wiz...

Page 64: ...em I encounter error Cannot open port device file when printing a document Please avoid changing print job parameters via LPR GUI for example while a print job is in progress Known versions of CUPS se...

Page 65: ...oving any internal accessories discharge static electricity from your body by touching something metal such as the metal back plate on any device plugged into a grounded power source If you walk round...

Page 66: ...To install the PostScript printer driver you need to select Custom and put a check mark on the PostScript printer driver See the Software Section 2 Click the Windows Start menu 3 For Windows 2000 sele...

Page 67: ...5 6 x 18 7 x 14 8 inches Phaser 3600 DN 396 x 509 x 375 mm 15 6 x 20 0 x 14 8 inches Operating environment Temperature 10 30 C 50 86 F Humidity 20 80 RH Printer language PCL 6d PostScript 3 IBM ProPri...

Page 68: ...location select 5 8 output tray 5 8 P paper guidelines 5 3 paper jam clear around the print cartridge 9 3 duplex area 9 4 In the paper feed area 9 1 optional tray 3 9 2 paper exit area 9 4 tray1 MPT...

Page 69: ...2 system requirements Mac OS 3 2 Windows 3 2 W Windows problems 9 15...

Page 70: ...Software section...

Page 71: ...Chapter 2 USING SETIP PHASER 3600 N PHASER 3600 DN ONLY Installing SetIP 11 Using SetIP 11 Chapter 3 BASIC PRINTING Printing a Document 12 Printing to a file PRN 13 Printer Settings 13 Layout Tab 14 P...

Page 72: ...What is an Overlay 23 Creating a New Page Overlay 23 Using a Page Overlay 23 Deleting a Page Overlay 23 Chapter 5 USING WINDOWS POSTSCRIPT DRIVER Printer Settings 24 Advanced 24 Using Help 24 Chapter...

Page 73: ...on 30 Configuring Printer Properties 30 Printing a Document 31 Printing from Applications 31 Printing Files 31 Chapter 9 USING YOUR PRINTER WITH A MACINTOSH Installing printer driver for Macintosh 32...

Page 74: ...his step and go to Installing Software for Network Printing on page 7 You can install the printer software using the typical or custom method NOTE If the New Hardware Wizard window appears during the...

Page 75: ...click Yes If not click No to reprint it 7 Click Finish NOTE After setup is complete if your printer driver doesn t work properly reinstall the printer driver See Reinstalling Printer Software on page...

Page 76: ...nted at the end of the installation The installation window that appears in this User s Guide may differ depending on the printer and interface in use 6 Select the components to be installed and click...

Page 77: ...rogram field and click Continue in the User Account Control window 3 Click Install Software 4 Select Typical installation for a network printer Click Next 5 The list of printers available on the netwo...

Page 78: ...ows Vista click Run Setup exe in Install or run program field and click Continue in the User Account Control window 3 Click Install Software 4 Select Custom installation Click Next 5 The list of print...

Page 79: ...change the printer name set the printer to be shared on the network set the printer as the default printer and change the port name of each printer Click Next To install this software on a server sel...

Page 80: ...nt to connect the printer at this time click Next and No on the following screen Then the installation will start and a test page will not be printed at the end of the installation The reinstallation...

Page 81: ...al 4 Click Next 5 Click Next 6 Click Finish Using SetIP 1 From the Windows Start menu select Programs or All Programs your printer driver name SetIP SetIP The program automatically detects and display...

Page 82: ...quired for printing from various Windows applications The exact steps for printing a document may vary depending on the application program you are using Refer to the User s Guide of your software app...

Page 83: ...epending on the printer in use If you access printer properties through the Printers folder you can view additional Windows based tabs refer to your Windows User s Guide and the Printer tab see Printe...

Page 84: ...Paper N Up Printing on page 19 For details see Printing Posters on page 20 Double sided Printing Double sided Printing allows you to print on both sides of paper If this option does not appear your p...

Page 85: ...Then select Tray n in the Source option and Multi Purpose Tray in the First Page option If this option does not appear your printer does not have this feature Scaling Printing Scaling Printing allows...

Page 86: ...ct output options for your document See Printing a Document on page 12 for more information about accessing the printer properties Click the Extras tab to access the following feature Watermark You ca...

Page 87: ...g If you set the passcode a specific file you must enter the passcode to print or delete the job 4 Troubleshooting Tab Click the Troubleshooting tab to access the following feature Printer Information...

Page 88: ...ected To delete a Favorites item select it from the list and click Delete You can also restore the printer driver s default settings by selecting Printer Default from the list Using Help Your printer...

Page 89: ...Printing Multiple Pages on One Sheet of Paper N Up Printing You can select the number of pages to print on a single sheet of paper To print more than one page per sheet the pages will be reduced in si...

Page 90: ...it easier to pasting the sheets together 4 Click the Paper tab select the paper source size and type 5 Click OK and print the document You can complete the poster by pasting the sheets together 0 15...

Page 91: ...t the document NOTE If your printer does not have a duplex unit you should complete the printing job manually The printer prints every other page of the document first After printing the first side of...

Page 92: ...message displays in the preview window When the First Page Only box is checked the watermark prints on the first page only 4 Select watermark options You can select the font name style size or graysca...

Page 93: ...T Dear ABC Regards WORLD BEST Using a Page Overlay After an overlay has been created it is ready to be printed with your document To print an overlay with a document 1 Create or open the document you...

Page 94: ...ows applications will override settings you specify in the printer driver Change all print settings available in the software application first and change any remaining settings using the printer driv...

Page 95: ...ettings Utility click Opening the Troubleshooting Guide Using the troubleshooting guide you can view solutions for error status problems Double click the Status Monitor icon on the Windows task bar Or...

Page 96: ...ROM Setting Up a Host Computer 1 Start Windows 2 From the Start menu select Printers and Faxes 3 Double click your printer driver icon 4 From the Printer menu select Sharing 5 Check the Share this pr...

Page 97: ...es Installing the Unified Linux Driver Installing the Unified Linux Driver 1 Make sure that you connect your machine to your computer Turn both the computer and the machine on 2 When the Administrator...

Page 98: ...to uninstall the driver follow the installation instruction above but type root localhost Linux uninstall sh on the terminal screen Uninstalling the Unified Linux Driver 1 When the Administrator Logi...

Page 99: ...igurator Printers Configuration button Scanners Configuration button Ports Configuration button Printers Configuration Printers configuration has the two tabs Printers and Classes Printers Tab You can...

Page 100: ...en the Unified Driver Configurator If necessary switch to Printers configuration 2 Select your machine on the available printers list and click Properties 3 The Printer Properties window opens The fol...

Page 101: ...es files such as color options image size or image position Device allows you to set the print resolution paper source and destination 5 Click Apply to apply the changes and close the Properties windo...

Page 102: ...e 2 Turn on your computer and the machine 3 Insert the PostScript driver CD ROM which came with your machine into the CD ROM drive 4 Double click CD ROM icon that appears on your Macintosh desktop 5 D...

Page 103: ...ter Model and your printer name in Model Name For MAC OS 10 4 if Auto Select does not work properly select Xerox in Print Using and your printer name in Model For MAC OS 10 5 if Auto Select does not w...

Page 104: ...nfigure the size of memory 6 Select Apply Change Printing NOTES The Macintosh printer s properties window that appears in this User s Guide may differ depending on the printer in use However the compo...

Page 105: ...etting The Job Setting tab provides options to select print mode Select Job Setting from the drop down list to access the following features Secure Print You can use this feature to print your documen...

Page 106: ...ding on your printer model You can select the printing resolution The higher the setting the sharper the clarity of printed characters and graphics The higher setting also may increase the time it tak...

Page 107: ...from Two Sided Printing option 4 Click Print and the printer prints on both sides of the paper CAUTION If you have selected duplex printing and then try to print multiple copies of a document the prin...

Page 108: ...orientation print 31 Windows 14 overlay create 23 delete 23 print 23 P Paper properties set 14 paper size set 14 print 31 paper source set 31 Windows 15 paper type set Macintosh 36 print 31 poster pri...

Page 109: ...true type option 15 software install Macintosh 32 Windows 4 11 reinstall Windows 10 system requirements Macintosh 32 uninstall Macintosh 32 Windows 10 status monitor use 25 T toner save set 15 36 U u...

Reviews: