background image

T h e   R e m o t e   C o n t r o l   P a n e l   ( R C P )

5-6


  D o c u P r i n t   4 5 0 8   U s e r   G u i d e

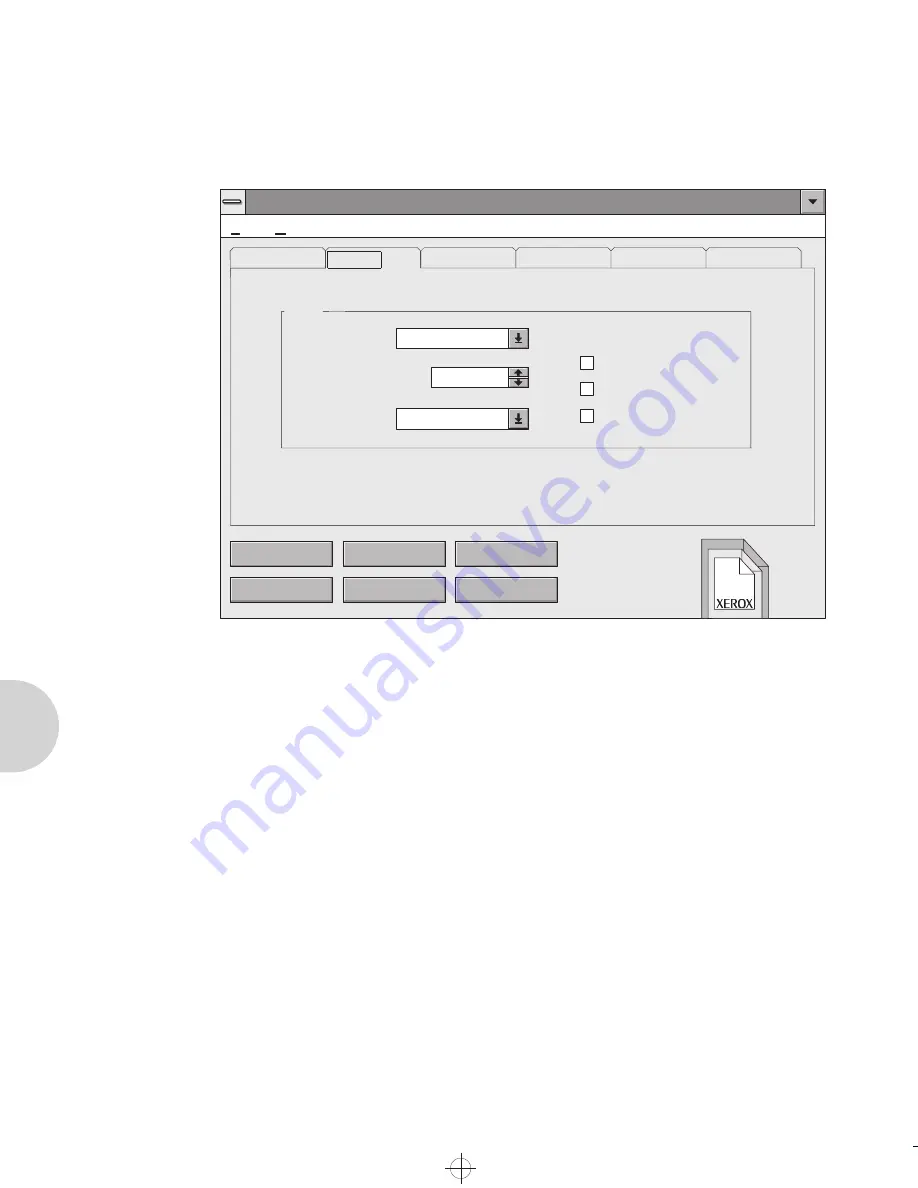
Printer Setup

Emulation

Current emulation in use. 

Paper  Jam  Recovery

When On, maintains print job in memory and reprints 

after paper jam is cleared. The default value is OFF.

Power Save

If it is not OFF, printer goes to the power save mode 

according to the indicated/selected time. In the power 

save mode, the power consumption is under 10 watts. The 

default value is 30 minutes

Printer  Timeout

Sets the printer value for how long to wait for data to print 

from the current interface before accepting data through 

Remote Control Panel : PCL 5e

File

Help

Form Feed

Send

Status Monitor

Default

Exit

Reset

Total View

Printer:

Baud Rate:

Emulation:     PCL 5e

Auto Continue

Paper Jam Recovery

Robust XON

Power Save:

Printer Timeout:

Printer

Font

Page

Quality

Test

9600

30 Minutes

20

x

x

T

HE

D

OCUMENT

C

OMPANY

4508-c05.frm  Page 6  Wednesday, May 22, 1996  7:09 AM

Summary of Contents for DocuPrint 4508

Page 1: ...The Xerox DocuPrint 4508 Desktop Laser Printer User Guide 4508 tle frm Page 1 Wednesday May 22 1996 6 22 AM...

Page 2: ...ks of Hewlett Packard Company IBM is a trademark of International Business Machines Corporation Microsoft Microsoft Windows Microsoft Word MS and MS DOS are trademarks of Microsoft Corporation Univers...

Page 3: ...inter Set up 2 3 Unpacking the Printer 2 4 Installing Components 2 6 Testing the Printer 2 10 Installing Software 2 11 Testing the Connection 2 12 Chapter 3 Using the Front Control Panel 3 1 Overview...

Page 4: ...ages 6 2 Remote Control Panel and Status Monitor Messages 6 4 Clearing Paper Jams 6 8 Solving Print Quality Problems 6 13 Chapter 7 Maintenance 7 1 Overview 7 2 Printer Cartridge 7 2 Adjusting the Pri...

Page 5: ...dering Information C 1 Appendix D Print Media Specifications D 1 Paper and Envelope Sizes Supported D 2 Paper Specifications D 3 Envelope Specifications D 3 Adhesive Label Specifications D 4 Appendix...

Page 6: ...iv D o c u P r i n t 4 5 0 8 U s e r G u i d e 4508 toc Page iv Thursday June 6 1996 12 01 PM...

Page 7: ...Chapter 1 C h a p t e r 1 O v e r v i e w o f t h e P r i n t e r 1 1 Overview of the Printer C h a p t e r 1 Overview of the Printer Features 1 3 4508 c01 frm Page 1 Wednesday May 22 1996 6 37 AM...

Page 8: ...aper cassette upgradeable to 500 with paper tray option which accommodates variable sizes of paper including A4 Letter Executive B5 Folio and Legal paper Top output tray with a 125 sheet capacity face...

Page 9: ...proofs and internal correspondence there are four EconoModes 1 2 1 4 1 6 1 8 This feature can be selected using the Remote Control Panel on your PC For more information refer to The Remote Control Pa...

Page 10: ...llel Interface Parallel interface for high speed two way communication between the printer and the host computer enables you to change printer settings and view printer status messages on your compute...

Page 11: ...ation 2 3 Environment 2 4 Safety Precautions 2 4 Unpacking the Printer 2 4 Installing Components 2 6 Printer Cartridge 2 6 Paper Tray 2 8 Interface Cable 2 9 Power Cord 2 9 Testing the Printer 2 10 In...

Page 12: ...ew In this chapter you will learn how to install the printer You will also learn how to handle the Printer Cartridge and paper tray Please read and perform all the steps in this chapter before you att...

Page 13: ...clearance around the printer to allow air circulation around the vents to prevent the printer from overheating and also allow you to easily Open the top door Open the rear door to remove any jammed p...

Page 14: ...lace any objects on top of the printer Unpacking the Printer 1 Set the box on a sturdy flat smooth surface Remove the Open Me First envelope from the box 2 Remove the User Guide Power Cord and Diskett...

Page 15: ...contents If any of the following package contents are missing or damaged contact your dealer distributor Rank Xerox or Xerox User Guide Power Cord Diskettes Printer Cartridge Figure 2 2 Shipping cont...

Page 16: ...rtridge will be packaged separately Remove the protective materials sponge vinyl sheet label tape and plastic strip shake it several times and slide it back into the printer Caution Always grasp the P...

Page 17: ...move the entire strip of clear sealing tape 4 Shake the Printer Cartridge several times 5 Insert the Printer Cartridge With one hand hold the Printer Cartridge by the top middle do not grasp the Print...

Page 18: ...ading the Paper Tray in Chapter 4 for details of adjusting the tray guide 3 Load up to 250 sheets of paper Place the paper by the rear guide first Secure the corner of the paper stack under the metal...

Page 19: ...nsumption when it is not in active use Plug the power cord into a 3 wire grounded power socket The printer will power on and the READY LED will illuminate If the READY LED does not illuminate see Chap...

Page 20: ...the Control Panel key for four seconds 2 Self Test sheets will be printed one PCL 5e Configuration sheet and two PCL 5e Font List sheets Configuration Sheet Provides all printer setup parameters Font...

Page 21: ...e Installation Diskette into the disk drive of your computer 2 In the Program Manager click on File then click on Run and type a setup or b setup Then click OK 3 Follow the instructions on the screen...

Page 22: ...inter and the computer 5 Insert the Xerox DocuPrint 4508 Software Installation Diskette disk in your disk drive 6 Create a directory in which to place the DOS software for example DOSUTIL and switch t...

Page 23: ...n t r o l P a n e l 3 1 Using the Front Control Panel C h a p t e r 3 Overview 3 2 Front Panel Key and LED Functions 3 3 Key Functions 3 3 LEDs 3 4 Resetting the Printer 3 6 Printing the Self Test Pag...

Page 24: ...LEDs and one Front Panel key The LEDs indicate the printer s status The Status Monitor utility displays more detailed information about the printer s status on your computer s screen Figure 3 1 Front...

Page 25: ...hen the printer is on line and all the other LEDs are off hold down the key for four seconds until all LEDs are blinking Three Self Test sheets will be printed Form Feed When the printer is on line an...

Page 26: ...uminated Off The current paper source is universal paper tray Blinking When manual feed is selected and there is some data to print this LED blinks for the following two cases Auto Continue ON Blinks...

Page 27: ...to continue or wait time out Recoverable error Overrun error or memory overflow error In this case you may need to install optional printer memory On There is a paper jam with ERROR LED on Blinking Th...

Page 28: ...ring permanent fonts and macros Printing the Self Test Pages You can view the printer s status information and available fonts through the Self Test Page This function is only available when the print...

Page 29: ...verview 4 2 Using the Paper Tray 4 2 Paper Sizes Supported 4 2 Adjusting and Loading the Paper Tray 4 6 Using Manual Feed 4 7 When to Use Manual feed 4 7 Setting Up the Software 4 7 Selecting the Corr...

Page 30: ...Tray Paper Sizes Supported Since the paper tray is adjustable it can hold up to 250 sheets of Executive Letter A4 B5 Folio or Legal sized paper To achieve the best print quality and to avoid paper ja...

Page 31: ...d paper size marker to adjust the side guide While pressing the side guide tab push the side guide forward towards the center of the tray until the tab hole of the selected paper size is positioned to...

Page 32: ...rear guide there are four positions three positions in the center of the rear and one position on the side of the rear If you are using A4 size paper place the rear guide in the side position Otherwis...

Page 33: ...adjust the extension guide at all If you need to use legal or folio sized paper perform the following adjustment While pressing the two tabs at the rear center of the paper tray pull the extension gu...

Page 34: ...Legal Folio Rear guide Letter Exec B5 A4 When letterhead is used load the paper face down with the top edge towards the front of the paper tray 3 Secure the corner of the paper stack under the metal...

Page 35: ...media that require the manual feed Envelopes Adhesive Labels Heavy or special paper such as a single sheet of letterhead paper Odd sized paper Transparencies Setting Up the Software To print in manua...

Page 36: ...er path rear paper path cover closed for normal paper Use the faceup paper path rear paper path cover open for envelopes transparencies labels odd sized paper and heavier paper 2 To prevent a paper ja...

Page 37: ...til you feel resistance on the left corner 3 Leave the other end of the paper resting on the table Manual feeding of materials such as C5 envelopes will require you to physically support the trailing...

Page 38: ...when the first page of your job is different from the rest Example Printing multiple page letters where first page is letterhead paper 1 Fill the paper tray with plain paper 2 While aligning the pape...

Page 39: ...re Tools C h a p t e r 5 Status Monitor and Remote Control Panel RCP 5 2 The Status Monitor 5 3 The Remote Control Panel RCP 5 4 Remote Control Panel for Windows 5 4 Remote Control Panel for DOS 5 14...

Page 40: ...Control Panel for Windows Figure 5 1 Status Monitor and Remote Control Panel for Windows Remote Control Panel PCL 5e File Help Form Feed Send Status Monitor Default Exit Reset Total View Printer Page...

Page 41: ...tatus Monitor double click the Status Monitor icon This will start a background program running which will display error conditions By double clicking the Status Monitor icon in the bottom left corner...

Page 42: ...lick on the Remote Control Panel icon Description of menu items Send Key When a change is made in the RCP the user must select the Send Key to change the printer s configuration Default Key Reset all...

Page 43: ...inter Page Font Quality Emulation PCL 5e Baud Rate 9600 Paper Jam Recovery Paper Size LETTER Paper Feed AUTO Symbol Set Roman 8 Typeface Courier SWC Upright Medium Density MEDIUM Auto Continue ON Time...

Page 44: ...d time In the power save mode the power consumption is under 10 watts The default value is 30 minutes Printer Timeout Sets the printer value for how long to wait for data to print from the current int...

Page 45: ...ithout paper in the manual feed slot but the paper source is set to manual feed If Auto Continue is ON the printer picks up the paper from the tray after ten seconds If Auto Continue is OFF the printe...

Page 46: ...an envelope you must insert paper into the manual feed slot and select Thick Paper Lines Per Page Sets the number of lines on the page The default value is 60 when the paper size is LETTER and 64 whe...

Page 47: ...5 9 Paper Size It sets the size of the image that will print on paper and envelope The default value is LETTER for 115V printers and A4 for 220V printers Orientation It determines the direction of th...

Page 48: ...The default value is 12 00 Remote Control Panel PCL 5e File Help Form Feed Send Status Monitor Default Exit Reset Total View Symbol Set Typeface Printer Font Page Quality Test 10 00 Pitch 12 00 Point...

Page 49: ...the current font The default value is Courier SWC Upright Medium Caution All items can be adjusted automatically according to the item you have changed Pitch and Point Size will be ignored or have no...

Page 50: ...rint The default value is off which denotes true 600 x 600 dpi resolution Note There are four EconoMode settings that enable toner conservation 1 8 1 6 1 4 1 2 when printing proofs drafts etc Remote C...

Page 51: ...rints the current available font list of the printer Demo List Prints the demonstration page which lists the main features of this printer Remote Control Panel PCL 5e File Help Form Feed Send Status M...

Page 52: ...s an example of the Remote Control Panel for DOS File FILE Save and open RCP file and communicate with printer Settings source D WBFONT DOSRCP SETTINGS DCP DocuPrint 4508 REMOTE CONTROL PANEL c 1995 C...

Page 53: ...accepted DOS4508 XX The XX parameter value has three meanings 0 deinstalls the Status Monitor TSR 1 98 is the polling time period in seconds 99 disables polling The Status Monitor for DOS is a TSR pro...

Page 54: ...5 16 D o c u P r i n t 4 5 0 8 U s e r G u i d e 4508 c05 frm Page 16 Wednesday May 22 1996 7 09 AM...

Page 55: ...tatus Monitor Messages 6 4 Clearing Paper Jams 6 8 Paper Jam Causes 6 8 First Action 6 9 Checking the Paper Feed Area 6 10 If the Paper has Gone Completely into the Printer 6 11 If the Paper is Jammed...

Page 56: ...r cover is open Close printer cover Printer Cartridge is not in printer Install Printer Cartridge into printer If problem persists contact your dealer or Xerox Rank Xerox for technical support ERROR P...

Page 57: ...UAL READY LED ON Blinking Manual feed slot is current paper source for feeding Auto Continue is set to OFF and there is processed data ready to be printed Insert a sheet of paper into manual feed slot...

Page 58: ...Remote Control Panel does not allow configuring of the printer when the RS232C Serial Interface Option is installed and the parallel interface is not connected Table 6 2 RCP and SM messages Message Co...

Page 59: ...ve data from the computer to process and is out of available memory Add additional printer memory SIMM You may have tried to transfer too many soft fonts or graphic image may be too complex Decrease p...

Page 60: ...ge 6 8 The paper jam sensors are stuck or worn Check for obstructions in paper path The paper tray was removed while a job was printing Do not remove paper tray during printing process If problem pers...

Page 61: ...is not communicating with the PC host Verify the parallel interface is connected to the correct PC host Verify the PC host is using the parallel port to establish communications If problem persists c...

Page 62: ...hile a job is printing Filling the tray too full Not securing the paper stack under the metal corner of the paper tray Using paper that is too coarse or too smooth Using damaged or used paper Storing...

Page 63: ...pressing the door release button on the right side of the printer then close it again In most cases this will clear the paper jam by feeding the jammed paper out of the printer If this doesn t solve t...

Page 64: ...release it from the feed roller Then pull the paper straight out If the paper has gone completely into the printer see the next page If the previous step clears the jam replace the paper tray and the...

Page 65: ...the print quality Remove paper horizontally If it is too difficult to remove the paper open the printer s rear access door and pull the paper straight out toward you Replace the paper tray and the Pri...

Page 66: ...Rear of the Printer Open the rear access door Pull out the paper Remember to close the rear access door again Figure 6 6 Clearing paper jams Note If the paper jam light continues to be lit open and cl...

Page 67: ...rinter page is blank with no visible print If just installed the Printer Cartridge insert tape may still be in place Remove the tape insert Defective Printer Cartridge or low on toner Replace Printer...

Page 68: ...artridge Defective paper stock creases folds etc Replace paper stock Defective Printer Cartridge or the Printer Cartridge is at its end of life Replace Printer Cartridge Horizontal line deletions Loca...

Page 69: ...replacing the Printer Cartridge Unfused or partially fused image The printed image is not fully fused to the paper and easily rubs off Damp paper stock Replace paper stock Heavy or unusual paper stock...

Page 70: ...he Printer Cartridge cleaning procedure discussed below before replacing the Printer Cartridge 1 Power ON the Printer and allow the READY LED to light and stay lit 2 Press and hold down on the Front P...

Page 71: ...e 7 1 Maintenance C h a p t e r 7 Overview 7 2 Printer Cartridge 7 2 Replacing the Printer Cartridge 7 2 Adjusting the Print Density 7 4 Print Density 7 4 EconoMode 7 4 Cleaning the Printer 7 5 4508...

Page 72: ...the Printer Cartridge Refer to the following steps for Printer Cartridge replacement 1 Press the top door release button to open the top door Remove the old Printer Cartridge 2 Remove the new Printer...

Page 73: ...iscard the tape shake the Printer Cartridge side to side to distribute the toner evenly inside the cartridge 4 Insert the Printer Cartridge With one hand hold the Printer Cartridge by the top middle d...

Page 74: ...setting is the factory default EconoMode With one Printer Cartridge you can print up to 6000 sheets of normal documents 5 coverage You can extend the life of your Printer Cartridge even further by uti...

Page 75: ...from its power source Figure 7 1 Cleaning the printer 1 Clean the outside of the printer with a slightly damp cloth Use water only Do NOT use ammonia based cleaners on or around your printer 2 Clean...

Page 76: ...7 6 D o c u P r i n t 4 5 0 8 U s e r G u i d e 4508 c07 frm Page 6 Wednesday May 22 1996 7 47 AM...

Page 77: ...C h a p t e r 8 F o n t s 8 1 Fonts C h a p t e r 8 Definition of Fonts 8 2 Internal and Soft Fonts 8 4 Internal Fonts 8 4 Soft Fonts 8 4 Selecting Fonts 8 5 4508 c08 frm Page 1 Wednesday May 22 1996...

Page 78: ...s in a font Spacing The character width Fixed pitch font characters have the same width The width of a proportional font character is variable Pitch The number of characters that can be printed in one...

Page 79: ...Orientation The position of the logical page with respect to the physical page Figure 8 2 Examples of orientation X ABCD Physical Page Portrait Physical Page Landscape 0 0 ABCD Y X ABCD 0 0 Physical P...

Page 80: ...om portrait to landscape depending on the page orientation When the printer is ON LINE and the READY LED is on you can print the list of currently available fonts for the printer by depressing the key...

Page 81: ...hrough the software program or by using the Remote Control Panel program The factory default font is Courier 12 point 10 pitch portrait orientation upright medium weight font with the Roman8 symbol se...

Page 82: ...8 6 D o c u P r i n t 4 5 0 8 U s e r G u i d e 4508 c08 frm Page 6 Wednesday May 22 1996 7 52 AM...

Page 83: ...A p p e n d i x A P r i n t e r C o m m a n d s A 1 Printer Commands A p p e n d i x A PCL Printer Commands A 2 HP GL 2 Printer Commands A 14 PJL Commands A 17 4508 apa frm Page 1 Wednesday May 22 19...

Page 84: ...08 049 072 104 1B 26 6C 31 48 68 Manual Feed E C l2H h 027 038 108 050 072 104 1B 26 6C 32 48 68 Manual Envelope Feed E C l3H h 027 038 108 051 072 104 1B 26 6C 33 48 68 Optional Paper Tray Lower E C...

Page 85: ...26 6C 31 4C 6C Horizontal Column Spacing Horizontal Motion Index HMI of 1 120 Increments E C k H h 027 038 107 072 104 1B 26 6B 48 68 Vertical Line Spacing Vertical Motion Index VMI of 1 48 Increment...

Page 86: ...B 32 47 67 CR CR LF LF CR LF FF CR FF E C k3G g 027 038 107 051 071 103 1B 26 6B 33 47 67 Push Pop Position Push Pop Position Push E C f0S s 027 038 102 048 083 115 1B 26 66 30 53 73 Pop E C f1S s 027...

Page 87: ...048 083 1B 28 30 53 ISO 17 Spanish E C 2S 027 040 050 083 1B 28 32 53 Windows 3 1 Latin 5 E C 5T 027 040 053 084 1B 28 35 54 PC Turkish E C 9T 027 040 057 084 1B 28 39 54 ISO 6 ASCII E C 0U 027 040 0...

Page 88: ...040 115 048 083 115 1B 28 73 30 53 73 Italic E C s1S s 027 040 115 049 083 115 1B 28 73 31 53 73 Condensed E C s4S s 027 040 115 052 083 115 1B 28 73 34 53 73 Condensed Italic E C s5S s 027 040 115 05...

Page 89: ...115 055 066 98 1B 28 73 37 42 62 Primary Typeface Family Typeface Family Albertus E C s4362T t 027 040 115 052 051 054 050 084 116 1B 28 73 34 33 36 32 54 74 Antique Olive E C s4168T t 027 040 115 052...

Page 90: ...temporary E C c6F f 027 042 099 054 070 102 1B 2A 63 36 46 66 Soft Symbol Set Management Creation Set Symbol Set ID E C c R r 027 042 099 082 114 1B 2A 63 52 72 Define Symbol Set of Bytes E C f W Data...

Page 91: ...a 027 042 114 048 065 97 1B 2A 72 30 41 61 Current Cursor E C r1A a 027 042 114 049 065 97 1B 2A 72 31 41 61 Raster Y Offset of Raster Lines of vertical movement E C b Y y 027 042 098 089 121 1B 2A 6...

Page 92: ...gle Dimensions Rectangle Width Horizontal Size of dots E C c A a 027 042 099 065 97 1B 2A 63 41 61 of decipoints E C c H h 027 042 099 072 104 1B 2A 63 48 68 Rectangle Height Vertical Size of dots E C...

Page 93: ...es E C c4G g 027 042 099 052 071 103 1B 2A 63 34 47 67 5 Square Grid E C c5G g 027 042 099 053 071 103 1B 2A 63 35 47 67 6 Diagonal Grid E C c6G g 027 042 099 054 071 103 1B 2A 63 36 47 67 USER DEFINE...

Page 94: ...4 116 1B 2A 73 30 54 74 Currently Selected E C s1T t 027 042 115 049 084 116 1B 2A 73 31 54 74 All Locations E C s2T t 027 042 115 050 084 116 1B 2A 73 32 54 74 Internal E C s3T t 027 042 115 051 084...

Page 95: ...41 Enter HP GL 2 Mode Use Previous HP GL 2 pen position E C 0B 027 037 048 066 1B 25 30 42 Use current PCL cursor position E C 1B 027 037 049 066 1B 25 31 42 HP GL 2 Plot Horizontal Size Horizontal s...

Page 96: ...arameters in brackets are optional Arc Absolute AA x_center y_center sweep_angle chord_angle Arc Relative AR x_increment y_increment sweep angle chord_angle Absolute Arc Three Point AT x_inter y_inter...

Page 97: ...IR p1x p1y p2x p2y Default Values DF None Initialize IN n Rotate Coordinate System RO angle Comment CO text text CHARACTER GROUP Parameters in brackets are optional Select Standard Font SS Select Alte...

Page 98: ...h PW width pen Pen Width Unit Selection WU type Select Pen SP pen required 1 for black recommended or 0 for white Symbol Mode SM char Fill Type FT fill_type option1 option2 Anchor Corner AC x_coordina...

Page 99: ...specified category of printer information such as printer model number printer memory available configuration status environment variables and unsolicited status variables ID MEMORY VARIABLES ENGINE...

Page 100: ...A 18 D o c u P r i n t 4 5 0 8 U s e r G u i d e 4508 apa frm Page 18 Wednesday May 22 1996 8 25 AM...

Page 101: ...B RS232C Serial Interface Option Installation B 2 Serial Interface Specifications B 2 Installing the RS232C Serial Option B 3 SIMM Memory Module Installation B 6 Available SIMM Options B 6 Installing...

Page 102: ...erial transmission is fixed at 8 data bits 1 stop bit and no parity The flow control can be either of the following DTR signal hardware handshake XON XOFF software handshake Apart from the XON XOFF fl...

Page 103: ...ng the RS232C Serial Option 1 Remove the power cord from the printer power receptacle 2 Remove the panel cover on the right side by pushing the latch down and pulling it out and up 3 Remove the screw...

Page 104: ...tor and tilt the SIMM to the left Pull the SIMM board away from the controller and out of the printer 6 Unscrew the three screws securing the system controller board and discard the metal plate 7 Slid...

Page 105: ...al pinout configuration for the printer 11 With the Serial Interface Setup in the Remote Control Panel select the appropriate serial transmission speed for your application Confirm serial option setup...

Page 106: ...age Available SIMM Options The system controller board contains one SIMM slot dedicated to increase the printer memory There are four available SIMM options you can choose from to increase the printer...

Page 107: ...g the SIMM Module 1 Remove the power cord from the printer power receptacle 2 Remove the panel cover on the right side by pushing the latch down and pulling it out and up 3 Remove the screw and the me...

Page 108: ...the module into the back of the slot to fully seat it B Rotate the module to the right until the clips on the edges of the slot snap into place you will feel and hear a click 6 Reverse order to reinst...

Page 109: ...Lower Base Installation 1 Remove the power cord from the printer power receptacle 2 Press the top door release button to open the top door 3 Remove the Printer Cartridge from the printer and close th...

Page 110: ...e printer and place it on top of the Lower Base as shown Verify that the printer is properly aligned to the Lower Base 6 Reinstall the main paper tray 7 Press the top door release button to open the t...

Page 111: ...t i o n A p p e n d i x B O p t i o n s I n s t a l l a t i o n B 11 9 Reinstall the power cord 10 Print the three Self Test Sheets Verify that the Lower Base is identified on the Configuration Sheet...

Page 112: ...B 12 D o c u P r i n t 4 5 0 8 U s e r G u i d e 4508 apb frm Page 12 Wednesday May 22 1996 8 30 AM...

Page 113: ...Appendix C A p p e n d i x C O r d e r i n g I n f o r m a t i o n C 1 Ordering Information A p p e n d i x C...

Page 114: ...configuration 97K26500 2 MB SIMM 97K15280 4 MB SIMM 97K15300 16 MB SIMM 97K22330 32 MB SIMM 97K26350 Serial Port To install refer to the installation instructions packaged with the option 97K26360 25...

Page 115: ...p e c i f i c a t i o n s D 1 Print Media Specifications A p p e n d i x D Paper and Envelope Sizes Supported D 2 Paper Specifications D 3 Envelope Specifications D 3 Adhesive Label Specifications D 4...

Page 116: ...Paper Letter Tray and Manual Feed 8 5 x 11 inches 216 x 279 mm Paper Legal Tray and Manual Feed 8 5 x 14 inches 216 x 356 mm Paper Executive Tray and Manual Feed 7 25 x 10 5 inches 184 x 267 mm Paper...

Page 117: ...C for 0 1 second without deterioration Do not use paper with a colored coating that was added after the paper was produced Preprinted forms must be printed with non flammable heat resistant inks that...

Page 118: ...st be compatible with the temperatures and pressure of the fusing process and must be coated for easy release of the top sheet The adhesives must be stable at the 392 F 200 C temperatures encountered...

Page 119: ...Appendix E A p p e n d i x E P r i n t e r T e c h n i c a l S p e c i f i c a t i o n s E 1 Printer Technical Specifications A p p e n d i x E 4508 ape frm Page 1 Wednesday May 22 1996 8 35 AM...

Page 120: ...ible Printer Status Display Controls On screen printer set up and status for DOS OS 2 Windows 3 1 Operating Panel 1 Key 4 LEDs PCL 5e Drivers Paper Handling Input 250 sheets universal cassette with 20...

Page 121: ...ter Cartridge 6000 pages 5 coverage per kit Toner saving EconoMode to extend the toner life Warm Up Time Up to 20 seconds at 25 C 77 F room temperature Operating Environment Temperature 50 to 90 F 10...

Page 122: ...E 4 D o c u P r i n t 4 5 0 8 U s e r G u i d e Communication Interfaces Parallel IEEE 1284 Nibble Byte ECP Serial Optional RS232C AIS Auto Interface Switching Memory Standard 2 MB Optional 2 4 16 32...

Page 123: ...Appendix F A p p e n d i x F E n v i r o n m e n t a l S p e c i f i c a t i o n s F 1 Environmental Specifications A p p e n d i x F 4508 apf frm Page 1 Wednesday May 22 1996 8 38 AM...

Page 124: ...has been tested and found to comply with the limits for a Class B digital device pursuant to Part 15 of the FCC Rules These limits are designed to provide reasonable protection against harmful interf...

Page 125: ...from your Rank Xerox representative WARNING In order to allow this equipment to operate in proximity to Industrial Scientific and Medical ISM equipment the external radiation from ISM equipment may ha...

Page 126: ...d into the ventilation openings Never operate the equipment if you notice unusual noises or odors Disconnect the power cord from the power source receptacle and contact your dealer or Xerox Rank Xerox...

Page 127: ...ctions laser danger labels may be visible These labels are for your dealer or service technician and are placed on or near panels or shields which require a tool for removal THESE PANELS ARE NOT TO BE...

Page 128: ...t or relocate the receiving antenna Increase the distance between the equipment and the receiver Connect the equipment into an outlet on a circuit different from that to which the receiver is connecte...

Page 129: ...adiation performance standard 21 CFR subchapter J Since radiation emitted inside this printer is completely confined within protective housings and external covers the laser beam cannot escape during...

Page 130: ...etting The energy star emblem does not represent EPA endorsement of any product or service Ozone Emission UL Standards for Ozone A standard for ozone emissions has been established by Underwriters Lab...

Page 131: ...Appendix G A p p e n d i x G G l o s s a r y G 1 Glossary A p p e n d i x G 4508 apg frm Page 1 Wednesday May 22 1996 8 45 AM...

Page 132: ...and receive messages using the standard telephone handset as the coupling to the phone line Active file A file that is being used in which entries or references are made on a current basis Alert Mess...

Page 133: ...of printers on a Novell network Bit Binary digit The smallest unit of information in a digital computer A bit can take on the value of either 1 or 0 Bitmap A pattern of bits representing the dots in a...

Page 134: ...ext Saving See State Saving Controller board The printer s system controller with firmware to direct all printer operations and slots for adding optional cards The controller board is accessed through...

Page 135: ...off a file server Direct Connect Printer A printer tied to a Novell network via its internal network interface card Document One or more pages forming a logical whole DOS Disk Operating System The ope...

Page 136: ...2 Messages sent to the SMS client when either the printer the SMS Service Coordinator or Novell has encountered some difficulty Escape Character A control code or control character represented by ASC...

Page 137: ...k to the page H Handshaking An exchange of signals between two devices in a computer network prior to the transfer of data The purpose of handshaking is to determine the readiness of each device to ex...

Page 138: ...ocal printer A printer that is connected to a network client through a serial or parallel cable Only the client user has access to a local printer Lower Base The optional base for the 4505 4505ps and...

Page 139: ...1 a server running PSERVER NLM or PSERVER EXE or 2 a network client running RPRINTER EXE NIC An abbreviation for Network Interface Card The optional card that attaches to the controller board for inte...

Page 140: ...in which data is transmitted and received in bytes rather than bits Typically used for local printing over short distances Parity The addition of one or more redundant bits of information used to veri...

Page 141: ...al and optional network ports The printer looks at each port in succession for incoming data then transfers it to the print buffer where it waits for processing The print buffer is shared among the po...

Page 142: ...the exchange of data between data processing devices PSERVER emulation Software that runs on a file server or a network interface card and that enables the file server or printer to function as a prin...

Page 143: ...istances Server A special purpose computer system typically a PC using a 80386 or 80486 CPU or another processor based on the Motorola 68000 CPU that is connected to the local area network and control...

Page 144: ...ter is connected to a PC through a serial or parallel cable Standard Data File A data file format that can be read by many software applications SDF files contain data elements delimited by any specia...

Page 145: ...y each time the user starts the PC The SMS TSR is responsible for routing status information to the IVD and displaying alert messages on the client s monitor Typeface The design of a set of characters...

Page 146: ...letions See Deletions Vertical Vertical streaks See Streaks Dark vertical W Wrinkled prints Prints are wrinkled creased or torn upon exiting the printer X XNIC E NET XEROX Network Interface Card Ether...

Page 147: ...8 D Default key Using in RCP 5 4 Demo List RCP Test 5 13 Density RCP Quality Setup 5 12 See also Print Density DocuPrint 4508 Cleaning 7 5 Control panel see Control panel Locating 2 3 to 2 4 Overview...

Page 148: ...efined 8 2 to 8 3 Internal 8 4 Selecting 8 5 Soft 8 4 Form Feed key Using in RCP 5 4 Front panel key 3 3 Form Feed 3 3 On Off line 3 3 Reset 3 3 Self Test 3 3 H HP GL 2 1 4 Printer commands A 14 to A...

Page 149: ...tup 5 10 PJL Printer commands A 17 Point Size RCP Font Setup 5 10 Power cord 2 9 Power Save 1 2 1 3 RCP Printer Setup 5 6 Print density Adjusting 7 4 Print quality Problems 6 13 to 6 16 Printer Cartri...

Page 150: ...erface See RS232C Serial Interface Option Side guide 4 3 SIMMs See Memory Software installation 2 11 to 2 12 DOS 2 11 to 2 12 OS 2 2 12 Windows 2 11 Status Monitor 1 3 DOS installation 2 11 to 2 12 Me...

Reviews: