background image

User’s Guide

17

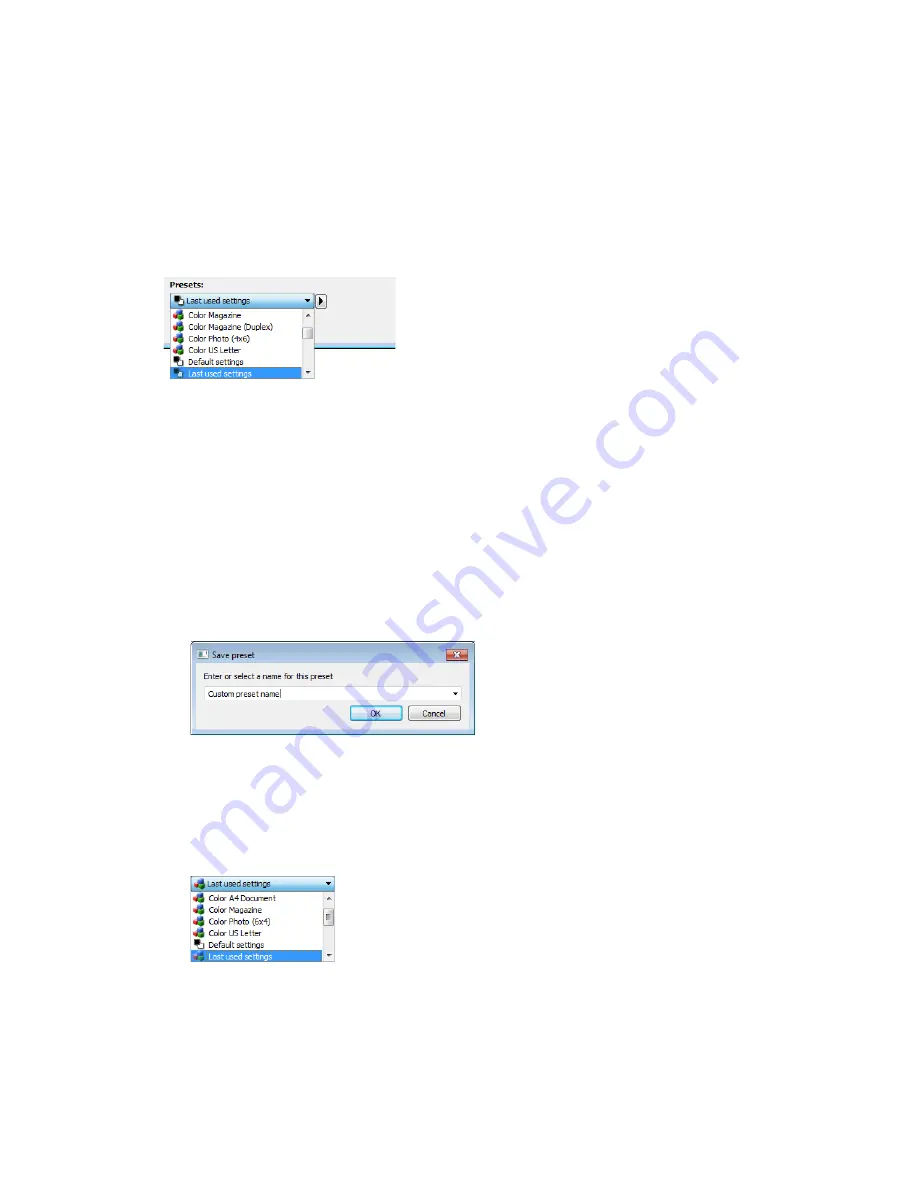
Presets

A preset contains all features in the scanner interface, including color mode, resolution, paper size, 
and so on. You can create, import, export, and delete presets. 

If  you  select  the

 Last used settings

 preset, then adjust the settings in the scanner interface, 

when you scan those changes will immediately save to the preset.

Click  the 

Cancel

 button to close the scanner interface without saving any changes.

Saving

1.

Click on the right arrow and select 

Save as...

 from the list.

2.

After clicking on the save option, a dialogue opens for you to type in a name. Type in the 
name you want then click 

OK

Editing

1.

Select the preset you want to modify in the preset list.

2.

Adjust the options in the scanner interface as needed. 

3.

Click 

Save

.

To rename a preset:

1.

Select the preset you want to rename in the preset list.

Summary of Contents for DocuMate 152i

Page 1: ...March 2015 05 0901 100 TWAIN Scanning Guide Windows Users Xerox DocuMate 152i Xerox DocuMate 3120 3125 Xerox DocuMate 4440 4760...

Page 2: ...accuracies and typographic errors will be corrected in subsequent editions Information is subject to change without notice and does not represent a commitment on the part of Visioneer Document Version...

Page 3: ...ear All Regions 12 Document Source Configuration 13 Basic Options 13 Advanced Options 14 Sides Identical 14 Summary 15 Presets 17 Saving 17 Editing 17 Deleting 18 Exporting 18 Importing 20 Document Se...

Page 4: ...Image 39 Mirror Image 40 Bit Depth Reduction 40 Fill Margin Holes 42 Color Processing Panel Options 42 Color Dropout 43 Perform Color Correction 44 Advanced Panel Options 45 Despeckle 45 Filter 45 Moi...

Page 5: ...this guide may not look exactly as they appear on your computer s screen The differences are minor and do not affect the steps to use the features Note Visioneer Acuity must be installed for the imag...

Page 6: ...s user guide for instructions A note about your scanner and Microsoft WIA Windows Image Acquisition The WIA platform has been developed to enable image transfer from devices using standard Windows ap...

Page 7: ...ed Scanning Interface If you see this locked version of the scanner s interface you will be able to select a predefined scanning profile from the Presets list and then click the Scan button to start s...

Page 8: ...TWAIN Scanning Guide Scanning from TWAIN and WIA 4 User s Guide...

Page 9: ...here is a page in the scanner the scanner will scan and display a sample image in the preview window If you do not have a page in the scanner when you click Preview the preview window will open and di...

Page 10: ...e If you select any of the document image adjustment options such as an option to automatically crop straighten or rotate an image it will not show in the sample image preview The preview window displ...

Page 11: ...e image you can move and resize a scan region to focus only on the area you want to scan The final image will be only the size of the region you set Important do not change the page size for the scann...

Page 12: ...se button down and then drag your mouse to create a scan region Release the mouse button when the area you want is within the rectangle If you want to create a region that overlaps another region hold...

Page 13: ...r each region set in the preview window The number of scan regions you can create is limited by the scanner model and installed modules For instance most scanners have only one region When you select...

Page 14: ...ine The cursor will change to a dual directional arrow Click on the line and drag the mouse to resize the region If you click on the top or bottom edge you can only resize the region up or down If you...

Page 15: ...ick on the region that is in the way and select Temporarily send this region to the back to move that region behind the one that you want to move or resize This is a temporary change in the region ord...

Page 16: ...ve the region number down one in the processing order This option is not available if the region you right clicked on is already the last region in the processing order After selecting this option all...

Page 17: ...olor scans the document in color creating a full color copy of an original document or photograph Color scans have the largest file size Gray scans the document using varying shades of gray to reprodu...

Page 18: ...scale scan mode is often used when scanning documents or graphics where the original color does not need to be retained but the graphics need to be legible Grayscale scanning preserves the graphic qua...

Page 19: ...e color mode you want for the first side 3 Click the top of the menu to collapse the list Select the options in the scanner interface that you want to use for the first side 4 When you are done making...

Page 20: ...TWAIN Scanning Guide Document Source Configuration 16 User s Guide...

Page 21: ...mmediately save to the preset Click the Cancel button to close the scanner interface without saving any changes Saving 1 Click on the right arrow and select Save as from the list 2 After clicking on t...

Page 22: ...d and then click on OK in the dialogue Deleting 1 Click the drop menu under Presets and select the preset you want to delete 2 Click the right pointing arrow button and select Delete 3 Click Yes when...

Page 23: ...to choose a location where you will be able to easily find the file 4 Select the preset you want to export in the dialogue for exporting a preset If you want to export multiple presets click on each...

Page 24: ...me Select the option Do this for all conflicts to have the action you select in this dialogue be used for all conflicts found Importing If you have previously exported presets or another user has give...

Page 25: ...mes If you see a notification indicating that a preset with the same name already exists select one of the options on screen to continue Overwrite select this option to replace the current preset with...

Page 26: ...TWAIN Scanning Guide Presets 22 User s Guide...

Page 27: ...ptions If you select an option in this panel that also appears on the Main panel when you return to the Main panel that option will be selected Scanner model panel this panel contains options that are...

Page 28: ...l may have advanced adjustment options on a different panel in this section When the Advanced configuration mode is selected an icon will appear next to those features which have adjustment options on...

Page 29: ...e longer to scan and produce large files Some resolution settings for typically scanned items are Text document letters forms or other typed black and white documents 100 dpi to 150 dpi Text document...

Page 30: ...ble a delay from when the last page is scanned and when the scanner stops the scan job This allows you to scan one page at a time without having to click Scan for each page you put in the scanner To s...

Page 31: ...de Select this option if you are scanning duplex pages that are calendar style orientation This option will rotate the back side image 180 degrees from the front side When scanning in duplex mode with...

Page 32: ...ges to be merged The sides will not be merged if the height of either the front or rear image exceeds this value For example if you are scanning a batch of mixed documents such as cheques and statemen...

Page 33: ...opping option in the interface Crop to original select this option to let the scanner automatically determine the size of the item being scanned This option is only available if the scanner supports t...

Page 34: ...ot have a noticeable effect in the final image file You should try test scans using the different levels of subsampling to make sure you are happy with the image quality 4 4 4 no subsampling and the r...

Page 35: ...your scanner If you select an option in this panel that also appears on the Main panel when you return to the Main panel that option will be selected Select the Advanced source configuration mode to s...

Page 36: ...ent stack in the input tray This improves document feeding and paper separation especially when scanning document stacks containing mixed sizes and paper thickness When this option is selected the sca...

Page 37: ...ion mode is selected this is the only panel available Change to the Advanced source configuration mode to enable the other panels which are also described in this section Color processing panel this p...

Page 38: ...to see information about why the feature is unavailable Main Panel Options Some of the options in this panel may have advanced adjustment options on a different panel in this section When the Advanced...

Page 39: ...ray scanning Clicking the reset button when Red Green or Blue is selected will restore BCG to the default values for only that color channel Brightness Brightness is the overall lightness of the image...

Page 40: ...of 50 brightness level 25 brightness and 75 brightness Adjusting the brightness level does not make the image completely black nor completely white Technical note Most monitors have a brightness sett...

Page 41: ...he transition of colors in the image appear smoother Adjusting the contrast level is based on how you want the image to appear and there is no standard to adhere to Contrast works in conjunction with...

Page 42: ...vel between 60 and 80 Gamma Gamma is the tone curve and starting point for image enhancement Move the slider left or right to darken or lighten the image As you raise or lower the Gamma value the valu...

Page 43: ...w you want try adjusting the monitor s gamma level Refer to the monitor s user guide for adjusting the gamma level and see if the manufacturer has any recommended settings Invert Image The Invert imag...

Page 44: ...set what level of light or dark to look for on a page When scanning in black and white everything on the page is set to either white pixels or black pixels in the final image If the text on the page...

Page 45: ...ted if the scanned image does not have image clarity similar to the original Sensitivity move the slider left or right to adjust the sensitivity level for dynamic thresholding This slider is only enab...

Page 46: ...This option is available in the interface only if the connected scanner supports this feature The size of the hole can be between approximately 5 mm and 7 mm The maximum width of the margin is 25 4 mm...

Page 47: ...lor by either inputting the values for R G and B in their respective boxes or by selecting the color from a sample scan Multicolor Dropout Click on the checkbox next to one of the clear colors to enab...

Page 48: ...to reference when clicking on a color in the sample image Perform Color Correction Select this option to use the scanner s default Gamma table which has been calibrated to produce the best quality co...

Page 49: ...speckle If this number of dots are in the circle the dots will not be considered a speckle and remain in the image If there are less than this number of dots in the circle the dots are considered a s...

Page 50: ...sting the radius will produce different results for the various types of items that can be scanned With this feature you may have to test scan a few times adjusting the Moir radius as needed until you...

Page 51: ...age If you are scanning items that have notes written with a pencil you may want to raise the black level to have the pencil notes appear black in the image You can set a value for black from 0 to 127...

Page 52: ...TWAIN Scanning Guide Image Enhancements 48 User s Guide...

Page 53: ...rayed out feature to see information about why the feature is unavailable Module Configuration When image processing modules are installed they will appear in the list on the Configure tab There are s...

Page 54: ...xt to the counter you want to set back to 0 Power Settings Sleep mode sleep mode is the low power state when the scanner is not in use You can adjust the amount of time you want the scanner to wait be...

Page 55: ...ies from the list Windows Vista from the Windows Control Panel open Hardware and Sound and then Scanners and Cameras Click on the scanner icon then click on the Properties button Windows XP from the W...

Page 56: ...iver When the scanner is connected to the computer and this option is selected or when a different scanner of the same model is connected a notification will show indicating that the firmware version...

Page 57: ...hen the interface opens only the scanning Presets will be available for a user to select and use for scanning Default preset select the preset you want to have be the default displayed options in the...

Page 58: ...match the application settings that were used to scan Select this option to have the settings reset to the last ones used when this interface was open Enable user compression this option is enabled on...

Page 59: ...f the original Postal Money Orders Bills Checks or Drafts of money drawn by or upon authorized officers of the United States Stamps and other representatives of value of whatever denomination which ha...

Page 60: ...seal of a public body or authority in Canada or of a court of law 5 Proclamations orders regulations or appointments or notices thereof with intent to falsely cause same to purport to have been printe...

Page 61: ...lty of making such reproductions Currency notes Bank notes and cheques Bank and government bonds and securities Passports and identification cards Copyright material or trademarks without the consent...

Page 62: ...TWAIN Scanning Guide Appendix A Copy Regulations 58 User s Guide...

Page 63: ...Configure Before Scan 1 Contrast 36 37 38 Counters 52 Crop to length 29 Crop to original 29 D Despeckle 45 Detect double feeds 26 31 Device settings 51 Disabled Options 24 34 49 Dither 41 Document Se...

Page 64: ...52 Power off 50 52 Preset 7 15 Presets 3 17 Preview 3 5 Q Quality 30 R Radius 45 46 Refresh preview 6 Regions 7 10 11 Remember compression 31 Reset device 50 52 Resolution 24 Rotate image 27 S Scanne...

Page 65: ......

Reviews: