background image

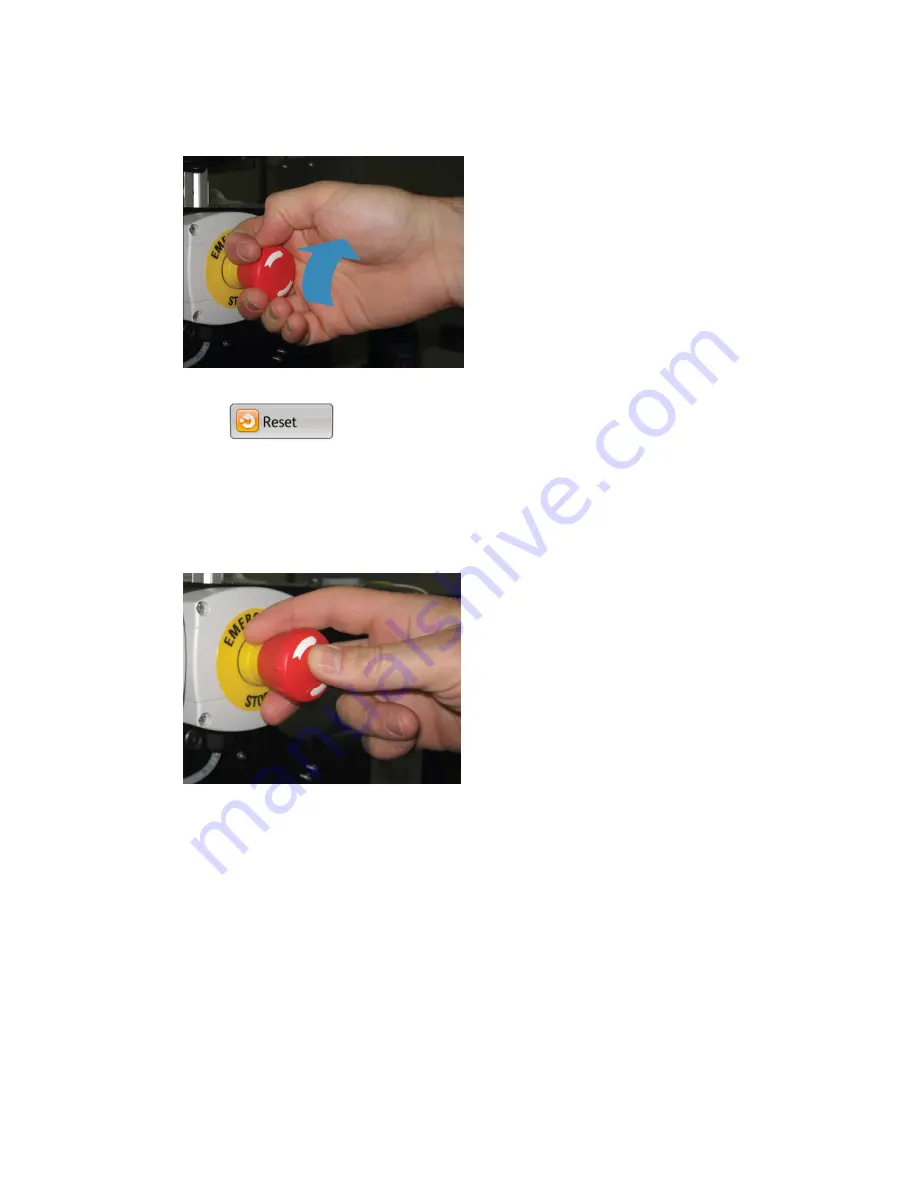
10. Reset the Emergency Stop Button. Pull and twist clockwise to return the button to

the normal position.

11. Select 

 on the CiPress™ UI to reset the Emergency Stop fault.

12. Slowly advance the web using the Feed option on the CiPress™ UI for about 20

seconds.

13. Press the Emergency Stop button on the Infeed Module of the CiPress™ until it clicks.

The CiPress™ is now offline.

14. Open the appropriate doors and repeat steps 4 through 8 to determine if the web

has shifted position.

• If the web has shifted position, also repeat steps 9 through 14 of this procedure.

• If the web has not shifted position, continue to 

Setting Up and Activating the

Web Registration Module

.

8-5

Xerox

®

 CiPress™ 325 / 500 Production Inkjet System

Web Threading Guide

Web Registration Procedures

Summary of Contents for CiPress 325

Page 1: ...Xerox CiPress 325 500 Production Inkjet System Web Threading Guide 5 0 Software August 2012...

Page 2: ...2012 Xerox Corporation All rights reserved XEROX XEROX and Design and CiPress are trademarks of Xerox Corporation in the United States and or other countries Document Version 1 0 May 11 2012 BR3164...

Page 3: ...aner and Around the Web Heating Drum 4 1 5 Threading the Right and Left Marking Towers 5 1 6 Threading Around the Web Cooling Drum 6 1 7 Threading the Outfeed Module 7 1 8 Web Registration Procedures...

Page 4: ...Xerox CiPress 325 500 Production Inkjet System ii Web Threading Guide Table of Contents...

Page 5: ...g the Web Registration Module 3 Threading the Web Cleaner and Around the Web Heating Drum 4 Threading the Right and Left Marking Towers 5 Threading Around the Web Cooling Drum 6 Threading the Outfeed...

Page 6: ...Xerox CiPress 325 500 Production Inkjet System 1 2 Web Threading Guide Overview...

Page 7: ...lign the physical position of the unwinder turnbars and finishing equipment with the CiPress The unwinder should be powered on in the ready state able to feed paper as it is pulled through the web pat...

Page 8: ...sheet leaving a straight edge about 76 mm 3 inches 4 Provide paper slack by manually pulling the web about 3 to 5 meters 5 to 10 feet off of the unwinder You need to perform this step throughout the w...

Page 9: ...d on the Infeed Module and perform the following steps Start web alignment here 1 Primary CiPress 2 Rear metal tabs 3 Secondary CiPress 4 Front metal tabs 5 a Begin at the right side of the guide and...

Page 10: ...b edge ends at the gold area use the metal tab that corresponds with the gold arrow 8 Ensure that the Front and Rear Web Edge Guides are located against their respective sides of the Infeed Module a L...

Page 11: ...egree position so that the pin is facing outward and is in the horizontal position For very heavy weight media set the Adjuster slightly past 90 degrees Pin at the 60 degree position 1 Web Tension Adj...

Page 12: ...y a Turn the Front Web Edge Sensor Adjustment Knob counterclockwise until it stops b Loosen the thumbscrew by turning it counterclockwise c Rotate the Rear Web Edge Sensor Adjustment Knob if necessary...

Page 13: ...y h Grasp the Rear Web Edge Sensor Knob and gently push it into the Printer until it stops i Close the Brass Clamp Thumbscrew 1 Front Web Edge Sensor Adjustment Knob 2 Rear Web Edge Sensor Adjustment...

Page 14: ...Xerox CiPress 325 500 Production Inkjet System 2 8 Web Threading Guide Preparing the Infeed Module for Threading...

Page 15: ...ving a 5 mm 2 inch space between each Web Edge Guide and the edge of the web begin threading the web through the Web Tension Adjuster by placing the web over the top of the Infeed Idler Roller and und...

Page 16: ...ess until it clicks The CiPress is now offline 3 On the Web Registration Module Control Panel select 4 Unlock the Infeed Module S wrap Roll Nip Release Lever Xerox CiPress 325 500 Production Inkjet Sy...

Page 17: ...forward towards you along the web path and rubbing against any of the front components of the machine Misalignment of the web could cause the web to continually rub against the front components of th...

Page 18: ...d e f g Xerox CiPress 325 500 Production Inkjet System 3 4 Web Threading Guide Threading the Web Registration Module...

Page 19: ...the registration guide and over the registration exit roller Ensure that the web passes through the appropriate web edge sensor For the Primary CiPress Rear Web Edge Sensor For the Secondary CiPress...

Page 20: ...c Front Web Edge Sensor 1 d Xerox CiPress 325 500 Production Inkjet System 3 6 Web Threading Guide Threading the Web Registration Module...

Page 21: ...um This section describes the web threading process for the highlighted part of the web path 1 Manually pull the web 3 to 5 meters 5 to 10 feet to increase the amount of web in the area 4 1 Xerox CiPr...

Page 22: ...counterclockwise until the Marking Tower clears the Web Cleaner Marking Tower Position Control Switch 1 Right Marking Tower 2 4 Open the Web Cleaner Rotate the red handle counter clockwise and downwa...

Page 23: ...er turn the switch clockwise until the Marking Tower moves into its original position Otherwise continue to the next step 9 To access the Web Heating Drum and tension roller area remove the ink drip t...

Page 24: ...move the small drip tray from the Marking Tower c Lift and remove the large drip tray from the Marking Tower 10 Pull the web over the top tension roller and feed down underneath and around the Web Hea...

Page 25: ...a b c d 4 5 Xerox CiPress 325 500 Production Inkjet System Web Threading Guide Threading the Web Cleaner and Around the Web Heating Drum...

Page 26: ...Thread the web around the Web Heating Drum and through the frame opening 13 Pull the web between the two edge sensors This may not apply to all machines Xerox CiPress 325 500 Production Inkjet System...

Page 27: ...d part of the web path Bring paper up and over the Apex roll If needed use the maintenance platform to reach the higher areas Warning While threading the web around the Apex Roll be careful not to tou...

Page 28: ...b c d Xerox CiPress 325 500 Production Inkjet System 5 2 Web Threading Guide Threading the Right and Left Marking Towers...

Page 29: ...rocess for the highlighted part of the web path 1 Thread the web between the Web Cooling Drum and baffle if present and around the Web Cooling Drum Refer to the web path labels on the machine panel fo...

Page 30: ...2 Thread over and around the Tension Roller Xerox CiPress 325 500 Production Inkjet System 6 2 Web Threading Guide Threading Around the Web Cooling Drum...

Page 31: ...threading process for the highlighted part of the web path 1 Open the Outfeed Module Right Door 2 Grab the Roll Assembly Handle and completely rotate it counterclockwise to lower the roller 7 1 Xerox...

Page 32: ...e Assembly Roll completely out of the CiPress until it stops This keeps the assembly out of the way while threading the web Xerox CiPress 325 500 Production Inkjet System 7 2 Web Threading Guide Threa...

Page 33: ...b until the Assist Pole is fully assembled 6 Insert the Assist Pole all the way through the side of the Outfeed Module to the Web Cooling Drum Refer to the web threading label for guidance a b 7 Acce...

Page 34: ...ght to secure the web into the Assist Pole Web Gripper 8 Go back to the end of the Outfeed Module Pull the web completely through the module using the Assist Pole 9 Open the Outfeed Module Left Door X...

Page 35: ...tate counterclockwise 11 Press the slide release button on the side of the Roll Assembly and push the Assembly into the printer until it clicks Turn the handle clockwise to lock the Assembly into plac...

Page 36: ...ller Tension Roller 1 Idler Roller 2 Tension Roller 3 13 Thread the web around the Idler Roller 14 Thread the web through the S wrap Rolls Xerox CiPress 325 500 Production Inkjet System 7 6 Web Thread...

Page 37: ...st the appropriate Front Metal Tab on the Web Edge Guide d Return to Preparing the Infeed Module for Threading and thread the Secondary CiPress Note Only continue with the next step after the web is t...

Page 38: ...e front edge of the web 2 a For the Infeed Module Front Idler Rollers loosen the thumb screws and move the Idler Roller to within the specification noted in the step above When finished tighten the th...

Page 39: ...Outfeed Module Front Idler Rollers 1 7 9 Xerox CiPress 325 500 Production Inkjet System Web Threading Guide Threading the Outfeed Module...

Page 40: ...Xerox CiPress 325 500 Production Inkjet System 7 10 Web Threading Guide Threading the Outfeed Module...

Page 41: ...riable in the next step 3 Use the following formulas to determine the target web edge position from the inside of the Infeed Module Front Frame Plate Note The actual web edge position should be within...

Page 42: ...ar Metal Tab c If the web is at the Left Front Metal tab on the Secondary CiPress verify that the measurement you take is 103 mm 3 mm Xerox CiPress 325 500 Production Inkjet System 8 2 Web Threading G...

Page 43: ...e measure the distance in millimeters between the Infeed Module Front Frame Plate and the beginning edge of the web Location to measure 1 Ruler measuring distance 2 5 If the web edge has shifted from...

Page 44: ...between the inside of the front frame and the beginning edge of the web If the web has moved manually adjust the web to match the distance calculated earlier within 3mm Location to measure 1 8 Return...

Page 45: ...Stop button on the Infeed Module of the CiPress until it clicks The CiPress is now offline 14 Open the appropriate doors and repeat steps 4 through 8 to determine if the web has shifted position If th...

Page 46: ...Xerox CiPress 325 500 Production Inkjet System 8 6 Web Threading Guide Web Registration Procedures...

Page 47: ...g process For more information on the various controls of the Web Registration Module see Web Registration Module Overview In a tandem configuration begin this procedure at the Primary CiPress 1 On th...

Page 48: ...on percentage currently shows a number that is Greater than 55 push the assembly in until the Display reads between 45 and 55 Less than 45 pull the assembly out towards you until the Display reads bet...

Page 49: ...calibration percentage currently shows a number that is Greater than 55 pull it towards you until you reach a percentage between 45 and 55 Less than 45 push it in until you reach a percentage between...

Page 50: ...After completing the Web Registration procedure close all doors 18 Reset all the faults displayed on the Touch Screen 19 At the CiPress UI select Fast Feed Line for about 20 seconds 20 Press the Emer...

Page 51: ...acceptable Close the Infeed Module Front Door Continue to the next step If the measurement you take is outside 3mm when compared to the distance calculated earlier release the Infeed Module and Outfee...

Page 52: ...between the edge of the web and the Front and Rear Web Guides 1 c Tighten the thumb screw 27 Close all doors of the Primary CiPress 28 Repeat steps 21 through 27 for the Secondary CiPress if this is a...

Page 53: ...orm length for your print job a If the paper width on the CiPress UI is not the same as the loaded web or a web break or splice occurs a fault message displays b If the paper width on the CiPress UI i...

Page 54: ...Xerox CiPress 325 500 Production Inkjet System 9 8 Web Threading Guide Setting Up and Activating the Web Registration Module...

Page 55: ...ew Web Registration Module Display and Control Panel 1 Thumbscrew 2 Front Web Edge Sensor Adjustment Knob 3 Rear Web Edge Sensor Adjustment Knob 4 Brass Clamp 5 10 1 Xerox CiPress 325 500 Production I...

Page 56: ...Close up of Thumbscrew 1 Xerox CiPress 325 500 Production Inkjet System 10 2 Web Threading Guide Web Registration Module Overview...

Page 57: ...tomatic Web Guiding 3 Manual Positioning 4 Center Positioning 5 Front Web Edge Sensor Control 6 Rear Web Edge Sensor Control 7 Front Web Edge Sensor location 1 10 3 Xerox CiPress 325 500 Production In...

Page 58: ...1 Rear Web Edge Sensor location Xerox CiPress 325 500 Production Inkjet System 10 4 Web Threading Guide Web Registration Module Overview...

Page 59: ......

Page 60: ......

Reviews: