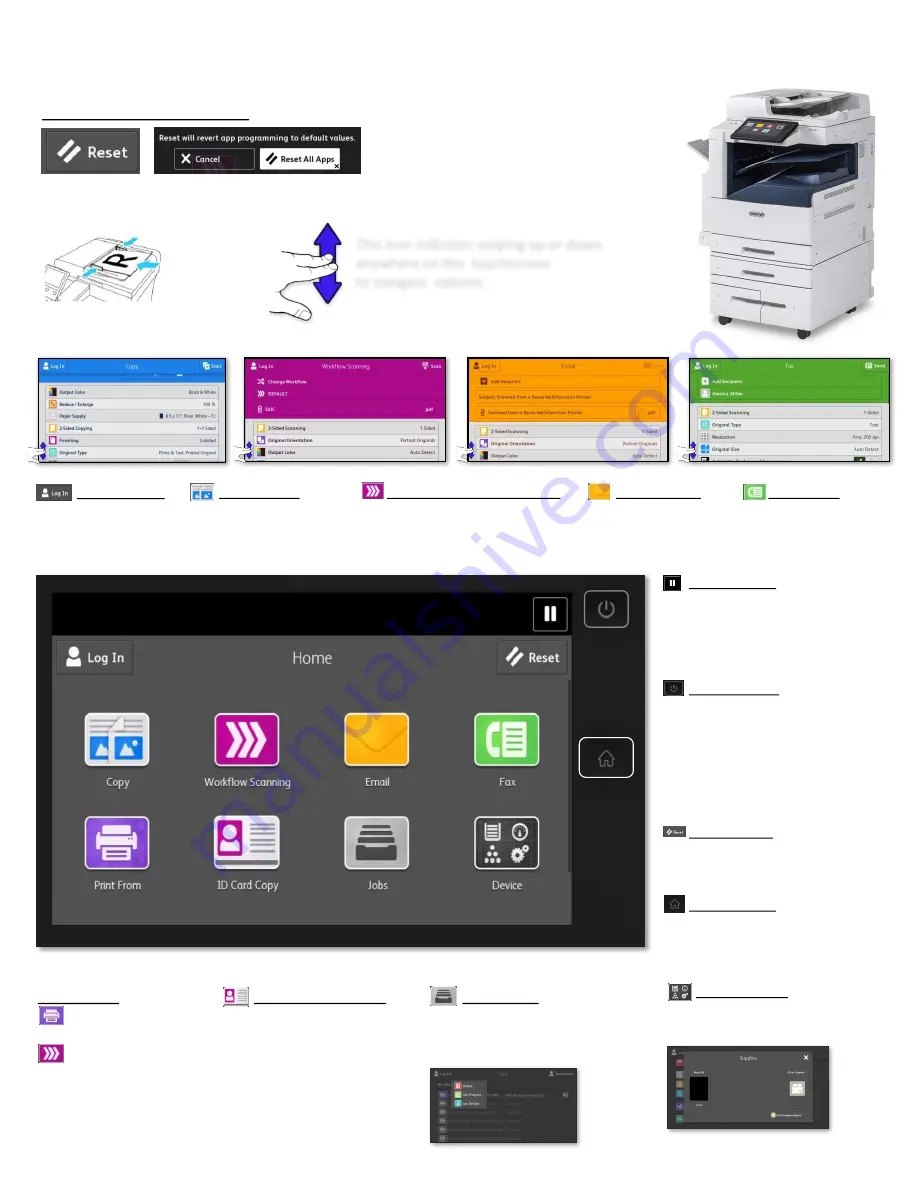
background image

        Copy Button  

Creates a duplicate of 
an original document. 

           Log In Button  

Xerox Administrator  
access.    

         Jobs Button 

Lists all processing, held, 
completed and secure print jobs.  
This is where you delete a job. 

Copying/Printing/Scanning/Faxing on the Xerox AltaLink B8000 Series 

Page 1 

Scan To Button  

Scans to a predefined 
destination

.


To Clear Settings to default: 


Touch the Reset Button on the Home Screen 

Load originals Face-Up. 


USB Buttons  

        Prints a PDF/Tif/Jpeg  
from a USB drive. 
        Scans a document  
directly to a USB drive. 


Device Button  

Allows you to view


current 

Supply 

levels as well as the Billing usage.


        Email Button  

Scans a document  
to an email address

.


       Fax Button  

Sends a scanned  
document via a  
fax number. 

         ID Card Copy Button 

Prints the front and back of  
a drivers license/check onto 
the front side of the paper.  

       Workflow Scanning 

Button


Scans a document to a 
preconfigured location

.    

             Home Button  

      Lists all features enabled on the   
      device

.  

*

Some apps may not be available. 


       Reset Button  

Clears all temporary settings in  
all  apps back to default. 


    Power Button 

When the printer is powered on, 
pressing this button displays a 
menu on the control panel. From 
this menu, you can choose to 
enter Sleep mode, restart, or 
power off the printer. 


                      This icon indicates swiping up or down                        
                      anywhere on the  touchscreen   
                      to navigate  options. 
 

       Pause Button  

Use this button to pause the 
current job. The job pauses with 
the option  to resume printing or 
delete the job.  

Summary of Contents for AltaLink B8000 Series

Page 1: ...address Fax Button Sends a scanned document via a fax number ID Card Copy Button Prints the front and back of a drivers license check onto the front side of the paper Workflow Scanning Button Scans a...

Page 2: ...ne appears on the control panel To view a complete list of active error and alert messages 1 At the printer control panel press the Home button 2 Touch Device 3 Touch Notifications 4 Touch Faults Alte...

Page 3: ...per jams can occur along the paper path WARNING Never touch a caution labeled area in the fuser You can get burned If a sheet of paper is wrapped around the inside of the fuser do not try to remove it...

Page 4: ...eft Adjust the paper edge guides so they just touch the edges of the paper stack 2 Confirm the settings on the touch screen by verifying the Size Type and Color loaded in the tray and press Confirm Wh...

Page 5: ...ree cloth Cleaning the Scanner and Control Panel To ensure optimum print quality clean the document glass regularly Cleaning helps avoid output with streaks smears and other marks that transfer from t...

Page 6: ...upper right corner on the touchscreen Making a Copy Touch Reset to clear all settings back to default Swipe the Sample Job to allow a test print of a copy job to inspect before printing multiple copie...

Page 7: ...0 1 to 2 0 All marks or defects within the measurement set are deleted Individual Edges enables an individual amount to be erased from each of the edges on both the first and second sides Use the arr...

Page 8: ...h as a case number or client reference together with a page number applied to a document as it is being processed Note Some features cannot be used with the Page Layout feature and will be grayed out...

Page 9: ...s Each segment of the job can have different settings After all the segments are programmed scanned and temporarily stored in the printer the job is processed and completed 1 Change the settings requi...

Page 10: ...n the Enter Fax Number field enter the fax number then touch Add To add more recipients touch Add Recipient then repeat the procedure 4 Adjust fax settings as needed 5 Touch Send Sending a Fax Page 10...

Page 11: ...the Home button 2 Touch Address Book 3 From the Address Book touch a contact name then touch Edit 4 To change contact information touch the information that you want to update edit as needed then tou...

Page 12: ...5 Adjust the settings as required 6 Touch Scan 7 When scanning is finished lift the automatic document feeder Flip the original document then place it in the upper left corner of the document glass 8...

Page 13: ...or group from the Address Book touch the Address Book icon Touch Favorites or Contacts then select a recipient 4 If scanning from 2 sided original documents touch 2 Sided Scanning then select an opti...

Page 14: ...scanning originals using the glass and the document feeder into a single scan job Or scanning multiple originals from the glass into one complete file eliminating the need to merge single page scans i...

Page 15: ...settings as needed To save the scanned document as a specific file name touch the attachment file name enter a new name then touch OK To save the scanned document as a specific file format touch the...

Page 16: ...you are scanning a document from the automatic document feeder a prompt does not appear WARNING Do not remove the USB Flash drive while the device is scanning and processing the job If you remove the...

Page 17: ...n the user specifies what time they want the job to print Ex Sending a large job to print during lunch or after hours so it s complete upon arrival Saved Job Stores commonly used preprinted documents...

Page 18: ...e going to print the file 3 Click the Job Type dropdown menu 4 Click FAX 5 Either double click under Name or click the icon of the person 6 Enter the contact name and fax number 7 If you would like to...

Page 19: ...Button Touch the job displaying Held Resources Required Touch Print on Alternate Paper Touch the alternate paper tray you would like to print from Touch the OK button the job will be scaled to that pa...

Page 20: ...tion for any incorrect setting Select the size before the type 5 On the printer touch screen touch Confirm Page 20 Loading Labels Letterhead 1 Open tray 5 by rotating it outward 2 Load labels in the t...

Reviews: