Xerox 701P40016 Print Manual Download Page 72

Xerox PPDs and PlugIns

Guide to Printing Using Xerox Production Print Services

5-6

With head-to-toe printing, also known as “tumble duplex,” both 
sides of the page are printed; but the position of the image is 
reversed (from top to bottom) on every other page, similar to the 
layout of a calendar.
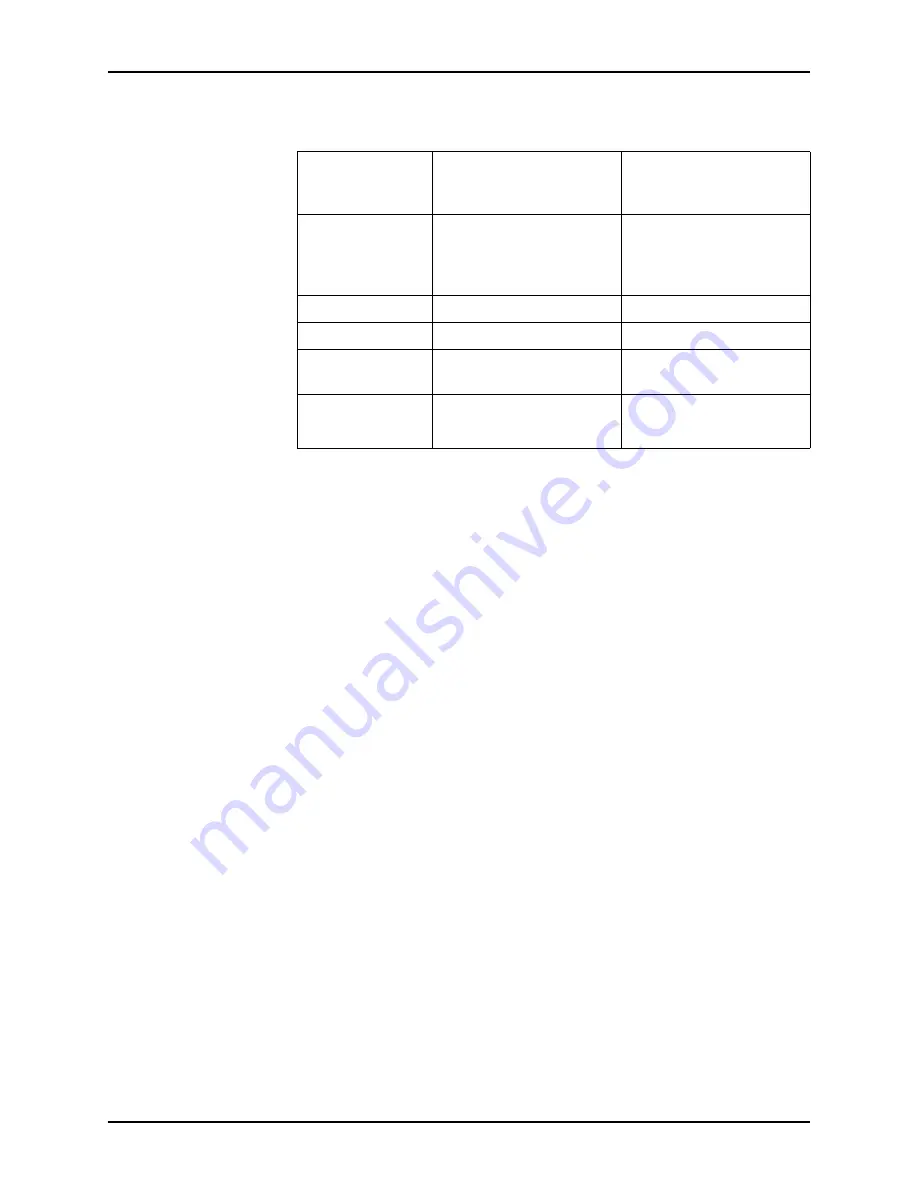
Finishing

All available finishing 
options are supported by 
the printer except 
[Custom].

All available finishing 
options are supported by 
the printer except 
[Custom].

Layout

1 up, 2 up, 4 up

Not available

Resolution

Set to 600 dpi

Set to 600 dpi

Halftone

For best results, use the 
printer settings

For best results, use the 
printer settings

Special

Negative image

Mirror image

PostScript Options - leave 
settings at defaults

Table 5-2. Available selections by printer driver in properties 

dialog (Continued)

Properties dialog 
selections

Native Adobe or Microsoft 
PS driver for Windows 95 
with Xerox PPD files

Microsoft PS driver for 
Windows NT 4.0 with 
Xerox PPD files

Summary of Contents for 701P40016

Page 1: ...Xerox Production Print Services Guide to Printing Using Xerox Production Print Services 701P40016 Version 3 7 March 2003...

Page 2: ...nd XEROX Canada Limited The Document Company the stylized X and all names identifying numbers used in connection with Xerox products mentioned in this publication are trademarks of XEROX CORPORATION A...

Page 3: ...Related documentation 1 5 Customer Support 1 5 2 Using XDS 2 1 Prerequisites 2 1 Accessing XDS from Windows 2 2 Accessing XDS from Macintosh OS X 2 2 Overview of the printing process 2 2 Windows prin...

Page 4: ...perties 3 7 Selecting a printer and queue 3 8 Printer and queue setup 3 8 Selecting a printer and queue 3 9 Change Printer window components 3 9 Viewing printer and queue properties 3 11 Selecting a p...

Page 5: ...ft 4 15 Specifying Rotation 4 17 Selecting OPI 4 17 Selecting OPI Prescan 4 17 Specifying Halftone 4 18 Specifying tone reproduction curves TRCs 4 18 Enabling anti aliasing 4 18 Setting color features...

Page 6: ...XDS Command Line from Windows 6 1 Accessing XDS Command Line from Solaris and Mac OS X 6 1 XDS Command Line operating modes 6 2 Using Print command mode 6 2 Print command mode parameters 6 2 Accessing...

Page 7: ...ing 8 3 9 Job ticket options 9 1 Setting up a print job 9 1 Printer Limitations window 9 1 The Printer default option 9 2 Setting job ticket options for XDS 9 2 Accessing the Setup window 9 3 Accessin...

Page 8: ...cting a file to print 9 32 Reprinting a saved job 9 33 Reprinting without changing the job ticket parameters 9 34 Reprinting with different job ticket parameters 9 35 Checking the status of a job 9 36...

Page 9: ...TABLE OF CONTENTS GUIDE TO PRINTING USING XDS ix...

Page 10: ...TABLE OF CONTENTS x GUIDE TO PRINTING USING XDS...

Page 11: ...m NT 4 0 2000 or XP Sun workstations running Solaris 2 6 or higher Macintosh OS To use the XPPS software to publish documents your workstation must be able to access the Xerox printer through a Xerox...

Page 12: ...DocuSP version 3 1 or higher software This software enables users of Xerox supported networks to take advantage of the many printing options that are offered by the supported Xerox printing systems XD...

Page 13: ...contents of this guide Chapter 1 Introduction contains an introduction to this guide Chapter 2 Using XDS contains the information that you need to access and understand to complete the printing proces...

Page 14: ...Document Submission Plus software Conventions This guide includes the following conventions Angle brackets Variable information that is displayed on the window or that can be entered as part of a com...

Page 15: ...paragraphs Example NOTE You cannot submit a job unless the printer is connected to your workstation Related documentation Further information on the specific Xerox printer and the print server or cont...

Page 16: ...Introduction Guide to Printing Using Xerox Production Print Services 1 6...

Page 17: ...isk or print to file option and any of the Xerox printer drivers do not use the XDS software to submit the job The job ticket information included with the PDL file may conflict with the job ticket in...

Page 18: ...oftware you must make your printer and document selections from the Document Submission window before programming the job ticket To run the Xerox Document Submission Client software double click the X...

Page 19: ...se Tab to select the text boxes in every Window Macintosh printing process The steps to print a document on a selected printer are listed below For the details on performing the procedure specified in...

Page 20: ...ob icon highlight the designated printer icon on the desktop NOTE This should be the default printer After the jobs are dropped 1 The printer type selection dialog box is displayed Select the printer...

Page 21: ...ct the designated printer icon then select Use Default Printer If the Printer Type pop up menu does not display the desired printer select Product Configuration from the Options pull down menu on the...

Page 22: ...st be queues that are available to you on the printer For each queue in the list you can assign a unique name The printer queue name that you assign may indicate the location of the printer that servi...

Page 23: ...ctions in the Add New Printer wizard to add a new printer to the Printer Connections list NOTE The network connection dialog that is displayed depends on the type of network you selected Refer to your...

Page 24: ...played is correct select Finish to complete the modification and return to the Printer Connections window If the information is not correct continue selecting Back until you reach the screen that you...

Page 25: ...viewing the printer information select OK or Close to exit the window Checking the printer connections When the XDS software is accessed the system checks all connected printers to ensure that the net...

Page 26: ...selected printer is being checked a window is displayed showing the status of the checking process To check all of the printers select Check All While all of the printer connections are being checked...

Page 27: ...requisites before you use the XDS Plus software Make sure that the Microsoft Windows Sun Solaris or Macintosh software is installed on your workstation If the software is installed as a shared copy on...

Page 28: ...0 for Solaris To run XDS Plus Applet on Solaris you must use Netscape 6 2 1 for Solaris NOTE Netscape is not supported on Windows applications Accessing XDS Plus from Windows Follow these steps to op...

Page 29: ...e Internet See your system administrator for more information If the XDS Plus software has been updated you should clear your browser cache to ensure that the latest version of the XDS Plus software i...

Page 30: ...estination print save or print and save Refer to Selecting printing or saving 4 Set up the print job and job ticket parameters as required Select the following tabs to access and set up the various jo...

Page 31: ...are connected to your workstation You record the network addresses of these printers in a file called printer disc after you install XDS Plus on your workstation When you select Change Printer on the...

Page 32: ...ame Name that was specified for the queue at the printer controller Printer Name of the printer that is associated with the queue Accept Jobs Indicates whether or not the queue is currently accepting...

Page 33: ...dow This button is grayed out unless a queue is selected Refresh Updates and redisplays the Printers and Queues lists Viewing printer and queue properties You can view information about printers and q...

Page 34: ...1 On the XDS Plus window select Change Printer to open the Change Printer window 2 If the queue that you want is not displayed in the Queues section select Show All Queues 3 In the Queues section sel...

Page 35: ...hat you want to print and to view the printer and queue properties Change Printer window components Printers and Queues sections The Change Printer window contains two sections Printers The Printers s...

Page 36: ...hat is displayed there However if you select an item in one of the tables the number changes to reflect the number of that item For example if you select a queue from the Queues list the number change...

Page 37: ...ct multiple printer or queue names by holding down the Control or Shift key while selecting the items If you select more than one printer or queue the other window displays the queues or printers for...

Page 38: ...er window 2 If the queue that you want is not displayed in the Queues section select Show All Queues 3 In the Queues section select the name of the queue to which you want to send the job The Printers...

Page 39: ...e are listed below Following each step is the name of the section of this chapter in which you can find a detailed description of the procedure 1 Access the web interface window 2 Select a print queue...

Page 40: ...printing you can check the job status by selecting the Administration button Refer to Checking job printer and queue status and messages later in this chapter Setting up a print job The web interface...

Page 41: ...job ticket that is on your workstation You can modify and save this job ticket from the Job Submission window if desired Select the queue default job ticket that was specified on your printer controll...

Page 42: ...ntation for more information on how each printer saves the job Print and Save Prints the job file and saves the file including the current job ticket Not all printers support the Print and Save option...

Page 43: ...re enabled in the PDL Type field Orientation Select the font orientation from the pull down menu Font Name Select the font from the pull down menu Font Size Enter a number for the font size or select...

Page 44: ...al job tickets from your default job ticket You have access to only one job ticket for your workstation Each workstation can have its own default job ticket Follow these steps to change parameters on...

Page 45: ...en specified parameters on any exception pages are used and so on NOTE If the Printer Default check box is selected you must deselect it if you want to select any of the other options in the same fiel...

Page 46: ...main stock for the job The main stock is the stock on which most of the job is printed Follow these steps to specify a stock that will be used for all pages in the job that are not programmed to use...

Page 47: ...ck for a job Displaying the stock window To display the stock window from which you select stocks for the job select Stocks on the Job Submission window The stock window is displayed in the Job Submis...

Page 48: ...e on both sides 1 and side 2 of the stock Stock selection buttons The following buttons are displayed for the user stock entry and for each printer stock entry in the Stocks section Favorites check bo...

Page 49: ...cks The stock window is displayed 2 On the stock window select the radio button at the left of the desired stock name You may select a printer stock from the Stocks section or the current user stock I...

Page 50: ...you can enter a custom width and height length for the stock Default size The default stock size for this field is determined by the unit of measure that was specified on the Preferences window Refer...

Page 51: ...displayed in the User Stock section of the stock window Specifying the sides imaged To select the number of sides of the paper on which the job will be printed follow these steps 1 On the Job Submissi...

Page 52: ...of each copy of the document print in numerical sequence If collation is not specified the system prints all copies of the first page followed by all copies of the second page and so on 1 To specify c...

Page 53: ...image vertically or horizontally from the edge of one or both sides of the sheet Shifting the image is particularly useful for bound or drilled jobs NOTE When an Image Shift option is set at 0 zero t...

Page 54: ...s leaves the vertical shift independent for both sides Mirror Y A vertical shift that moves the images on both sides in opposite directions This leaves the horizontal shift independent for both sides...

Page 55: ...able depend upon the attached printer but may include 0 90 180 and 270 Selecting OPI Open Prepress Interface OPI is an extension of the PostScript page description language that enables you to design...

Page 56: ...The menu contains a list of transfer functions that were created at the controller Enabling anti aliasing The Anti Aliasing field allows you to alleviate any aliasing problem that may occur in an ima...

Page 57: ...visible at the edges of the black objects that are printed directly onto colored areas Selecting the Black Overprint check box eliminates this white space Color Adjustments The following settings are...

Page 58: ...specifies the maximum cyan cast that is supported by the system and 100 specifies the maximum red cast Magenta Green 100 specifies the maximum magenta cast that is supported by the system and 100 spe...

Page 59: ...le Color Space monochrome From the Images Profile and the Text and Graphics Profile pull down menus in the desired color space field select one of the source profiles that have been loaded onto the pr...

Page 60: ...rve the amount of color saturation in order to optimize the rendering of business graphics such as charts and graphs Perceptual Adjusts the print colors to make full use of the range of colors that th...

Page 61: ...of the job the names of the individuals that are sending and receiving the job a billing account number and so on This information is available to the printer operator and prints on the banner sheet w...

Page 62: ...age may consist of a maximum of 255 characters Special Instructions In this field you may enter a job instruction that is forwarded to the operator at the start of the job The message may consist of a...

Page 63: ...3 Restore Factory Default button Restores the defaults that were set for the printer when it was manufactured 4 Select OK to save your changes and to close the Preferences window If you want to close...

Page 64: ...ionary printing section of the Job Submission window select Print 2 If any conflicts exist among the chosen parameters an alert dialog will be displayed 3 While the job is being sent to the printer yo...

Page 65: ...the Jobs in Queue section You can select the following types of jobs to view All jobs All jobs that have been submitted including those that are completed aborted pending etc All completed Jobs that h...

Page 66: ...iew link under the View Detailed Messages column for the job queue or printer that is listed in either Queues or Jobs in Queue sections 2 When finished viewing the properties close the Properties wind...

Page 67: ...your document to look before you start Set up the physical page and document attributes by selecting the appropriate features in the application layout page setup and other associated dialog boxes Wh...

Page 68: ...t to display the Print dialog box for your Xerox printer 2 Select the printing options and select Print If the Xerox PlugIn is not loaded no job ticket is available Refer to the Adobe driver documenta...

Page 69: ...u to print the document using the print dialog If the application can not be determined a message is displayed and the printing is cancelled NOTE If the job was printed using a Xerox printer driver in...

Page 70: ...er driver and the appropriate Xerox PPD file have been installed and set up and that the Xerox printer is selected as the default printer and has been connected to the appropriate port If you are subm...

Page 71: ...edge Flip on short edge None Short side Long side Paper Media Size Use Page Setup to set paper size not all paper sizes may be supported by the selected printer Not all paper sizes may be supported by...

Page 72: ...om All available finishing options are supported by the printer except Custom Layout 1 up 2 up 4 up Not available Resolution Set to 600 dpi Set to 600 dpi Halftone For best results use the printer set...

Page 73: ...right of the window Accessing the XDS Command Line software The XDS Command Line software is installed as part of the process of installing XDS Plus Refer to the Installation Guide for information on...

Page 74: ...etting up and printing a job as a single command with multiple parameters You can key in commands and parameters at the XDSCL prompt on the Java DOS window or the Unix Run window The command syntax di...

Page 75: ...ptions Using Listp along with options will display printer status information Syntax ListP options Argument v or V Displays the printer name printer status output status printer type printer network a...

Page 76: ...rinting Syntax jt job Argument job Specifies the directory path and name of the saved job ticket that will be used to print the job Setting the number of copies copies Specifies the number of copies o...

Page 77: ...dual left staple dual right bind left bind right booklet maker Setting user name Specifies the sender s user name Syntax user sender Argument sender Enter the sender s user name as the argument Displ...

Page 78: ...ive and must be entered completely The status values are displayed as bold text below queued The job is queued for printing processing The job is currently printing completed The job has been complete...

Page 79: ...es and displays the status of each queue Syntax Listq options Argument l or L Displays the queue name identification number status priority printer name printer type network address and any comments f...

Page 80: ...e Follow these steps to submit a print job in single command mode 1 To set up and print a job in single command mode you must edit and execute a batch file that is provided for you in the folder that...

Page 81: ...er information on the command structure Refer to the Single command mode commands earlier in this chapter for a list of the available parameters for the Print command Command quick reference The follo...

Page 82: ...jobs status format date and time forward date and time s or S status Displays job status for specified job type Refer to information earlier in this section for complete listing i or I Displays job I...

Page 83: ...fied printer queue RegFileLoc Printer Registration File Location set location The location of the Printer Registration File in URL format get Displays current set location of the Printer Registration...

Page 84: ...Using Command Line Client Guide to Printing Using Xerox Production Print Services 6 12...

Page 85: ...rs the following features Full printing capabilities and finishing options of the supported printers for users who print directly from within Windows applications Full printing capabilities and finish...

Page 86: ...etup 2 On the Print or Print Setup window specify the following options as desired Copies The Copies setting in the Xerox Document Submission dialog box overrides any settings that you make here Colla...

Page 87: ...ket options and selections refer to the Job Ticket Options earlier in this document Starting printing After you have selected all of the options and features of the print job you must exit the tab win...

Page 88: ...The Xerox Custom PCL printer drivers Guide to Printing Using Xerox Production Print Services 7 4...

Page 89: ...downloading and substitution may be different between PostScript and PDF files of the same job In addition you may encounter font differences between versions of Windows If you have a problem successf...

Page 90: ...ment This section explains how to select the options and features of the Xerox Custom PostScript printer driver for applications The procedure to access the user interface windows of the PostScript dr...

Page 91: ...supports defining a page range to print set the page range in the application rather than in the Xerox Job Ticket Setting the page range in the application creates a smaller PDL file For further info...

Page 92: ...The Xerox Custom PostScript printer drivers Guide to Printing Using Xerox Production Print Services 8 4...

Page 93: ...To set up a print job you specify parameters that define the appearance and destination of the printed output The Setup window enables you to specify the parameters for the job that you are printing...

Page 94: ...ified as queue overrides at your printing system controller are used as defaults first If no queue overrides have been specified parameters on any exception pages are used and so on Setting job ticket...

Page 95: ...his set of parameter specifications for a job is called a job ticket A job ticket specifies the set of printing options that the system will use for a job Every time you print a job you must specify o...

Page 96: ...b window Color tab window Special Pages tab window NOTE The features that appear on the tab windows vary depending on which features are available from the job ticket settings you select or for the pr...

Page 97: ...rform the following 1 Select the Copies text box 2 Enter the number of copies that you want to print Specifying the page range To specify a range of pages that will be printed follow these steps 1 In...

Page 98: ...printer saves the job 2 If you selected Save on Server or Print and Save on Server a dialog box opens requesting a save location for your job Enter the path to the directory in which you want to save...

Page 99: ...nu 3 Select Options to make additional selections for ASCII and OPI selections Specifying the sides imaged The Sides Imaged pop up menu lets you specify whether the document is printed on one or both...

Page 100: ...before printing the next page Specifying the image rotation From the Rotation pop up menu select 90 180 or 270 degrees if you want to rotate the page image on the printed sheet Specifying an image sh...

Page 101: ...toe and the printer supports independent side 2 image shift Independent Independent vertical or horizontal shift for the images on both side 1 and side 2 Mirror X A horizontal only shift that moves t...

Page 102: ...g box may interfere with any offset for binding that is set by the application in the document file Selecting an Output Location In the Job Setup dialog box you can select an output location Ensure th...

Page 103: ...ields require entries The fields that are available on the Job Notes dialog box vary depending on your printer type Job Name Enter the name of the document that you want to print If you want to place...

Page 104: ...ferent number of up to 19 characters Banner message In this field you may enter a message that will be printed on the banner page of the job Special instructions In this field you may enter a job inst...

Page 105: ...in the User Preferences file If no user stocks have been saved a default list of 10 user stocks is displayed in the Paper Stock dialog box Overview of the stock selection procedure To select a stock f...

Page 106: ...no Printer Capabilities file has been selected no printer stocks appear on the ID menu Refer to Creating a Printer Capabilities file later in this chapter for further information To select an ID for...

Page 107: ...dialog box select a user stock ID from the ID pop up menu 2 Select Delete User Stock The selected ID is removed from the ID menu The Delete User Stock button is grayed out and unavailable unless a use...

Page 108: ...are defining 1 From the Type pop up menu select the stock type Depending on your printer the following options may be available Standard Opaque paper Transparency Clear plastic sheets 8 5 to 9 inches...

Page 109: ...for your stock The name may have up to 255 characters Specifying the stock weight In the Weight field enter the stock weight in grams per square meter g m2 Specifying drilled paper To indicate whethe...

Page 110: ...x a On the Paper Stocks dialog box select the same stock number from the Stocks menu that you selected on the Covers dialog box b Program the stock for the cover Refer to Specifying stocks for the job...

Page 111: ...u want to select a different stock ID or specify different properties for the stock number select the Stocks icon to open the Paper Stocks dialog box a On the Paper Stocks dialog box select the same s...

Page 112: ...page enter the same number in both fields 3 Specify the other properties of the exception pages from the available options as appropriate Stock Specify the stock for the exception pages a Select a st...

Page 113: ...ages dialog box Color If the printer supports full color printing and you want to specify color source and printing parameters for the exception pages do the following a In the Color field deselect th...

Page 114: ...box select the exception page range that you want to view or change Double clicking the range in this list box displays the range settings in the dialog box fields 3 Make any necessary changes and sel...

Page 115: ...Fast Scan either Pixels or Printer Default Select an option for Slow Scan either Pixels or Printer Default Select Ok when complete Black Overprint Prevents the background of a black object from being...

Page 116: ...Color Cast A slider lets you select a color cast that will be applied to all input colors You have three color ranges that you can adjust Cyan Red 100 specifies the maximum cyan cast that is supporte...

Page 117: ...ve been loaded onto the printing system at the controller screen 3 Make additional profile selections as desired from the menus in the other fields on the Source Color Setup dialog box 4 Select OK to...

Page 118: ...Perceptual Also called photographic rendering Adjusts the print colors to make full use of the range of colors that the printer supports while preserving the color relationships This rendering produce...

Page 119: ...full color the system provides a conversion of full color documents to highlight color by mapping each color to a shade or a tint of the selected highlight color Specifying the mismatch action From t...

Page 120: ...ghlight color The choices are Printer Default Pictorial Maintains the pictorial quality of the images as follows Colors with a hue that matches the map color are printed unchanged Colors with a hue cl...

Page 121: ...sets of page inserts immediately following the given page For example to specify three inserts of blue paper followed by three inserts of green paper the blue paper is Insert Position 1 and the green...

Page 122: ...llow these functions Changing an insert Follow these steps to change a blank insert 1 On the Job Ticket dialog box select the Inserts icon to display the Page Inserts dialog box 2 In the list box doub...

Page 123: ...ter Starts icon to open the Chapter Starts dialog box 2 In the Starting Page text box enter a page number on which the chapter will start 3 Select Add The chapter starting page is displayed in the Pag...

Page 124: ...tting up submitting and printing a job refer to Overview of the printing process earlier in this document Selecting a print queue The Printer Connections field displays a list of the print queues that...

Page 125: ...cument area Command line 1 From the workstation Start menu select Run 2 Enter XDS filename in the Run Window The name of the selected document file is displayed in the name field of the Document area...

Page 126: ...the Document field on the XDS window enter or browse to locate and display the name of the document that will be reprinted If the save directory is the default save location that was set at the DocuS...

Page 127: ...a source directory that is different from the default save directory was selected enter the directory path to the save location NOTE The source directory and file names are case sensitive and must be...

Page 128: ...at a DocuTech printer enter the Xerox Client Submission listjob command on the DOS command line Refer to Using the Xerox Client Software for Solaris for information on using the listjob command Settin...

Page 129: ...s been completed Consult your system administrator for further information NOTE Job notification does not apply when you are using TCP IP Display the job submission success message Enables your PC to...

Page 130: ...you can create the printer capabilities file on a different system and transfer it to your PC Systems on which you can load and run XDS Plus include A PC running Windows A Sun workstation running Sol...

Page 131: ...fer the printer capabilities file to your workstation from the system on which you created the file 9 Specify the location of the printer capabilities file in the Preferences window within XDS Refer t...

Reviews: