background image

Wiring Diagrams

7-16

11/06

FaxCentre 2121/2121L

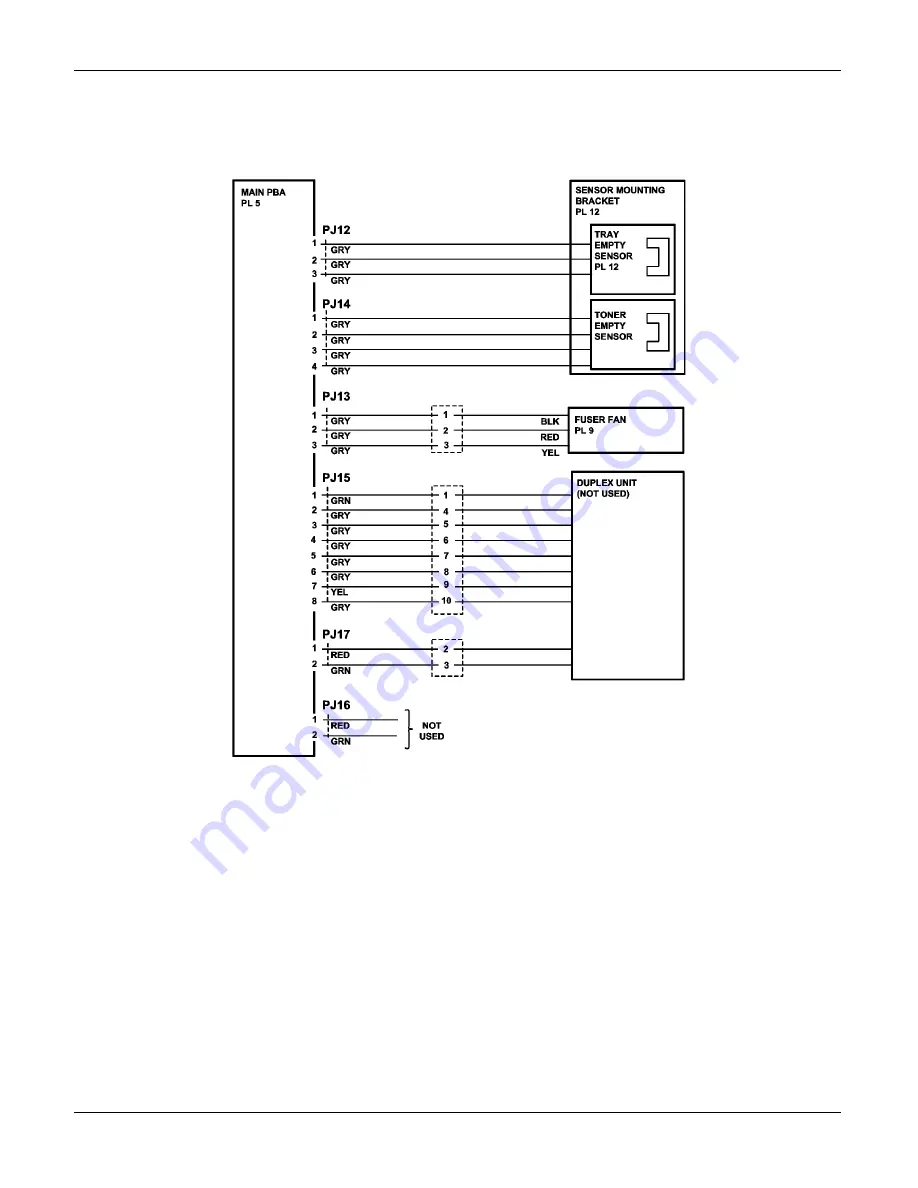
WD 3 Connection Diagram (3 of 5)

Figure 1 

Summary of Contents for 2121L - FaxCentre B/W Laser

Page 1: ...708P88662 11 06 Service Manual 708P88662 FaxCentre 2121 2121L ...

Page 2: ...o liability will be accepted by Xerox Europe arising out of any inaccuracies or omissions All service documentation is supplied to Xerox external customers for informational purposes only Xerox service documentation is intended for use by certified product trained service per sonnel only Xerox does not warrant or represent that it will notify or provide to such customer any future change to this d...

Page 3: ... Information xi Toner Cartridge Service xiii Handling of Consumables xiv Health and Safety Incident Reporting xv 1 Service Call Procedures Section Contents 1 1 2 Repair Analysis Procedures Section Contents 2 1 3 Image Quality Section Contents 3 1 4 Repairs and Adjustments Section Contents 4 1 5 Parts List Section Contents 5 1 6 General Procedures and Information Section Contents 6 1 7 Wiring Data ...

Page 4: ...Introduction ii 11 06 FaxCentre 2121 2121L Service Manual Formats Table 1 Service Manual Formats Part number Format 708P88661 Hardcopy 708P88662 PDF on CD ...

Page 5: ...tice condition or statement Safety Precautions for Inspection and Service When performing inspection and service procedures observe the following precautions to prevent accidents and ensure utmost safety Depending on the model some of the precautions given in the following do not apply Different markings are used to denote specific meanings as detailed below Used to call the CSE s attention to wha...

Page 6: ...azardous situation Always replace a blown electrical fuse or thermal fuse with its corresponding gen uine part specified in the manufacturer s parts manual Installing a fuse of a differ ent make or rating could lead to a possible fire If a thermal fuse blows frequently the temperature control system may have a problem and action must be taken to eliminate the cause of the problem Handle the power ...

Page 7: ...ical shock the electrical outlet should be replaced if the plug can not be inserted into it Never use a grounded adaptor plug to connect the product to an electrical outlet that lacks a ground connection Do not modify the product Any unauthorized alteration which may include the addition of new functions or connection of external devices may impact the product certification Please con tact your au...

Page 8: ... care not to allow your clothing to be caught in the moving parts Never leave a product in this condition unattended Never place disassembled parts or a container of liquid on the product Parts fall ing into or the liquid spilling inside the mechanism could result in an electric shock or fire Never use a flammable spray near the product This could result in a fire Make sure the power cord is unplu...

Page 9: ... puts the operator in the direct stream of exhaust from the printer Where ammonia gas might be generated such as Blueprint Machines Power source If any other electrical equipment is attached to the same power outlet make sure that the capacity of the outlet is not exceeded Use a power source with little voltage fluctuation Ensure that the machine does not sit on the power cord or communications ca...

Page 10: ...6 F Humidity 15 to 85 Rate of temperature change 10 C 50 F hr Rate of humidity change 10 hr Power requirements The power source voltage requirements are as follows Voltage fluctuation 110V 127V 6 10 Frequency 50 60 Hz 3 Hz Miscellaneous precautions Use the following precautions when servicing laser printers When a service call needs to be performed in the laser beam path such as when working aroun...

Page 11: ...utions for dis assembly Be sure to unplug the machine from the outlet before attempting to service the machine The basic rule is not to operate the machine any time during disassembly If it is absolutely necessary to run the copier with its covers removed use care not to allow your clothing to be caught in revolving parts such as the timing belt and gears Before attempting to replace parts make su...

Page 12: ...ges of the board When touching the PWB observe standard ESD procedures Note that replacement of a PWB may call for readjustments or resetting of particular items 7 Handling of other parts The magnet roller generates a strong magnetic field Do not bring it near a watch floppy disk magnetic card or CRT tube 8 Handling of the Image Cartridge and Print Unit Note Only for products employing an Imaging ...

Page 13: ...th the CDRH regulations and must be attached to laser products marketed in the United States There is no possibility of danger from a laser provided the machine is serviced according to the instruction in this manual Laser Safety Information CAUTION Use of controls adjustments or performance of procedures other than those specified in this manual may result in hazardous radiation exposure With spe...

Page 14: ...m The laser diode and the scanning polygon mirror are incorporated in the ROS unit WARNING The ROS unit is NOT A FIELD SERVICE ITEM Therefore the ROS unit should not be opened under any circumstances Figure 2 Table 1 Internal Laser Radiation Semiconductor Laser 1 Maximum power of the laser diode 15 mW 2 Maximum average radiation power see note 36 903 micro Watt 3 Wavelength 770 800 nm ...

Page 15: ...ed image is light due to the toner supply becoming low you can temporarily improve the print quality by redistributing the toner shake the print cartridge However you should replace the print cartridge to solve the problem permanently Note Special procedures will need to be followed if the toner cartridge is replaced prematurely as the smart card will be rejected Redistributing toner When the prin...

Page 16: ...the standard guarantee on those parts How to identify a refilled toner cartridge One way security screws are used in the manufacture of the cartridge check if these are dam aged Handling of Consumables Before using any consumables always read the label on its container carefully Paper can get damp To prevent absorption of moisture store paper in a place with low rela tive humidity Keep consumables...

Page 17: ...report product incidents to Xerox Environment Health Safety within 24 hours of becoming aware of the event 2 The information to be provided at the time of reporting is contained in Appendix A Health and Safety Incident Report involving a Xerox product 3 The initial notification may be made by any of the following methods For incidents in North America and Developing Markets West Brazil Mexico Lati...

Page 18: ... ated equipment located in the vicinity of the incident b Return any affected equipment part s to the location designated by Xerox EH S and or the Business Division c Implement all safety retrofits 2 Xerox EH S shall a Manage and report all incident investigation activities b Review and approve proposed product corrective actions and retrofits if necessary c Manage all communications and correspon...

Page 19: ...Service Call Procedures FaxCentre 2121 2121L 11 06 1 1 1 Service Call Procedures SCP 1 Service Call Actions 3 SCP 2 Preventive Maintenance 4 SCP 3 HSFI Schedule 7 SCP 4 Final Actions 8 ...

Page 20: ...Service Call Procedures 1 2 11 06 FaxCentre 2121 2121L Page intentionally blank ...

Page 21: ...an cause injury WARNING Do not touch the fuser while it is hot WARNING Take care during this procedure Sharp edges may be present that can cause injury 1 Take note of symptoms or error messages 2 Ask the operator to describe or demonstrate the problem 3 Make sure that The power cord is connected to the wall outlet and to the machine All cables are connected correctly 4 If available check the machi...

Page 22: ...lean the control panel keys and the machine covers Note To clean the machine use a soft cloth Never use abrasives or detergents Paper Transport Rolls Figure 1 To clean the paper transport rolls perform the following 1 Set the on off switch to O off 2 Open the control panel scanner by actuating the cover release latch located on the left of the machine CAUTION The opening is limited to approx 60 by...

Page 23: ...prox 60 by stops Do not try to force the panel any further 3 Wipe the elements of the retard pad with a lint free cloth soaked with film remover Note The recommended interval is between 2 to 6 months CIS Window To clean the CIS Window perform the following 1 Set the on off switch to O off 2 Open the control panel scanner by pressing the cover release latch located on the left of the machine CAUTIO...

Page 24: ...he on off switch to O off 2 Clean the top of the control panel and the keys with a cloth dampened with water Perform when required Cleaning the Covers It is advisable to clean all covers during a service call It is recommended to wipe covers with a cloth dampened with water during a service call Top cover release latch Control panel ...

Page 25: ...placed by the user Note The contents of the Maintenance List are subject to change without notice Note For the part numbers see Parts Manual and Parts Modification Notice Table 1 Maintenance Schedule Component Clean Replace Reference Continuous One printed page per job Paper Feed Roll When a paper feed failure occurs Replace when a paper feed failure occurs PL 12 BTR 50K PL 12 Drum Cartridge 20K 1...

Page 26: ...e customers preferred set tings At the first service and at any subsequent service where changes are made or options are added print the configuration report and store it with the machine log book Discard any pre vious versions of the configuration report Mark off any hardware software options and modifications installed and or enabled on the Tag matrix card Complete the machine service log book G...

Page 27: ...5 4 Fuser Exit Misfeed RAP 6 5 Polygon Motor Malfunction RAP 7 6 Laser Malfunction RAP 8 7 Fuser Fan Malfunction RAP 9 8 Warm Up Failure RAP 10 9 Abnormally Low Fuser Temperature RAP 11 10 Abnormally High Fuser Temperature RAP 12 11 High Voltage Failure RAP 13 12 Controller Related Malfunctions RAP 14 13 Power Supply Failure RAP 15 14 Noise from Paper Tray RAP 16 ...

Page 28: ...Status Indicator RAPs 2 2 11 06 FaxCentre 2121 2121L Page intentionally blank ...

Page 29: ...is flat level and free from vibration If necessary move the machine Ensure that the temperature and humidity of the surroundings are within specification If nec essary move the machine Ensure that the machine is positioned away from any air conditioning or other heating or cool ing equipment Also ensure that it is not positioned in a direct draft from any air conditioning fan or open window If nec...

Page 30: ...after the misfeed has been cleared Table 1 Paper Misfeed Initial Actions Checks and Causes Solutions 1 Does the paper meet product specifica tions 1 Replace paper 2 Is the paper curled wrinkled or damp 2 Replace paper and instruct user of correct paper storage 3 Is the paper transport path deformed dirty or obstructed with foreign matter 3 Clean the paper path 5 Is the roll dirty deformed or worn ...

Page 31: ...feed sequence has started The Paper Feed Switch is de actuated too early after it has actuated The Paper Feed Switch is not de actuated within the correct time after it has actuated Table 2 Paper Feed Transport Misfeed Checks and Causes Solutions 1 Check the registration switch PL 12 Wir ing Diagram 2 1 Install a new registration switch PL 12 2 Check the exit sensor PL 10 Wiring Dia gram 1 2 Insta...

Page 32: ...in the fuser The paper de actuates the Exit Sensor too early after the paper feed switch has been actu ated The paper does not de actuate the Exit Sensor within the correct period of time after the paper feed switch has been actuated Table 3 Fuser Exit Misfeed Checks and Causes Solutions 1 Check the registration switch PL 12 Wir ing Diagram 2 1 Install a new registration switch PL 12 2 Check the e...

Page 33: ...gins 1 sec after the Polygon Motor has been energized No new LOCK signal is detected for a 1 sec period that begins 1 5 sec after the first LOCK signal was detected The LOCK signal is not detected for a continuous 0 5 sec period in a state in which the Poly gon Motor runs The LOCK signal remains ON for a continuous 5 sec period or more when the Polygon Motor remains de energized Table 4 Polygon Mo...

Page 34: ...e upper limit value The laser output remains lower than the lower limit value The Start Scan signal is not detected at all within a predetermined period of time after the laser has been turned ON The Start Scan signal is turned OFF Table 5 Laser Malfunction Checks and Causes Solutions 1 Check cables for connection 1 Tighten loose connections and correct con nections as necessary 2 Check the ROS PL...

Page 35: ... Moving parts can cause injury Description The LOCK signal remains HIGH or LOW continuously for a predetermined period of time while the fuser fan remains energized Table 6 Fuser Fan Malfunction Checks and Causes Solutions 1 Check the motor connectors 1 Tighten loose connections and correct as necessary 2 Check the fuser fan PL 9 Wiring Diagram 3 for possible overload 2 Install a new fuser fan PL ...

Page 36: ...egins 5 sec after and ends 9 sec after the start of the warm up cycle where the temperature detected by the thermistor is 80 C 176 F or less The temperature detected by the Thermistor does not increase for a 3 sec period or more for the period of time that begins after the lapse of a predetermined period of time after the fuser roll heat lamp has been turned ON and ends when the lamp is turned OFF...

Page 37: ...tected by the thermistor remains lower than the set temperature continuously for a predetermined period of time while the fusing temperature control is being provided The set temperatures are as follows 140 C 284 F during a print mode at 600 dpi 110 C 230 F during a print mode at 1200 dpi 70 C 158 F during the standby mode Table 8 Abnormally Low Fuser Temperature Check and Cause Solutions 1 Check ...

Page 38: ...ot need electricity Electricity can cause death or injury Moving parts can cause injury Description The temperature detected by the thermistor remains higher than 235 C 455 F for a predeter mined period of time Table 9 Abnormally High Fuser Temperature Checks and Causes Solutions 1 Check the thermistor 1 Install a new fuser PL 10 2 Install a new Main PBA PL 5 3 Install a new LVPS PL 11 2 Check the...

Page 39: ... injury Description The Drum Charge Monitor Voltage HVC_MON signal falls outside a predetermined range at any time after the lapse of a predetermined period of time after the power switch has been turned ON The Image Transfer Voltage Monitor signal T_MON_V and Image Transfer Current Monitor signal T_MON_I fall outside a corresponding predetermined range Table 10 High Voltage Failure Checks and Cau...

Page 40: ...res Engine Initialization failure Engine I F failure ROM Malfunction DRAM Malfunction EEPROM Malfunction Video transfer malfunction Data decompression failure Video output failure Unsupported engine failure Table 11 Controller Related Malfunction Checks and Causes Solutions 1 Check the flat cable connections 1 Tighten loose connections or correct and re place connections as necessary 2 Check the h...

Page 41: ...ply Failure Checks and Causes Solutions 1 Check that the power cord is connected into the power outlet 1 Connect the power cord into the power out let 2 Check that the power cord is connected to the machine 2 Connect the power cord correctly into the machine 3 Disconnect the power cord from the power outlet and the machine 3 Check the continuity of the power cord If necessary install a new power c...

Page 42: ...cord from the customer supply while performing tasks that do not need electricity Electricity can cause death or injury Moving parts can cause injury Description Noise from the paper tray when the machine is feeding paper Procedure 1 Apply plastislip grease PL 13 to the pivot points of the paper lift plate Refer to Figure 1 and Figure 2 Figure 1 Figure 2 ...

Page 43: ...lank Print and Black Print RAP 3 IQ 2 Deletions RAP 5 IQ 3 Contamination on Back of Page RAP 6 IQ 4 Light Image RAP 7 IQ 5 Background RAP 8 IQ 6 White Lines and White Streaks RAP 9 IQ 7 Black Lines and Black Streaks RAP 10 IQ 8 Ghost Images RAP 11 IQS 1 Copy Density 12 ...

Page 44: ...Image Quality 3 2 11 06 FaxCentre 2121 2121L Page intentionally blank ...

Page 45: ...ern set SOS 1 Bit 8 to 1 then press the key refer to GP 4 2 Printed page is blank 1 Check that the toner cartridge is not empty If necessary install a new toner cartridge PL 13 2 Check ROS connectors for proper connec tion 3 Is the coupling of the drive mechanism of the imaging cartridge properly connected 2 Check coupling of drive mechanism for connection and correct as necessary or Install a new...

Page 46: ...Is the problem eliminated when step 4 was checked 6 Install a new HVPS PL 11 7 Install a new Main PBA PL 5 8 If the problem still occurs Install a new CPU PL 5 9 Install a new ROS PL 11 Table 1 Blank Print and Black Print Checks and Causes Solutions ...

Page 47: ...periodically on the print Table 2 Deletions Checks and Causes Solutions 1 Determine the source of the problem Make a copy Print an internal test pattern Note To print an internal test pattern set SOS 1 Bit 8 to 1 then press the key refer to GP 4 2 Is paper damp 1 Load fresh paper 3 Is the drum scratched 2 Install a new Drum Cartridge PL 13 4 Is there foreign matter in paper path 3 Remove foreign m...

Page 48: ...tasks that do not need electricity Electricity can cause death or injury Moving parts can cause injury Description The back page is contaminated Table 3 Contamination on Back of Page Checks and Causes Solutions 1 Is there foreign matter in the paper path 1 Remove foreign matter 2 Is fuser roll dirty or scratched 2 Install a new Fuser Assembly PL 10 3 Is BTR dirty or scratched 3 Install a new BTR P...

Page 49: ...he source of the problem Make a copy Print an internal test pattern Note To print an internal test pattern set SOS 1 Bit 8 to 1 then press the key refer to GP 4 2 Are the machine settings correct 1 Correct the settings 3 Is the paper damp 2 Load fresh paper 4 Is there toner left in toner cartridge 3 Install a new Toner Cartridge PL 13 5 Is drum at end of life 4 Install a new Drum Cartridge PL 13 6...

Page 50: ... Dark background on the print Table 5 Background Checks and Causes Solutions 1 Determine the source of the problem Cover the ROS window Make a copy 1 If the fault is no longer present clean the ROS window or install a new ROS PL 11 2 Is drum scratched 2 Install a new Drum Cartridge PL 13 3 Is developing bias making good contact 3 Clean contact terminal or check terminal position 4 Is the problem e...

Page 51: ...n Straight thin white vertical lines occur in the printing Straight white vertical bands occur in the printing Table 6 White Lines and White Streaks Checks and Causes Solutions 1 Is BTR damaged scratched or dirty 1 Install a new BTR PL 12 2 Is drum scratched or dirty 2 Install a new Drum Cartridge PL 13 3 Is fuser roll scratched or dirty 3 Install a new Fuser Assembly PL 10 4 Is ROS window dirty 4...

Page 52: ...traight thin black vertical lines occur in the printing Straight black vertical bands occur in the printing Table 7 Black Lines and Black Streaks Checks and Causes Solutions 1 Is BTR damaged scratched or dirty 1 Install a new BTR PL 12 2 Is drum scratched or dirty 2 Install a new Drum Cartridge PL 13 3 Is fuser roll scratched or dirty 3 Install a new Fuser Assembly PL 10 4 Is the CIS window dirty ...

Page 53: ...ns 1 Distance between the image and the ghost image is 50 6 mm 1 BTR is scratched 1 Install a new BTR PL 12 2 Distance between the image and the ghost image is 51 8 mm 2 Flexible sleeve is scratched or dirty 2 Install a new Toner Car tridge PL 13 3 Distance between the image and the ghost image is 75 3 mm 3 Pressure roller is scratched or dirty 3 Install a new Fuser Assem bly PL 10 4 Distance betw...

Page 54: ...nd the machine luminosity M 8 4 1 6 to 1 point less than normal Make a copy of the test pattern Figure 1 Compare the copy with the test pattern The density of 4 1 line pair must be as dark or darker than the original The density of the 3 0 line must be as dark as the original The 3 3 blue area must be black The 2 0 2 2 and 2 4 areas must be black Figure 1 ...

Page 55: ...9 ROS 18 REP 10 Main Motor 20 REP 11 Paper Empty Sensor 21 REP 12 Paper Feed Solenoid 23 REP 13 Paper Feed Clutch 25 REP 14 Wrap Spring Feed Clutch 28 REP 15 White Roller 30 REP 16 Scanner Retard Pad 32 REP 17 Control Panel Circuit Board Key Pad Display Glass Top Cover with Loudspeaker 33 REP 18 CPU Board 36 REP 19 Control Panel Scanner Chassis Assembly 38 REP 20 CIS Flat Cable 41 REP 21 Motor Dri...

Page 56: ...Repairs Adjustments 4 2 11 06 FaxCentre 2121 2121L Page intentionally blank ...

Page 57: ...ore any repair or adjustment the machine must be switched off and all cords on the back of the machine disconnected phone line LAN parallel port and power cord Remove the document trays and the paper feed tray Tools Phillips screwdriver Torx hex screwdriver Torx10 Refer to PL 13 Flat screwdriver medium size ...

Page 58: ...connect the power cord from the customer supply while performing tasks that do not need electricity Electricity can cause death or injury Moving parts can cause injury Removal 1 Remove the imaging cartridge Note The Imaging Cartridge is the Drum Cartridge to which the Toner Cartridge is mounted 2 Using a soft cloth wipe the surface of the paper feed roll Figure 1 ...

Page 59: ...chine Disconnect the power cord from the customer supply while performing tasks that do not need electricity Electricity can cause death or injury Moving parts can cause injury Removal 1 Remove the imaging cartridge Note The Imaging Cartridge is the Drum Cartridge to which the Toner Cartridge is mounted 2 Remove the paper feed roll Figure 1 ...

Page 60: ...ridge is mounted 2 Release the locking tabs white on the right and left ends of the bias transfer roller Rotate the BTR downwards then remove it Figure 1 3 Pull out the bushings on the right and left ends and the gear from the BTR removed from its holder Install the bushings and the gear to the new BTR Note Do not touch or dirty with chemicals or toner the surface of the BTR as indentations in and...

Page 61: ...Repairs and Adjustments FaxCentre 2121 2121L 11 06 4 7 Replacement 1 Insert the new BTR into the BTR holder 2 Rotate the locking tabs into the original up right position Figure 3 ...

Page 62: ...itch off the electricity to the machine Disconnect the power cord from the customer supply while performing tasks that do not need electricity Electricity can cause death or injury Moving parts can cause injury Removal 1 Open the front door Figure 1 2 Remove the imaging cartridge Figure 2 ...

Page 63: ...from the drum cartridge Note If the Drum Cartridge is to be placed on a floor or similar place use care to prevent Toner from spilling Figure 3 Replacement 1 Take out a new toner cartridge and shake it in the horizontal direction sufficiently so that toner is agitated Note Placing the Toner Cartridge in an upright position or shaking it vigorously will spill toner Figure 4 ...

Page 64: ...e Insert the Toner Cartridge along the guide provided on the Drum Cartridge frame and make sure that the Toner Cartridge is not tilted when inserted Figure 5 3 Install the imaging cartridge in the machine Note Insert the Imaging Cartridge along the guide provided on the machine frame Figure 6 4 Close the front door ...

Page 65: ...hile performing tasks that do not need electricity Electricity can cause death or injury Moving parts can cause injury Removal 1 Remove the imaging cartridge Note The Imaging Cartridge is the Drum Cartridge to which the Toner Cartridge is mounted Figure 1 2 Pull the lever of the toner cartridge in the direction shown in the illustration and disconnect the drum cartridge Figure 2 ...

Page 66: ...dge Note Insert the Toner Cartridge along the guide provided on the new Drum Cartridge frame and make sure that the Toner Cartridge is not tilted when inserted 2 Install the imaging cartridge in the machine Note Insert the Imaging Cartridge along the guide provided on the machine frame Figure 3 3 Close the front door ...

Page 67: ...jury WARNING Do not touch the fuser or any surfaces around the fuser while they are hot Removal 1 Turn OFF the power switch unplug the power cord and let the machine cool down 2 Remove the left and right covers 3 Remove the Control Panel Scanner Chassis Assembly REP 19 4 Remove two screws and two washers Then remove the fuser protective cover Figure 1 5 Remove the upper transport cover Remove two ...

Page 68: ...ide assembly to the new fuser 3 Connect connector A Figure 3 4 Mount the fuser in the machine and secure it in position by tightening the two screws 5 Connect connectors B and C Note When installing the Fuser route the harness as shown in Figure 3 Do not trap the harness between the Fuser and Machine 6 Reinstall the fuser protective cover ...

Page 69: ...tricity can cause death or injury Moving parts can cause injury Removal 1 Remove the Right Cover REP 25 2 Disconnect all external connectors to the CPU board 3 Remove two screws then the CPU metal cage 4 Disconnect all connectors and the flat cable from the Main PBA CAUTION Use utmost care not to snap off the flat cable 5 Remove four screws then the Main PBA Figure 1 Replacement 1 The replacement ...

Page 70: ...lectricity Electricity can cause death or injury Moving parts can cause injury Removal 1 Remove the Fuser Assembly REP 6 steps 1 to 6 2 Remove two screws and the power switch stay Figure 1 3 Remove the CPU metal cage REP 18 steps 3 to 5 4 Disconnect PJ7 from the Main PBA 5 Remove five screws disconnect two ground harnesses disconnect CN1 from the HVPS and CN3 on the LVPS then remove the power unit...

Page 71: ...entre 2121 2121L 11 06 4 17 6 Remove four screws then the LVPS as shown in figure 3 Figure 3 7 Remove one screw then the HVPS as shown in the figure 4 Figure 4 Replacement 1 The replacement is the reverse of the removal procedure ...

Page 72: ...ARNING Avoid exposure to laser beam Invisible laser radiation Removal 1 Remove the control panel scanner chassis assembly REP 19 steps 1 to 9 2 Remove the fuser exit guide assembly from the fuser 3 Remove the CPU metal cage REP 18 steps 3 to 5 4 Disconnect one connector and one flat cable from the Main PBA Note Use utmost care not to snap off the flat cable Figure 1 5 Remove three screws and the R...

Page 73: ...ts FaxCentre 2121 2121L 11 06 4 19 Replacement 1 The replacement is the reverse of the removal procedure CAUTION Do not touch the window on the under side of the ROS A dirty window can cause image quality problems Figure 3 ...

Page 74: ...the power cord from the customer supply while performing tasks that do not need electricity Electricity can cause death or injury Moving parts can cause injury Removal 1 Remove the left cover REP 24 2 Disconnect one connector 3 Remove two screws two washers then the main motor Figure 1 Replacement 1 The replacement is the reverse of the removal procedure ...

Page 75: ...ury Moving parts can cause injury 1 Remove the imaging cartridge REP 4 steps 1 and 2 2 Use a flat bladed screwdriver to carefully release the right side of the front door then remove the front door 3 Remove the left cover REP 24 and the right cover REP 25 4 Remove the CPU metal cage REP 18 steps 3 to 5 5 Disconnect PJ12 and PJ14 from the Main PBA 6 Unhook two tabs disconnect one connector Remove t...

Page 76: ...Repairs and Adjustments 4 22 11 06 FaxCentre 2121 2121L 8 Disconnect one connector and remove the paper empty sensor Figure 3 Replacement 1 The replacement is the reverse of the removal procedure ...

Page 77: ... cord from the customer supply while performing tasks that do not need electricity Electricity can cause death or injury Moving parts can cause injury Removal 1 Remove the left cover REP 24 2 Disconnect the paper feed solenoid inline connector Figure 1 3 Remove one screw then the paper feed solenoid Figure 2 Replacement 1 Mount the paper feed solenoid and tighten one screw ...

Page 78: ...Repairs and Adjustments 4 24 11 06 FaxCentre 2121 2121L 2 Turn the gear in the direction of the arrow shown below so that the arm of the paper feed solenoid catches the gear Figure 3 ...

Page 79: ... performing tasks that do not need electricity Electricity can cause death or injury Moving parts can cause injury 1 Remove the Fusing Assembly REP 6 2 Remove the Power Unit Assembly REP 8 3 Remove the Paper Feed Upper Guide Assembly REP 11 steps 1 to 6 4 Disconnect one connector and remove the Cooling Fan Motor PL 9 item 2 5 Remove the Main Motor Figure 1 6 Remove the Paper Lifting Plate Assembly...

Page 80: ...e 2121 2121L 7 Disconnect the Paper Feed Solenoid inline connector Remove four screws then carefully release the Left Frame Figure 3 8 Remove one screw then the Paper Feed Solenoid Figure 4 9 Remove one screw then the Paper Feed Clutch Figure 5 ...

Page 81: ...xCentre 2121 2121L 11 06 4 27 Replacement 1 The replacement is the reverse of the removal procedure CAUTION Take care when re installing the left frame Make sure all components are correctly aligned before installing the screws ...

Page 82: ...ry Moving parts can cause injury Removal 1 Remove the Paper Feed Clutch REP 13 2 Remove the coupling gear then the Wrap Spring Feed Clutch Figure 1 Replacement The Coupling Gear has five positions for adjusting the position of the Feed Roller Figure 2 Figure 2 When the Wrap Spring Feed Clutch is replaced adjust the set position of the Coupling Gear so that the Feed Roller is correctly positioned T...

Page 83: ...d with the Paper Feed Solenoid armature Figure 3 4 Check the position of the Feed Roller If the Feed Roller is biased clockwise Figure 4 move the coupling gear in the direction of A refer to Figure 2 Figure 4 5 If the Feed Roller is biased counter clockwise Figure 5 move the coupling gear in the direc tion of B refer to Figure 2 Figure 5 ...

Page 84: ...cause injury Removal 1 Stand at the back of the machine 2 Press the top cover release latch 3 Press outwards on the latch and release the stop 4 Press outwards on the latch hold and extract the white roller 5 Remove and keep the gear and the bearings Figure 1 Replacement 1 Unpack the new white roller and inspect it visually Fit the bearings and gear on the new roller 2 Place the equipped white rol...

Page 85: ...Adjustments FaxCentre 2121 2121L 11 06 4 31 3 Press on the latch and place the other end of the white roller in end housing A 4 Press on the latch and close the control panel letting the stop lock behind the latch ...

Page 86: ...old the retard pad assembly while removing the mounting screw Remove the assembly Note The fixing plate is attached to a ground wire Move the plate to one side to remove the remaining parts Figure 1 Replacement 1 Visually inspect the new parts 2 Put the new parts in place on the control panel in the following order Slide plate retard pad centre blade spring side blade spring and fixing plate Make ...

Page 87: ...cause death or injury Moving parts can cause injury CAUTION The active surface of the CIS is fragile and light sensitive Take care to protect it and to expose it to light as little as possible during this operation Removal 1 Stand at the back of the machine 2 Press the top cover release latch Use a flat screwdriver as a lever at the four locations shown in Figure 1 to unclip and remove the top cov...

Page 88: ...nnect the control panel flat cable and remove the control panel 6 Disconnect the flat cable of the display and the loudspeaker connector 7 Remove the eight mounting screws of the control panel board Remove the control panel board the key pad the display the glass and the control panel cover Replacement 1 Unpack and visually inspect the new parts 2 Put the new parts in place on the control panel co...

Page 89: ...1 06 4 35 5 Position the lower part of the control panel on the chassis and clip it in place Press down on the upper part of the control panel to complete the assembly Figure 3 Mounting screws Control panel Key pad Display Display window Top cover ...

Page 90: ...eed electricity Electricity can cause death or injury Moving parts can cause injury Removal 1 Perform a remote readout if the function has been enabled 2 Save the directory and the parameters on a directory card MENU 5 3 Remove the right hand cover REP 25 4 Disconnect all external connectors to the CPU board 5 Remove two screws then the CPU metal cage Figure 1 6 Remove the five mounting screws the...

Page 91: ...s 4 Reconnect all cables 5 Replace the right cover and close the control panel 6 Restore directory and parameters from the directory MENU 9 7 Perform a remote readout if the function has been enabled 8 Perform a scanner calibration MENU 8 0 Note It is essential that the E2PROM memory stays with the machine because this memory contains The consumables counters The counters of the number of printed ...

Page 92: ...achine Disconnect the power cord from the customer supply while performing tasks that do not need electricity Electricity can cause death or injury Moving parts can cause injury Removal 1 Remove the document trays from the machine 2 Open the front door 3 Remove the left cover REP 24 4 Remove the two screws shown in Figure 1 Figure 1 5 Remove the right cover REP 25 ...

Page 93: ... 2121L 11 06 4 39 6 Remove the two screws shown in Figure 2 Figure 2 7 Disconnect the cables shown in figure 3 Figure 3 CAUTION Take note of the blue reinforcing tape on the flat cables The cables must be reconnected in the same orientation ...

Page 94: ...t to damage the paper output guides Replacement CAUTION Take care not to damage the upper transport cover when placing the scanner assembly back into position Lift the paper output guides before placing the scanner assembly so that they don t interfere with the assembly 1 The replacement is the reverse of the removal procedure 2 Perform a scanner calibration MENU 8 0 3 Print out a gray scale sampl...

Page 95: ...ming tasks that do not need electricity Electricity can cause death or injury Moving parts can cause injury Removal 1 Dis assemble the scanner assembly REP 23 2 Turn the scanner up side down Remove the three screws show in Figure 1 Figure 1 3 Remove the two cover screws shown in Figure 2 Figure 2 4 Remove the scanner lower cover CAUTION Take care not to damage the CIS assembly ribbon cable ...

Page 96: ...6 FaxCentre 2121 2121L 5 Remove the CIS securing screw then the CIS assembly Figure 3 Figure 3 6 Disconnect the CIS flat cable from the CIS Remove the CIS flat cable Replacement 1 The replacement is the reverse of the removal procedure ...

Page 97: ...mble the control panel scanner chassis assembly REP 23 2 Free the wires that supply the motor drive from their cable guide 3 Remove the two mounting screws Disconnect the grounding screw 4 Remove the motor drive Remove and keep the 44 18 gear Figure 1 Replacement 1 Unpack and visually inspect the new parts 2 Attach the 44 18 gear on the motor drive 3 Pass the wires in the wire guide Connect the gr...

Page 98: ...p 5 Free the control panel flat cable 6 With the control panel assembly placed on a work surface take hold of the control panel and lift the chassis towards the right to free the left hand joint then push it forward to free the right hand joint Disconnect the control panel grounding wire and remove the chassis Figure 1 7 Free the control panel flat cable from the cable guide and remove it Replacem...

Page 99: ...t do not need electricity Electricity can cause death or injury Moving parts can cause injury Removal 1 Remove the Control Panel Scanner Chassis Assembly REP 19 2 Remove the screw beside the scanner release button as shown in Figure 1 Figure 1 3 Remove the screw on the right side of the scanner beside the alignment pin as shown in Fig ure 2 Figure 2 4 Release the catch on the left of the Control P...

Page 100: ...e right catch located underneath the right side of the Control Panel Scanner Chas sis Assembly Figure 4 Figure 4 6 Separate the Control Panel Scanner Chassis from the lower scanner frame Replacement 1 The replacement is the reverse of the removal procedure Left catch Right catch ...

Page 101: ...he power cord from the customer supply while performing tasks that do not need electricity Electricity can cause death or injury Moving parts can cause injury Removal 1 Remove the screw located on the rear of the machine above the power cord connection Figure 1 2 Release the rear of the cover then remove the cover toward the front of the machine Figure 2 ...

Page 102: ...pairs and Adjustments 4 48 11 06 FaxCentre 2121 2121L Replacement 1 Slide the cover in place Fit the cover by firmly pushing into place as indicated in Figure 3 Figure 3 2 Reinstall the screw on the rear ...

Page 103: ...ne Disconnect the power cord from the customer supply while performing tasks that do not need electricity Electricity can cause death or injury Moving parts can cause injury Removal 1 Remove the screw located at the rear of the right cover Figure 1 2 Release the rear of the cover then remove the cover toward the front of the machine Figure 2 ...

Page 104: ...pairs and Adjustments 4 50 11 06 FaxCentre 2121 2121L Replacement 1 Slide the cover in place Fit the cover by firmly pushing into place as indicated in Figure 3 Figure 3 2 Reinstall the screw on the rear ...

Page 105: ...l Panel and Scanner 6 PL 4 Retard Pad and White Roller Assemblies 8 PL 5 Printer Unit Assembly 10 PL 6 Control Panel Assembly 12 PL 7 Paper Tray 14 PL 8 CIS Support and Motor Drive Assemblies 16 PL 9 Drive Transfer Unit 18 PL 10 Fuser Assembly 20 PL 11 Power Supplies and ROS Unit 22 PL 12 Paper Feed Section 24 PL 13 Consumables Tools and Kits 26 ...

Page 106: ...Spare Parts List 5 2 11 06 FaxCentre 2121 2121L PL 1 FaxCentre 2121 Assemblies and Trays 3 2 1 4 7 6 5 9 8 10 ...

Page 107: ... Introducteur scanner assemblé 3 117N01773 AC Power cord Cordon d alimentation secteur 4 117N01774 Telephone line cord Cordon ligne téléphonique 5 050N00510 Paper feed tray Bac papier imprimante 6 050N00511 Paper output tray Réceptacle imprimante assemblé 7 050N00512 Document output tray Réceptacle sortie scanner 8 117N01784 USB Cable 9 091N80262 Directory card 10 091N80261 Legend label ...

Page 108: ...Spare Parts List 5 4 11 06 FaxCentre 2121 2121L PL 2 Machine Assembly 1 3 5 6 2 4 ...

Page 109: ...nel Pupitre équipé Refer to PL 6 2 Scanner assembly Scanner assemblé Refer to PL 4 REP 23 3 002N02656 Right cover Capot droit REP 25 4 050N00515 Paper tray 2 optional Bac supplémentaire 500 feuilles selon modèle ou option 5 Printer assembly Imprimante assemblée ROHS Not spared 6 002N02657 Left cover Capot gauche REP 24 ...

Page 110: ...Spare Parts List 5 6 11 06 FaxCentre 2121 2121L PL 3 Control Panel and Scanner 2 1 ...

Page 111: ...l Panel and Scanner Item Part Number Description Remark 1 Control panel scanner chassis assembly Ensemble pupitre châssis scanner Refer to PL 4 2 Mounting screws for printer control panel scan ner Vis de fixation imprimante pupitre scanner Part of PL 13 item 1 ...

Page 112: ...Spare Parts List 5 8 11 06 FaxCentre 2121 2121L PL 4 Retard Pad and White Roller Assemblies 1 5 6 7 4 3 2 8 ...

Page 113: ...assembly Ensemble pupitre REP 22 2 019N00929 Scanner retard pad assembly Kit déliasseur REP 16 3 101N01412 Scanner chassis assembly Ensemble châssis scanner 4 007N01574 37 29 pinion gear Pignon 37 29 5 013N13869 Bearing Palier 6 022N02313 White roller Rouleau blanc REP 15 7 013N13870 Bearing Palier 8 022N02314 Feed roll assembly Ensemble rouleau chargeur ...

Page 114: ...Spare Parts List 5 10 11 06 FaxCentre 2121 2121L PL 5 Printer Unit Assembly 1 4 2 3 8 5 6 7 9 11 10 ...

Page 115: ...2N02660 Jam access cover Capot accès papier 4 002N02661 CPU board cover Mylar carte UC 5 140N63243 140N63244 CPU board F2121 CPU board F2121L Carte UC REP 18 6 002N02662 Card cage cover Tôle UC 7 002N02663 Front right cover Fixation avant droite 8 002N02664 Front left cover Fixation avant gauche 9 140N63253 Main PBA REP 7 10 EPROM Not spared 11 Mounting screws for the top cover assembly Part of PL...

Page 116: ...Spare Parts List 5 12 11 06 FaxCentre 2121 2121L PL 6 Control Panel Assembly 1 2 3 4 5 6 7 8 ...

Page 117: ...quette plastron 2 002N02685 Control panel top cover Plastron REP 17 3 062N00280 Display glass Vitre afficheur REP 17 4 128N00528 LCD display Afficheur LCD REP 17 5 019N00938 Key pad Elastomère REP 17 6 140N63254 UI Control board Cartre pupitre REP 17 7 Mounting screws for control panel board Vis de fixation carte pupitre Part of PL 13 item 1 8 117N01775 Control panel flat cable Nappe pupitre ...

Page 118: ...Spare Parts List 5 14 11 06 FaxCentre 2121 2121L PL 7 Paper Tray 1 2 ...

Page 119: ...Spare Parts List FaxCentre 2121 2121L 11 06 5 15 PL 7 Paper Tray Item Part Number Description Remark 1 Paper tray assembly Tiroir papier Refer to PL 1 2 002N02665 Cover Couvercle ...

Page 120: ...Spare Parts List 5 16 11 06 FaxCentre 2121 2121L PL 8 CIS Support and Motor Drive Assemblies 1 2 4 5 3 ...

Page 121: ...Item Part Number Description Remark 1 117N01776 CIS flat cable Nappe CIS REP 20 2 127N07532 CIS Motor assembly Motorisation REP 21 3 007N01575 44 18 pinion gear Pignon 44 18 4 Mounting screws for motor drive Vis de fixation motorisation Part of PL 13 item 1 5 117N01777 Ground wire Fil de masse ...

Page 122: ...Spare Parts List 5 18 11 06 FaxCentre 2121 2121L PL 9 Drive Transfer Unit ...

Page 123: ...e assembly Structure gauche assemblée 2 127N07540 Fuser fan Ventilateur 3 127N07541 Main drive motor Moteur REP 10 4 Drive gear assembly Support assemblé Not spared 5 Drive gear assembly Platine assemblée Not spared 6 038N00510 Paper feed guide Guide papier assemblé 7 Right frame assembly Structure droite assemblée Not spared ...

Page 124: ...Spare Parts List 5 20 11 06 FaxCentre 2121 2121L PL 10 Fuser Assembly 2 1 ...

Page 125: ...Spare Parts List FaxCentre 2121 2121L 11 06 5 21 PL 10 Fuser Assembly Item Part Number Description Remark 1 032N00483 Transport assembly Guide assemblée 2 126N00278 Fuser assembly Four REP 6 ...

Page 126: ...Spare Parts List 5 22 11 06 FaxCentre 2121 2121L PL 11 Power Supplies and ROS Unit ...

Page 127: ...re 2121 2121L 11 06 5 23 PL 11 Power Supplies and ROS Unit Item Part Number Description Remark 1 105N02133 LVPS Carte alimentation REP 8 2 112N00226 HVPS Carte HT REP 8 3 062N00277 ROS assembly Tête d impression assemblé REP 9 ...

Page 128: ...Spare Parts List 5 24 11 06 FaxCentre 2121 2121L PL 12 Paper Feed Section ...

Page 129: ...1101 Feed clutch Embrayage REP 13 REP 14 5 009N01620 Normal force spring Ressort pour palette imprimante 6 015N00603 Lift plate Palette imprimante 7 107N00451 Tray empty sensor Capteur 8 019N00930 Sensor mounting bracket Support 9 110N01419 Registration switch Capteur 10 038N00512 Paper guide Support 11 121N01152 Feed solenoid Electro aimant REP 12 12 022N02328 Bias transfer roll BTR 13 120N00515 ...

Page 130: ...Spare Parts List 5 26 11 06 FaxCentre 2121 2121L PL 13 Consumables Tools and Kits ...

Page 131: ...m Part Number Description Remark 1 500N00114 Hardware kit 2 095N99318 Packaging box with inserts 3 Toner cartridge Refer to the User Guide for the part number 4 Drum cartridge Refer to the User Guide for the part number 5 043E00550 Plastislip grease 6 600T41300 Torx bit kit with handle ...

Page 132: ...Spare Parts List 5 28 11 06 FaxCentre 2121 2121L Page intentionally blank ...

Page 133: ...adout 34 GP 7 Saving Data on the Directory Card 40 GP 8 Packaging and Transport of the Machine 42 GP 9 Functions of the Service Provider 43 GP 10 Paper Path 47 GP 11 Paper Feed Section 48 GP 12 Drum Charge 50 GP 13 ROS Unit 51 GP 14 Imaging Cartridge Section 56 GP 15 Image Transfer 62 GP 16 Fuser Assembly 63 GP 17 Paper Exit 66 GP 18 Functioning 67 GP 19 Operating Sequence 68 GP 20 Scanning and Co...

Page 134: ...General Procedures and Information 6 2 11 06 FaxCentre 2121 2121L Page intentionally blank ...

Page 135: ...or equal to 3000 lux Fax Storage Temperature 0 C to 40 C 35 F to 104 F Temperature changes Less than or equal to 10 C 50 F hour Humidity 20 to 80 RH non condensing Humidity changes Less than or equal to 20 hour Altitude From 0 to 2500 meters 8202 feet above sea level Consumables Storage Normal temperature 0 C to 35 C 32 F to 95 F Extreme temperatures 10 C to 0 C 14 F to 32 F and 35 C to 40 C 95 F ...

Page 136: ...16lb to 24lb Capacity of document loading tray 35 pages Acquisition time for black and white document Normal 200 x 100dpi 1 8 sec Fine 200 x 200dpi 3 6 sec Super fine 200 x 400dpi 5 4 sec Photo 200 x 200dpi 3 6 sec 300 dpi 300 x 300dpi 5 4 sec First copy print out time for color document 300 x 300dpi 16 sec Zoom in steps of 1 25 to 400 Contrast 7 levels Brightness 7 levels Margin adjustment in ste...

Page 137: ...acity of the output tray in pages 100 Printing rate 20ppm Printing area 206 x 292mm 8 1x11 5 inch Max number of jobs in the print queue 500 Consumable life Max drum capacity A4 pages ratio 5 20000 Max toner cartridge capacity A4 pages ratio 5 6000 Consumables management By smart card Weight of drum 300g 0 66lb Table 5 Printer General Specifications Item FaxCentre 2121 Type Desktop Laser Beam Print...

Page 138: ...mmended paper MP Tray 150 sheet Paper Exit System Face down Tray capacity 100 sheets Drum Charging System Rotating brush pre charge film Developing System FMT single component developing system BTR Transfer Roller system Drum OPC organic photoconductor Drum Cleaning System Non cleaner system Detack System Curvature separating system Charge Neutralizing Needle Fuser System Heated roller system Dime...

Page 139: ... 1200 1200 Emulation None Printer Driver Windows 98SE 2000 Me XP Test Print Configuration page Table 7 Copier Specifications Item FaxCentre 2121 Type Black and white Input resolution optical dpi 300 x 200 fast or 300 x 300 quality Output resolution dpi 600 x 600 Paper size A4 210 x 297mm Legal Letter 8 5x11 inch Maximum speed with resolution 300 x 200 fast 20ppm Multicopy 1 to 99 Zoom 25 to 400 Zo...

Page 140: ...capacity bps 4800 to 9600 V22bis capacity bps 2400 V22 capacity bps 600 to 1200 Table 10 Fax Communication Specifications Item FaxCentre 2121 Type PSTN ITU 30 G3 V34Fax Maximum speed bps 33600 Coding MH MR MMR JBIG ECM T30 ECM Time to transmit 2 5 sec Type of transmission From memory and immediate Max send delay 24 hours PSTN redial 10 Table 11 Internet Access Specifications Item FaxCentre 2121 Ty...

Page 141: ...e initial capacity of the consumable from 100 to 1 Table 12 LAN Access Specifications Item FaxCentre 2121 Type Ethernet 10 100 base T Plug and Play configuration DHCP BOOTP Internet protocol TCP IP DNS 2 DNS servers access Table 13 E mail and Fax Communication Specifications Item FaxCentre 2121 Compatibility ITU T37 Mail protocol sending SMTP Mail protocol polling POP3 Mail format MIME Charset US ...

Page 142: ...s of the consumable counters are updated regularly in the flash memory At each power on the machine the counters are read from the flash memory Furthermore it is essential to initialize the new consumables with the smart card supplied with the consumable refer to the User Guide ...

Page 143: ... Original document output tray Printer output tray Printer Printer paper feed tray Second paper cassette option Scanner AC power connector Phone cord AC power cord Scanner release button On Off switch Second cassette paper tray 500 pages Smart card reader Telephone line connector Document feed tray for scanning Adjustable paper guide ...

Page 144: ...ses An alphanumeric keyboard and function keys used to control the machine A display with 2 lines of 16 characters and a line of icons to display control messages and alerts to the user A smart card reader used to initialize the consumables It can also be used to store user func tions directory and user parameters When replacing the machine it is advisable to transfer the consumables toner cartrid...

Page 145: ...1 06 6 13 GP 3 Machine Dimensions and Installation Instructions Machine Dimensions Figure 1 Note Figure 1 shows the overall dimensions of the machine optional accessories not included 530 mm 260 mm 510 mm 420 mm 420 mm 21 6 in 17 1 in 10 6 in 20 8 in 17 1 in ...

Page 146: ...he machine the following points should be taken into account The telephone socket should be located no more than 2 meters 6 5 feet from a telephone socket A standard single phase power socket with ground rated in conformance with the information on the label on the back of the fax should be located at no more than 2 meters 6 5 feet For easy access to the machine leave a space of about 10 cm 3 9 in...

Page 147: ...e end of the LAN cable supplied by your network administrator into socket B of the machine and the other end into the local area network socket allocated to your fax Powering up the machine WARNING Refer to the safety regulations in the Introduction Plug one end of the power cord 2 into the power socket D of the machine and the other end into the wall socket the types of connector may vary dependi...

Page 148: ...o the PC connector C located at the back of your machine Connect the other end of the PC cable to the USB port of your PC Paper Supply Installing the paper tray Using the left and right tabs of the printer as a guide carefully push in the tray until it stops as shown in the Figure 3 Figure 3 Put the tray cover in place ...

Page 149: ...Installing an additional paper tray option Refer to the User Guide Figure 4 Installing the Trays Document input tray Install the tray by inserting the two tabs in the corresponding openings at the back of the machine Figure 5 415 mm 115 mm 475 mm 16 9 in 4 6 in 19 3 in ...

Page 150: ...e two tabs in the corresponding openings at the front near the top of the machine Figure 6 Output Tray With both hands slightly bend the centre part of the tray upwards in order to insert its tabs into the notches located on the upper part of the printer Figure 7 Installing the Consumables Refer to the User Guide 1 2 1 2 ...

Page 151: ...y test configurations The installer can obtain a printed listing of these parameters key sequence MENU 5 4 OK Note It is advisable to keep a paper copy of the list of these parameters at delivery Only service personnel are authorised to access the parameters The machine is equipped with a set of logic blocks referred to as SOS Soft Switches Each block consists of 8 bits called bit 1 to 8 Each bit ...

Page 152: ...Long short pause while dialing Values 0 Short 2sec or 1 Long 6sec 4 0 Reserved 5 0 Reserved 6 1 SOS IMPAUTO Automatic log print Values 0 No or 1 Yes 7 0 SOS IMPT30 Automatic printing of T30 trace after comm error Val ues 0 No 1 Yes 8 0 SOS IMPTRA Trace printing PC download enable Values 0 No 1 Yes Table 2 Scanner Printer engine configuration Bit Default Value Naming 1 0 Reserved 2 0 Reserved 3 0 K...

Page 153: ...ation Bit Default Value Naming 1 1 SOS MODPRIV Communication in private mode Values 0 No 1 Yes 2 0 SOS DIS COURT Restricted DIS size Values 0 long DIS complete 1 Short DIS 3 0 SOS TCF TCF accept criterion Values 0 Normal refused if there has not been 1 continuous second 1 Special 1 discontinuous second in the TCF then accepted sys tematically at 2 400 b s 4 0 SOS RTN Page accept criterion Values 0...

Page 154: ...erved 5 0 Reserved 6 0 Reserved 7 0 Reserved 8 0 SOS TSTDCOM Driver test functions Values 0 No 1 Yes Table 7 Reserved Bit Default Value Naming 1 1 Reserved 2 1 Reserved 3 1 Reserved 4 0 Reserved 5 0 Reserved 6 0 Reserved 7 0 Reserved 8 1 Reserved Table 8 Remote readout internal answering machine modem Bit Default Value Naming 1 0 SOS TLR Remote readout enable ATTENTION Values 0 No remote readout 1...

Page 155: ... 5 sec line 1 Maximum length of a line 5 seconds 8 1 SOS AGRE FRA French approval functions Values 0 No 1 Yes Table 10 Communications Locks Miscellaneous Bit Default Value Naming 1 0 SOS AFFVIT Communication rate display Values 0 No the page number is displayed 1 Yes the comm rate is displayed 2 1 SOS BTYPNUM Access to impulse DTMF parameter Values 0 Yes Reserved 1 No 3 0 Reserved 4 1 Reserved 5 1...

Page 156: ... SOS PROMONET Auto directory enrichment Internet promotion Values 0 No automatic enrichment of directory 1 automatic enrichment of directory enabled 5 0 SOS VIDEMBOX Delete first message in the mailbox Values 0 No 1 Systematically delete first document 6 0 SOS VIDEALLMBOX Delete entire mailbox Values 0 No 1 Systematically empty mailbox 7 0 Reserved 8 1 SOS PJTXT Text attachment processing Values 0...

Page 157: ...ompression protocol field Values 0 No compression 1 compression enabled 4 0 SOS REPSMTP Wait for 2 packets after HELO command in SMTP Values 0 Normal wait for single rely packet 1 Wait for a second packet if the first one is empty 5 0 Reserved 6 0 Reserved 7 0 Reserved 8 1 Reserved Table 16 Internet Bit Default Value Naming 1 0 SOS ACKNORECNET2 Send a message not understood reply on reception of T...

Page 158: ...rt printout 8 0 Values 00 no 01 yes 10 systematically 11 only in case of error Table 18 Coding UART Rate Bit Default Value Naming 1 1 SOS CODMEM Stored document encoding type 2 1 Values 00 RL encoding 01 MH encoding 10 MR encoding 11 MMR encoding 3 1 SOS CODCOM COM negotiated encoding type 4 1 Values 01 MH encoding 10 MR encoding 11 MMR encoding 5 0 SOS VITUART Baud rate of serial link to modem 6 ...

Page 159: ...Reserved 7 1 Reserved 8 1 Reserved Table 21 Decoder Debug Bit Default Value Naming 1 1 SOS TRAITLIGERR T4 decoding line copying mode Values 0 For each line with an error 1 Only once then destroy 2 0 Reserved 3 0 Reserved 4 0 Reserved 5 1 SOS GARBAGE FLASH Flash memory garbage collection method Values 0 garbage collection when application terminates 1 garbage collection as background task Attention...

Page 160: ...anager Table 23 Miscellaneous Bit Default Value Naming 1 1 SOS JBIG SUPER G3 capability to execute communication with JBIG encoding Values 0 No SUPER G3 1 negotiated SUPER G3 2 0 SOS BRID LAN Restriction on LAN function Values 0 No 1 Yes 3 0 SOS FSI NOCOVER Inhibition of generation of cover pages Values 0 FSI V6 cover page 1 FSI V7 cover page SAGEM Only 4 1 SOS COMPACTE RL Compacting of run length...

Page 161: ...Disabled 1 Enabled 6 0 Reserved 7 1 SOS SMSRECV23 Activation of the SMS V23 reception function Values 0 No SMS V23 reception 1 With SMS V23 reception 8 0 SOS SMSV23 Activation of the SMS V23 reception function Values 0 SMS V23 enabled 1 SMS Internet enabled Table 25 SMS Bit Default Value Naming 1 0 SOS TIMSMSSWITCH Waiting time before transmitting a RING after the first buzzer preceding the CLIP 0...

Page 162: ...th or without dual chip smart card 0 With dual chip smart card display PUT IN OTHER WAY sync chip detected 1 No dual chip smart card management display WRONG CARD if sync chip detected 4 0 Restriction on USB function 0 No 1 Yes 5 0 With or without duplication of on page passage threshold 0 No duplication NBI_SUP_B 1cm 1 Duplication NBI_SUP_B 2 2 cm 6 0 RR RNR regulation limitation to 4 in T30 0 No...

Page 163: ...vation of fax modification for DTS label 0 Missing 1 Present 2 0 Carrier drop in ECP mode for DTS label 0 Missing 1 Present 3 0 Disable the 1 second timer before the hanging up 0 Enabled 1 Disabled 4 0 SMS reception error in manual mode in Austria 0 Modification disabled 1 Modification enabled 5 0 Number of bits at the end of frame 0 18 mark bits 1 10 1 6 mark bits 6 0 Telecom Timers Italy 0 With ...

Page 164: ... rates 0 Enabled 1 Disabled 5 0 Restriction on ECP driver for dumping without menu D 0 ECP enabled 1 Disabled 6 0 Restriction on Modem presence 0 Modem present 1 Modem missing 7 0 Reserved 8 0 Reserved Table 30 Miscellaneous Bit Default Value Naming 1 0 Reserved 2 0 Reserved 3 0 Reserved 4 0 Reserved 5 0 Reserved 6 0 Reserved 7 0 Reserved 8 0 Reserved Table 29 Miscellaneous Bit Default Value Namin...

Page 165: ...formation FaxCentre 2121 2121L 11 06 6 33 GP 5 Software Download The machine software can be updated by means of a link to a PC Download Via PC Link Use the Firmware Download Tool provided on the CD in the product training kit ...

Page 166: ...ns of another softswitch bit 5 of SOS 10 which can be set to 1 for conventional fax transmission and 0 for transparent mode Trigger Criteria The remote readout can be triggered by two types of criteria day or threshold The day criterion is based on the interval in days parameter entered in the remote readout menu accessed by the key sequence MENU 6 This parameter represents the interval at the end...

Page 167: ... key sequence MENU 6 for each consumable the first remote readout will be triggered on the base of a threshold criterion of 1000 pages After this when the consumable has been replaced and after reading the smart card the machine switches to the standard remote readout mode as described earlier Description of the Transmitted Data Format of transmitted data in transparent mode When a criterion is me...

Page 168: ... Yes TDATE_EMIS 0x21 char No T_CPT_PAGES 0x40 long No T_CRIT_JOURS 0x42 long Yes T_CPT_PAGES_JOURS 0x43 long No T_DATE_SEUIL_JOURS 0x45 char No T_INIT_NOIR 0x46 long No T_CPT_NOIR 0x47 long No T_SEUIL_NOIR 0x48 long Yes T_DATE_SEUIL_NOIR 0x49 char No T_DATE_CHG_NOIR 0x4a char No T_INIT_OPC 0x5a long No T_CPT_OPC 0x5b long No T_SEUIL_OPC 0x5c long Yes T_DATE_SEUIL_OPC 0x5d char No T_DATE_CHG_OPC 0x...

Page 169: ...al to this report The report uses the presentation shown below Description of the Parameters The different fields shown in the report are described below General Information Code 23xxxxx TNO_23MIL The 23M of the module managed by the server entered by the installer Serial number TNO_SERIE The identification of the terminal entered by the installer Client account number TNO_CLIENT The identificatio...

Page 170: ... day criterion 0 if the criterion is not active entered by the installer Last remote maintenance T_DATE_SEUIL_JOURS Date of the last remote readout trig gered by the day criterion Number of pages T_CPT_PAGES_JOURS Value of the cumulative number of pages printed at the date of the previous remote readout triggered by the day criterion or 0 if there has not been any previous remote readout Toner Est...

Page 171: ...mote readout trig gered by the drum threshold criterion or installation date if there has not been any previous remote readout Pages T_CPT_FOUR number of pages remaining to be printed at the instant of the trigger ing of the previous remote readout by the drum threshold criterion or 0 if there has not been any previous remote readout Last replacement T_DATE_CHG_ FOUR date of the last replacement o...

Page 172: ...l addresses and op tionally the technical parameters Archiving restoring of the directory only MENU 16 Archiving of the directory and the parameters MENU 5 Restoring of the directory and the parameters MENU 9 Simplified List of the Parameters Saved on a Directory Card General parameters Softswitches Fax number of the machine Serial Number of the machine Index number of the rerouting address list R...

Page 173: ...hibited time period for periodic connection Internet connection transmission modes Internet rerouting mode LAN configuration mode manual automatic Internet provider connection mail service servers authentication parameters des providersin ternet LAN mail service server authentication parameters If a machine is to be cloned record the bios names of both machines ...

Page 174: ...isconnect the power cord from the wall socket then disconnect all cables connected to the machine Remove all the document and paper trays including the paper tray If your machine has the optional second paper tray installed remove it and keep it 3 Pack the document and paper trays in their original plastic bags and packing boxes Pack the machine in its original styrofoam and place it in the origin...

Page 175: ...procedure will erase the network enablement option If this is done on a network enabled machine a new network option will have to be purchased Erase directory Erase logs Erase printer counters Erase consumables counters using menu 85 CAUTION This procedure will erase options GDF FSI and kit LAN Note To see the initialization message switch the machine off then on Re initialize the flash memory dat...

Page 176: ...on a network enabled machine a new network option will have to be purchased Complete reset of the machine combination of functions 0 1 2 6 8 Erase first element of printing queue Re initialize the remote readout counter Other Functions For these functions bit 8 of configuration 1 of the installation parameters must first have been set to 1 Printout of all parameters including installation and tech...

Page 177: ... card reader Save the directory via STN Accept directory download via STN Restore directory and parameters from a smart card via the smart card reader Start feeder scanner calibration Note Refer to GP 21 for more information regarding scanner calibration Display main software version Display modem type Display boot software version Enter serial number Display LAN rate MENU 5 MENU 7 MENU 8 MENU 9 M...

Page 178: ...1 2121L Manually reboot the machine with SOS 1 bit 8 set to 1 Display PCL SG Script fonts checksum Retransmission of faxes to print to rerouting mail Activation of dump RAM server Accept soft download via internet or Intranet MENU R MENU F MENU G MENU K MENU T ...

Page 179: ...s the 1 way paper feeding system by means of the main paper tray capa ble of holding up to 150 sheets of paper The paper taken up and fed in by the paper feed roll is transported through the machine by the BTR fuser roller and exit rolls and fed out of the machine face down onto the exit tray Figure 1 ...

Page 180: ...eed roll At the same time the paper feed cam turns so as to raise the paper lifting plate Then the top sheet of paper loaded in the tray is taken up and fed into the machine The actual length of paper is detected based on the period of time through which the paper feed switch remains actuated or through which the paper moves past the switch and the system speed It is then determined whether or not...

Page 181: ...cts paper loaded in the tray When there is a paper stack loaded in the tray the actuator is raised to block the paper empty sensor When paper runs out the actuator drops into the hole in the tray unblocking the paper empty sensor Figure 3 Paper feed retry function To reduce the number of paper misfeeds as a result of a paper feed failure a paper feed retry sequence is carried if the paper feed swi...

Page 182: ...rge brush and the pre charge film directly deposit charge on the drum they produce little ozone Further the charging voltage is low and the deposited charge is even and stable across the surface of the drum The pre charge film supplies a preliminary charge to the drum prior to charging by the drum charge brush thereby increasing charging efficiency Construction Figure 1 Figure 2 1 Drum Charge Brus...

Page 183: ...am light emitted from the print head is used to scan the image as driven by the polygon motor Figure 1 Laser Exposure Process The laser beam light emitted from the ROS is used to create an electrostatic latent image on the surface of the drum The following control is provided to correctly time image printing ...

Page 184: ...aying the time at which the VIDEO signal is to be transmitted The start of scan sensor provided in the ROS ensures that the laser beam is emitted at the same timing for all lines in the main scanning direction Laser Emission Timing When a READY signal is detected a given period of time after the print command has been issued the CPU outputs a laser ON signal The laser ON signal causes a laser beam...

Page 185: ...dth of the paper The laser emission area is determined by the paper size Areas with a width of 4 mm on both edges are not however printed Sub scanning direction The print start position is determined by the sub scanning print start signal TOD output from the CPU and the length of the paper The laser emission area is determined by the paper size Areas with a width of 4 mm on both the leading and tr...

Page 186: ...es and Information 6 54 11 06 FaxCentre 2121 2121L Figure 1 Cooling of the Machine Interior The Fuser Fan is used to discharge heat generated from the ROS out of the machine thereby preventing the ROS from overheating ...

Page 187: ...General Procedures and Information FaxCentre 2121 2121L 11 06 6 55 Figure 1 ...

Page 188: ...agitating screw conveys toner in the toner cartridge onto the toner supply roller The toner supply roller transports the toner to the sleeve roller The resin sleeve of the sleeve roller carries the toner onto the drum to form a toner image on the latent image formed on the surface of the drum The illustration below shows the construction of the toner cartridge and the developing unit Figure 1 Figu...

Page 189: ...onsists of two layers Charge Transport Layer CTL and the Charge Generating Layer CGL applied to an aluminium alloy base cylinder Handling precautions The Drum of this type exhibits light fatigue after being exposed to light for a long time which re sults in its sensitivity being changed Therefore always wrap the drum in the drum cloth or a soft cloth immediately after it has been removed from the ...

Page 190: ...all times in contact with the shaft of the front plate of the imaging cartridge When the im aging cartridge is loaded in the printer the set pin of the front plate of the imaging cartridge con tacts a side plate on the printer side thereby providing grounding The potential on the surface of the drum exposed to the laser beam is then grounded through the ground plate shaft and set pin to the frame ...

Page 191: ...ains the toner there on The toner transfers to the area on the surface of the drum that has been exposed to the laser beam The Bias Seal on the underside of the sleeve roller separates toner which has not been attracted onto the surface of the drum from the sleeve roller The same bias as that applied to the sleeve roller is applied to this Bias Seal thereby preventing toner from falling The develo...

Page 192: ...C built into the toner cartridge detects that the imaging cartridge is installed correctly when the power switch is turned ON and the front door is opened and closed The detection is made electrically Detection of a new toner cartridge The IC chip CSIC built into the toner cartridge detects a new toner cartridge only when it is first installed ...

Page 193: ...t of toner still available for use in the toner car tridge The counter counts down when the amount of toner equivalent to Letter A4 B W 5 is con sumed and the corresponding data is stored in the CSIC board A toner near empty condition and a toner empty condition are detected when the counter reads the corresponding predetermined count Figure 9 ...

Page 194: ...hed between the PC Drum and the image transfer roller at all times during the print cycle This results in a very little amount of ozone being produced and there is a little chance of a double transferred image occurring To clean the image transfer roller reverse bias is applied to the image transfer roller The cleaning sequence is carried out when the printer is started a print command is issued a...

Page 195: ...ge transferred onto the paper is securely fixed to the paper A heated roller system is used as the fusing system The paper to which the toner image has been transferred is fed between the fusing roll heated by the heat roll lamp and the pressure roll This permanently fuses the toner image to the paper Figure 1 ...

Page 196: ...n the power is turned ON the front door is opened and closed and the pause mode is cancelled During the standby state the fuser temperature is kept lower 130 C than during printing so as to economize on power consumption Table 1 Thermistor Detected Temperature at Start of Temperature Control Less than 50 C 122 F 50 C to 130 C 122 F to 266 F More than 130 C 266 F Mode before Tempera ture Control Po...

Page 197: ...emperature is 50 C 122 F or more the timer count before the interruption continues When mode 1 is completed mode 2 starts Mode 2 Mode 2 lasts for 208 sec During this period the fuser temperature is gradually decreased and when it is decreased to the fuser temperature of mode 3 mode 2 is terminated and mode 3 is started Mode 3 Mode 3 continues until the temperature control is interrupted as by open...

Page 198: ...tion 6 66 11 06 FaxCentre 2121 2121L GP 17 Paper Exit Paper Exit Mechanism The paper exit mechanism transports the fused paper onto the exit roll The exit sensor detects not only a paper misfeed but also an open upper cover Figure 1 ...

Page 199: ...managing an external telephone answering machine connected on the same line with a stackable plug More generally it is not designed to function with any telephone equipment connected in parallel on the same phone line It is preferable to used a dedicated phone line for the fax This allows the user to leave the fax permanently in service and to receive communications without user intervention The f...

Page 200: ...General Procedures and Information 6 68 11 06 FaxCentre 2121 2121L GP 19 Operating Sequence Print Start Sequence Figure 1 Figure 2 ...

Page 201: ... paper jam or cover open This fault code only appears if the reception without paper parameter is set to WITHOUT PAPER Code 07 Disconnect The communication has been cut bad connection Code 08 Quality This code generally indicates line quality problems The document that you have transmitted has not been received correctly Contact your correspondent to check whether it is necessary to re transmit th...

Page 202: ... the mailbox with this number does not exist with this correspondent Code 16 List number x not retransmitted You have requested the retransmission of a document by a remote fax but the latter has not pro grammed the requested list of recipients Code 17 Mailbox number x unknown You want to recover a document from a mailbox of a correspondent but the mailbox with this number does not exist with this...

Page 203: ...ossible to connect to the POP3 server to receive mail The service is momentarily not availa ble If this is a systematic error verify the internet e mail and server settings Code 45 Provider disconnect The service has become momentarily unavailable Try to connect again later Code 46 SMPT server disconnect Disconnect of the SMPT server to send mail or mailbox full The service has become momentarily ...

Page 204: ...ke some copies with the CIS and check that the quality of the copies is satisfactory 5 In the case of a scanner problem repeat the calibration procedure above 6 In the case of a printer problem the result remains unsatisfactory after scanner calibration a Print the logs to check the printer component of the machine b Check the consumable 7 To further evaluate the image quality run a dark dusting 8...

Page 205: ...es and Information FaxCentre 2121 2121L 11 06 6 73 GP 22 Machine Components Layout Figure 1 1 ROS Assembly 2 Exit Roller 3 Fusing Unit 4 Image Transfer Section 5 Multipurpose MP Tray 6 Toner Cartridge 7 Drum Cartridge ...

Page 206: ...General Procedures and Information 6 74 11 06 FaxCentre 2121 2121L GP 23 Service Log ...

Page 207: ...ard 3 CPU Board 5 Voltage Checks 10 LVPS 11 Electrical Components Layout 12 Main PBA and CPU PJ Locations 13 WD 1 Connection Diagram 1 of 5 14 WD 2 Connection Diagram 2 of 5 15 WD 3 Connection Diagram 3 of 5 16 WD 4 Connection Diagram 4 of 5 17 WD 5 Connection Diagram 5 of 5 18 ...

Page 208: ...Wiring Diagrams 7 2 11 06 FaxCentre 2121 2121L Page intentionally blank ...

Page 209: ...ver using COG Chip On Glass technology On this board are also installed The scanner sensors The external connector for the smart card and the internal connector for the loudspeaker These latter elements being managed by the CPU Figure 1 Sensors PSF sheet present detects the insertion of a sheet to be scanned DA start of scan used to position the sheet relative to the CIS OUV cover open detects the...

Page 210: ...ound 3 CLKPUCE I Smart card clock 4 RSTPUCE I Smart card reset 5 CVCC I Smart card supply control 6 FERCAP O Smart card present detec tion 7 SELALIM I Smart card supply select 8 GND Ground 9 SCLKPUP I Control panel micro control ler synchronous serial link clock 10 TXPUP I Serial data to control panel micro controller 11 RXPUP O Serial data to control panel micro controller 12 CSPUP I Micro contro...

Page 211: ...o zones 1 A zone reserved for the storage of the code 2 A zone reserved for the storage of the documents The code is loaded from this flash memory into SDRAM and the microprocessor executes its in structions from the SDRAM Before printing the documents to be printed are stored as bitmaps in SDRAM The SDRAM is also used as the working memory for the Digicolor2 Block Diagram of Electronics Architect...

Page 212: ... STN P4420 6 External RJ11 Table 2 Connections to the Printer Pin Signal Input Output Use 1 6 7 8 GND Ground 2 P24V 4V Supply 3 GND Ground 4 Not connected 5 RESETIMP O Printer reset 9 HSYNC I Horizontal sync line 10 linked to 23 11 READY I Printer ready not used 12 VSYNC I Vertical sync page 13 ETBSY I Engine status busy 14 RXIMP I Printer status serial data transmitted by printer 15 TXIMP O CPU c...

Page 213: ...ial data from control panel micro controller 12 CSPUP O Micro controller chip select 13 VEILLE I Not used 14 REVEIL O Not used 15 STSC I Start of scan sensor 16 PSF I Sheet present sensor 17 OUVCAP I Cover open sensor 18 P3V3 3 3 V supply 19 VALIM 5 V supply 20 ALIMCOUPE 5 V supply 21 HPM O Differential LF signal to loudspeaker 22 HPP O Differential LF signal to loudspeaker Table 4 Connection to t...

Page 214: ...PRPHCLK O Data clock reverse 11 PRPHACK O Data acknowledgment forward 12 ACKRVRS O Acknowledgment of reverse request 13 XFLAG O Indicates that ECP mode is supported 14 HOSTACK I Data acknowledgment reverse 32 PRPHREQ O Data drive request 31 RVRSREQ I Data drive enable 36 ECPACTIVE O Mode select 18 ERREUR Proprietary 17 19 GND Ground 20 GND Ground 21 GND Ground 22 GND Ground 23 GND Ground 24 GND Gr...

Page 215: ...l pair 2 TXN O Network transmission differential pair 3 RXP I Network reception differential pair 4 NC Not connected 5 NC Not connected 6 RXN I Network reception differential pair 7 NC Not connected 8 NC Not connected Table 8 Switched Telephone Network Interface Pin Signal Input Output Use 1 NC Not connected 2 R2 I O Loopback L1 3 L2 I O Telephone line pair 4 L1 I O Telephone line pair 5 R1 I O Lo...

Page 216: ...tage Checks Supply Voltages Connections between power supply board and CPU board Note The power input of the supply is protected by a fuse Table 1 Supply Voltages CPU Board pin Value Function 17 5 V 5 V Supply 18 GND Ground 19 5V 5 V Supply 20 24V 24 V ...

Page 217: ...supplied by the machine Figure 1 Supply 24 V 24 V Resistors R4048 R4049 12 V regulator Z4051 CIS LED current generator ANAVCC CAN vcc ana 5 V VCC 3 3 V regulator Z4050 command CIS 5 V 5 V regulator Z113 Resistors R4044 and R4045 Motor driver 3 3 V P3V3 P12V Resistors R4395 R4397 Regulator Z4376 ALIMCIS 3 3V ...

Page 218: ... Table 1 Electrical Components Layout Symbol Component Symbol Component M1 Main Motor S2 Interlock M2 Fuser Fan PE1 Paper Empty Sensor H1 Fuser Heat Lamp PS3 Exit Sensor TH1 Thermistor SL 1 Paper Feed Solenoid TS1 Thermostat PU 1 LVPS PH ROS HV 1 HVPS S1 Paper Feed Switch PWB P Main PWB ...

Page 219: ...Wiring Diagrams FaxCentre 2121 2121L 11 06 7 13 Main PBA and CPU PJ Locations Figure 1 ...

Page 220: ...Wiring Diagrams 7 14 11 06 FaxCentre 2121 2121L WD 1 Connection Diagram 1 of 5 Figure 1 ...

Page 221: ...Wiring Diagrams FaxCentre 2121 2121L 11 06 7 15 WD 2 Connection Diagram 2 of 5 Figure 1 ...

Page 222: ...Wiring Diagrams 7 16 11 06 FaxCentre 2121 2121L WD 3 Connection Diagram 3 of 5 Figure 1 ...

Page 223: ...Wiring Diagrams FaxCentre 2121 2121L 11 06 7 17 WD 4 Connection Diagram 4 of 5 Figure 1 ...

Page 224: ...Wiring Diagrams 7 18 11 06 FaxCentre 2121 2121L WD 5 Connection Diagram 5 of 5 Figure 1 ...

Page 225: ... that apply Excessive Smoke Describe quantity and duration of smoke Fire with open flames seen Electric shock to operator or service representative Physical injury illness to operator or service representative Describe Other Describe Any damage to customer property No Yes Describe Did external emergency response provider s such as fire department ambulance and etc respond No Yes Identify ie source...

Page 226: ...Telephone Number Organization E Mail Mailing Address Date Report Submitted Instructions E mail or fax this completed form to EH S žFor incidents in Xerox Europe and Developing Markets East Middle East Africa India China and Hong Kong please e mail Elaine Grange gbr xerox com or fax 44 0 1707 35 3914 intelnet 8 668 3914 Note If you fax this form please also send original by internal mail žFor incid...

Reviews: