MHTX7 User’s Manual
Xenotronix/TLI
3
CAUTION:
This unit is not short circuit protected - it will deliver the full rated current
into a short. If the short is not removed, the charger may overheat and be damaged. While
in a shorted condition the charger will indicate that it is in the charging mode. If the
charging light is on while not connected to a battery then there is probably a short in the
output cable or connector. Remove the output cable and see if the charge light goes out
with the charger plugged back in. If the light stays on without an output cable connected
then there is a problem with the charger.
Plug the battery charger into a properly grounded (3-prong) wall outlet which supplies
the correct input power as marked on the unit. The indicators should be dark until a
battery is attached.
Attach the output connector to the battery connector. The charger should now be on and
charging the battery. The orange charging indicator should light. If the green ready
indicator lights instead then the battery voltage may be too high (too many cells). The
battery must be a 1.2 to 14.4 volts (1 to 12 cells) battery.
The orange charging light indicates that the charger is on and charging the battery. The
charger will deliver a constant current to the battery for 14 hours. After this time, the unit
will switch into the ready mode - the charging indicator will darken and the green ready
indicator will light. At this point the battery is fully charged. When the charger is in the
ready mode, a low rate constant current (1/4 that of the rated output current) is delivered
to the battery to keep it fully charged. Most nickel-metal-hydride batteries may be left
connected to the charger in the ready mode, for some time, without a danger of damaging
them. However, many manufacturers do not recommend trickle charging their nickel-
metal-hydride batteries. We recommend you refer to the battery manufacturer’s
documentation for the suitability of trickle charging your battery.
CHARGING NOTES AND TIPS
The batteries should be fully discharged before being put onto charge. This has two
benefits: the batteries will not be overcharged, although it is a fairly benign overcharge,
and they will be less likely to develop a “memory effect”.
The
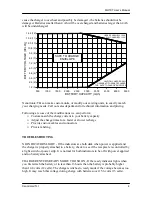
safe charging curve
graph on the next page represents what size batteries, based on
voltage and capacity, can be properly charged using this charger. The charger is designed
to charge batteries at the C/10 charge rate (capacity ÷ 10). If your battery capacity is 2.8
Ah (2800 mAh) then the charger should be rated for 280 mA (2800 ÷10). Refer to your
battery documentation to see if the charger is appropriate to charge your battery.
Example: If your charger is rated for 400 mA then it will charge 4 Ah batteries between
4.8 to 13.2 volts (4 to 11 cells). It will charge a 14.4 volt (12 cells) battery as long as the
charger receives a full 115 volts ac input. If the input voltage is below 115 volts at that
charge voltage, the maximum current will begin to drop and the battery may not be fully
charged. Attempting to charge 4 Ah batteries between 1.2 to 3.6 volts (1 to 3 cells) may

