background image

37 | Chapter 1 : DVR User Manual
 

4.1


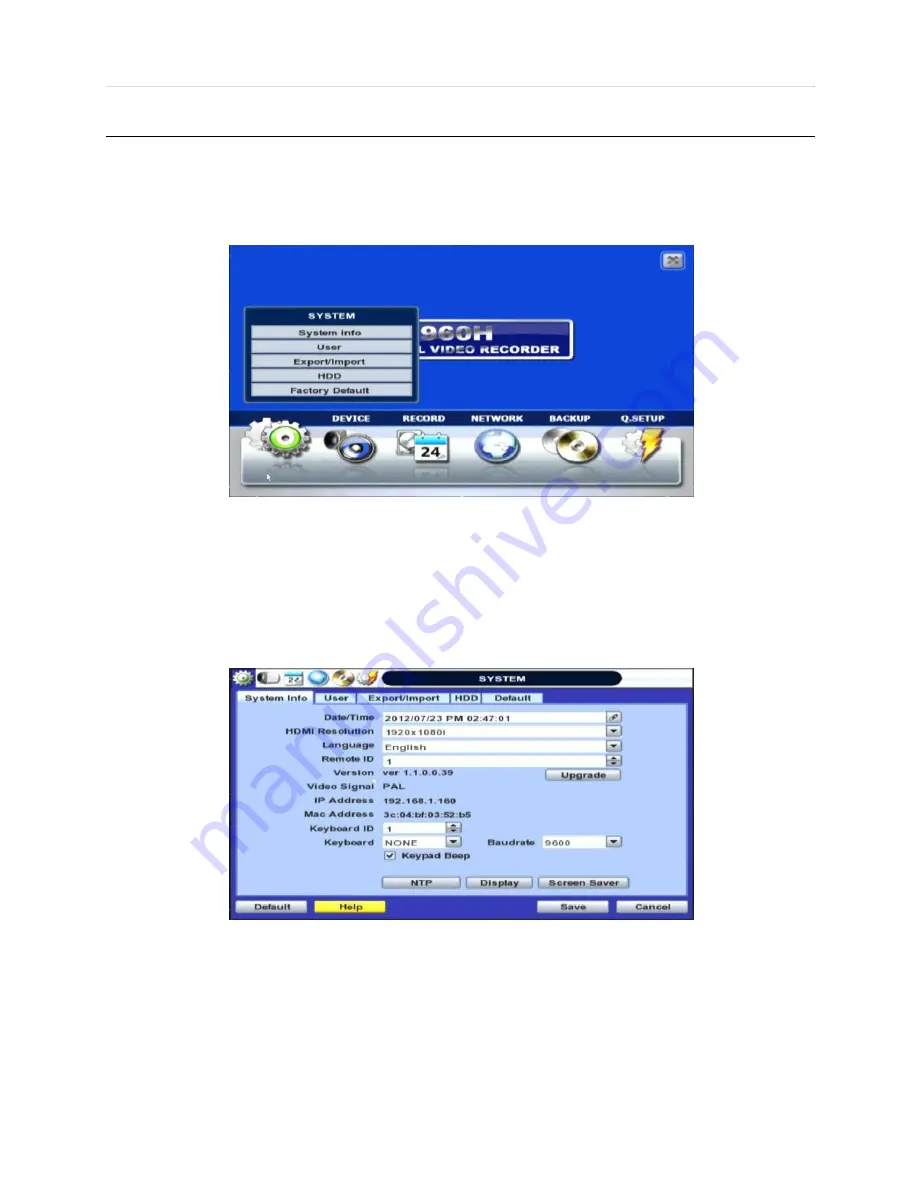
System 

The system menu button is selected by clicking 

“TOOL” on the menu bar or clicking the right mouse button. 

Users can move mouse pointer from 

“System” through “Quick Setup” to instantly look around the sub-menus on the menu 

screen. Using the left mouse button, the user can select a desired category for editing. 


4.1.1 System Info 

Use this submenu to check system information status or to change the system-related configuration. 

Users can then move to other sub-menu of the System; System Info, User, Export/Import, HDD, and Factory Default by 
moving mouse pointer or pressing the front arrow buttons.   

Mac address is a unique network identification number for each system. 


Summary of Contents for XDR960

Page 1: ...XDR960 8 16 Channel DVR User manual...

Page 2: ...wing warning CAUTION and Note statements identify potential hazards that can occur if the equipment is not handled properly Warning Improper use of this equipment can cause severe bodily injury or equ...

Page 3: ...s the right to make changes to the product and specification of the product from time to time without prior notice WARNINGS AND CAUTIONS To reduce the risk of fire or electric shock do not insert any...

Page 4: ...Quick Startup Wizard 16 3 3 Live Display Mode 17 3 4 PTZ Operation 22 3 5 Freeze Mode 24 3 6 Call Monitor Operation 24 3 7 Playback of Recorded Video 25 3 8 Simultaneous Live and Playback Cameo 26 3 9...

Page 5: ...6 ACS Setup 84 CHAPTER 3 MAC ACS CLIENT SOFTWARE USER MANUAL 7 MAC ACS USER GUIDE 92 7 1 System Requirement 92 7 2 Install 92 7 3 Basic Operation 94 CHAPTER 4 MOBILE PHONE SOFTWARE USER MANUAL 8 MOBIL...

Page 6: ...User s Manual 6...

Page 7: ...of these items are missing or damaged notify your vendor immediately Keep the packing utilities for moving or storage purposes afterwards Items Photo Quantity User Manual DVR Software Quick Start Gui...

Page 8: ...User s Manual 8 Ground Screw 1 Set 1piece QVS Rear 1piece...

Page 9: ...1 5U Height case it is recommend to install the system on a shelf and use 2 5 3U 1U 1 75 inch or 4 45 cm space for proper ventilation 8CH W 360x H 66x D 380mm 16CH W 360x H 66x D 380mm NOTE Install t...

Page 10: ...ssigned with an unchangeable User ID marked as admin The default password is empty No Password Administrator account has full access to the DVR and its configurable parameters The Administrator Accoun...

Page 11: ...p to power off the DVR The default password for admin account is none Therefore just click Enter button on the dial pad If you changed the password for admin account please type in the changed passwor...

Page 12: ...n video of a selected spot out channel 7 PTZ I backup Press and hold Bring up PTZ Camera control Used to initiate instant back up 8 Mode Freeze Press and hold Change screen mode Used to initiate Freez...

Page 13: ...IC IN Microphone input 7 VGA D sub 25pin VGA Output 8 HDM I True HDMI Output 9 USB 2 0 USB ports mouse backup F W update 10 Ethernet Gigabit Network port 10 100 1000 11 RS 232C Serial port for externa...

Page 14: ...ons of the IR Remote Controller are as below No Functions 1 Instant Emergency Recording Button 2 Numeric Button 3 Auto Sequence Button on Live Display Mode 4 Freeze Button 5 Call Monitor Button 6 Chan...

Page 15: ...m password and User to prevent unauthorized changes to setting values and alteration of recorded file Enter the Admin or User password which had been set by using the virtual keyboard NOTE 1 LOGIN win...

Page 16: ...ard is specially designed to make it much easier for the major DVR settings such as Time Date setup Record setup Network setup and Quick setup When the DVR boots up the Quick Startup Wizard operates a...

Page 17: ...n is 960x480 960x576 NTSC PAL Full HD Live Display 3 3 2 Automatic Long Reach Built in 4CH The adjustable 4CH built in Long Reach Video Amplifier enables to extend the distance coverage upto 900m betw...

Page 18: ...the front panel or IR remote controller is pressed the screen will be sequentially changed 1 Ch 4 Ch 9 Ch 16 Ch To select channel by mouse click target channel to display in full screen live mode Ret...

Page 19: ...hown at Left bottom corner on full screen Continuous Recording Sequence display on Motion Detection Recording Digital zoom on Sensor Activating Recording Audio Channel Continuous Motion Recording Cont...

Page 20: ...sage percentage by video recording If it shows 60 then 60 of HDD space has been used up for recording NOTE If you cannot find any colored mark in the top right corner of the live screen mode then it m...

Page 21: ...rning sound may be generated depending on the system settings Admin user can set different level of authorization for each user If a certain user is not allowed to view a certain live and playback cha...

Page 22: ...trol PTZ operation with USB mouse While pressing the left button of mouse user can drag the mouse pointer to up down or left right to move pan tilt position of the camera If user moves the mouse point...

Page 23: ...max supported by the PTZ may be less User can automatically switch PTZ camera positions according to the defined of preset setting by using GUARD TOUR function The connected PTZ camera must support t...

Page 24: ...ight button on the mouse and select the CALL MONITOR in order to enter call monitor control mode The numeric panel will pop up at the center of the screen Click the specific channel button on the nume...

Page 25: ...forwards User can click playback button to automatically play the latest video clip It can be performed by pop up menu and playback button in front button The picture below shows the system playing b...

Page 26: ...d Playback Cameo 1Channel playback can be displayed in live view mode simultaneously It s so called Cameo function In live view mode mouse right click on the channel that is desired to playback and th...

Page 27: ...9 Panorama Search It will display frame by frame for the selected channel to bring a detail search In live mode mouse right click on the channel that is desired for Panorama search and then select Pan...

Page 28: ...an keep playing back video until user wants to finish archiving and then press and hold the same I BACKUP button again to set backup end time The backup menu window will pop up and user can select the...

Page 29: ...video data Click a desired date in Red color Then the recorded data for the selected date will be shown Once the recorded video data of the selected date is shown user can adjust the vertical search...

Page 30: ...ing even though a sensor is triggered Sky Blue color Continuous Motion detection recording The system records all the time by continuous as set by the CAMERA in the RECORD but will switch recording mo...

Page 31: ...riggered during dwell time 3 11 2 Event Log The Event log search is used to find particular event quickly and easily Click play icon to play back the selected event data Users can copy this event list...

Page 32: ...le stored in the date folder The following are the categories indicated on the system log viewer 1 Log by system 2 Log by setup 3 Log by network NOTE 20 numbers of log record will be shown on one page...

Page 33: ...k list very simply by click button during playback When you do bookmark search you can easily playback the bookmarked video data by clicking button right next to each list NOTE User can press SEARCH b...

Page 34: ...finishes To make DST setting on the DVR go to the menu SYSTEM SYSTEM INFO and click DATE TIME to get the DST setting window as shown below User can setup DST Begin End time after checking USE DST box...

Page 35: ...and or VGA by checking the boxes Users can set the WAITING TIME for when the monitor will automatically turn off Users can turn on the selected monitor by clicking a mouse pressing any frontal key bu...

Page 36: ...YSTEM DEVICE RECORD NETWORK BACKUP Q SETUP Main Classification Sub Classification SYSTEM SYSTEM INFO USER EXPORT IMPORT HDD FACTORY DEFAULT DEVICE CAMERA AUDIO SENSOR MOTION ALARM EXTRA ALARM PTZ RECO...

Page 37: ...he menu screen Using the left mouse button the user can select a desired category for editing 4 1 1 System Info Use this submenu to check system information status or to change the system related conf...

Page 38: ...controller in order for the remote to function Upgrade Users can easily upgrade the system in Upgrade menu via USB FTP server upon the selection as shown below NOTE There are two types of TIME SYNC M...

Page 39: ...ver 1 Select FTP in the drop down list and type a given IP address in the Host Address FTP server IP address field Username and password is none Default The FTP server address is subject to change wit...

Page 40: ...lected channels are not displayed as black screen in covert 3 Spot out cam popup If cam popup is set in Sensor Motion notify Spot monitor also pops up the event 4 Spot Monitor interval Spot Sequence t...

Page 41: ...ke system device record network backup and quick setup Live Playback is to restrict a user to see both live display and a playback video for a certain camera channel User can change the setting so the...

Page 42: ...es During import process make sure that the firmware version of source DVR is the same as the destination DVR 4 1 4 HDD HDD information is displayed at the menu SATA HDD is used in this system User ca...

Page 43: ...k such as making a network connection or performing video playback during the format process the format may fail If the format fails reboot the system resources and then try to format again Format com...

Page 44: ...n get the system back to factory default configuration NOTE Upon clicking Start button and entering the admin password all the configuration values made by the user will be deleted The system setting...

Page 45: ...ting the icon on the top right of the menu screen Users can setup camera title covert brightness contrast motion sensitivity and audio mapping for each camera Covert also called hidden camera feature...

Page 46: ...or Cam Select the associated camera Notify Users can select how to be alerted when a sensor is activated or motion is triggered by pressing the NOTIFY button The system can generate a buzzer sound and...

Page 47: ...r wants to copy from at the From field Choose the parameters such as Type Cam Notify Preset Relay and Dwell Time on the check box Check on the checkbox next to the sensor numbers to apply the copy set...

Page 48: ...l Time on the check box Check on the checkbox next to the sensor numbers to apply the copy setting s to another channel on the To box 4 2 5 Extra Alarm S M A R T alarm is an alarm signal triggered whe...

Page 49: ...nnected PTZ camera are in accordance with the assigned value for that P T Z protocol 3 Check if the address of the connected PTZ camera is correct 4 Check if the wiring to the P T Z controllers are co...

Page 50: ...On the Record window Click on Record Setup tab 3 Choose the desired resolution frame rate quality and recording type by using the drop down list items They are configured by each channel or you may u...

Page 51: ...rd settings For example users can configure 960H 960x480 resolution 15 FPS with Normal quality for Live Stream for Network and configure 960H 960x480 30 FPS with Highest quality for record Users also...

Page 52: ...ate and time Simply select a record mode by mouse and drag it to the desired date and time 4 3 3 Holiday Users can setup a specific day of a month or day of week as a holiday as shown below Once holid...

Page 53: ...of the network router or gateway server It is required when the user wants to connect through the external router from the remote For more information please consult your network administrator or you...

Page 54: ...ion will help to automatically setup a router if the DVR connects to the internet via a router When a PC connects to a DVR which is not in the same local area network a real IPO address and correspond...

Page 55: ...rk the Use DDNS check box to use it DDNS Server joinip net or joinip2 net is the fixed domain name of DDNS server User cannot change the DDNS name NOTE The standard DDNS domain name is joinip2 net and...

Page 56: ...ged Video Loss and Power On Off By clicking Use TLS users can use a public email address such as Yahoo Google Hotmail accounts Type DVR name in the DVR Name box The DVR name will appear in the email s...

Page 57: ...e will be shown before burning NOTE Backup device shall be a well known major brand of USB thumb drives formatted by FAT FAT32 for proper backup NOTE User can easily backup video in Quick Backup durin...

Page 58: ...can double click Player exe file to open the video data file PSF format in the folder User can print out capture a still image zoom out or make an ASF file format by using the icons located on top of...

Page 59: ...this quick setup and will follow this rule regardless of configurations set in other menus Users should not fill in the checkbox of Use Quick Setup if he she wants to utilize full system configuration...

Page 60: ...he correct IP address in the web browser after making the web port available in the router After allowing the download of the Active X file users can find the login page view seen below Default USER I...

Page 61: ...ogging in with the right ID and password users can make various configuration changes in the Web Configuration window seen below This Web Configuration menu is only available to the admin account Syst...

Page 62: ...ver in the DVR regardless of Internet connection NOTE System Reboot enables user to reboot the system without any changes to the setup When the network is disconnected due to abnormal operation of the...

Page 63: ...ctive X file from DVR and install it at workstation PC before monitoring live video Web Active X Install User can get into web monitoring after log in as shown below In order to connect to DVR the use...

Page 64: ...r can change to single mode by clicking the mode icon located at the bottom left NOTE The image resolution in Live monitoring in this web browser is directly transferred from DVR Live image over the w...

Page 65: ...at the middle of left side of window and click button Playback Icon Play Pause is toggled and playback speed is shown on the left box Play DST Check this box to play overlapped images during DST Dayl...

Page 66: ...User s Manual 66 Chapter 2 ACS CLIENT SOFTWARE USER MANUAL...

Page 67: ...67 Chapter 2 ACS Client Software User Manual...

Page 68: ...ment OS WindowXP Vista CPU Intel Core i5 cpu 2 80GHz VGA ATI Radeon HD 512 RAM 4GB HDD 20MB Free space 6 2 Install a Run Advanced Client SoftwareSetup exe saved on the included CD When clicked the Set...

Page 69: ...69 Chapter 2 ACS Client Software User Manual b Press if you want to install the program in a different directory c Press to move to the next screen d Press to move to the next screen...

Page 70: ...shortcuts you wish to install on your desktop Press to move to the next screen f Select to begin installation When the installation is complete the below message will appear Select whether you want t...

Page 71: ...User Manual 6 3 Uninstall To uninstall ACS press UNINSTALL ACS from the Start Menu of your PC A window will appear in Windows7 or Windows Vista Press YES to begin the process When the process is compl...

Page 72: ...ick on the ACS icon on the Desktop or click START on Windows PC and go to the ACS Folder 6 4 1 Log In The default ID is Administrator and there is no default password The administrator account has the...

Page 73: ...Panel Registered DVR Site list 3 PTZ Panel PTZ camera control in live mode 4 Calendar Panel Search by time and date 5 Search Panel Recorded information is shown in search mode Control the speed of Pl...

Page 74: ...Disconnect All Disconnect all channels 6 Image Save a selected image 7 Movie Save a selected video asf format 8 Print Print out still image 9 Split Single channel 4 split channel 9 split channel 16 sp...

Page 75: ...y setup for remote connection with the ACS application To select and view a desired camera or device simply drag it from the site list panel onto the viewing area Then select the options Live or Searc...

Page 76: ...on is released 2 Zoom Zoom In and Zoom Out 3 Focus Adjust the focus of the PTZ camera 4 Virtual PTZ If Virtual PTZ is activated it enables users to control the PTZ camera s movement Zoom and Focus PTZ...

Page 77: ...arch panel is only available in search mode The Search panel shows the record information for each channel Each record mode is similar to below No Record White Continuous Yellow Color Panic Red Color...

Page 78: ...ayback Increase the speed 3 Step Backward 4 Reverse Playback 5 Pause 6 Forward Playback 7 Step Forward 8 Forward Playback Increase the speed Reverse Playback Decrease the speed 9 Go to Last Audio cont...

Page 79: ...Live will be displayed with all white text information Blue channel boundary In Search mode Search will be displayed with all red text information Red channel boundary Yellow channel boundary for sele...

Page 80: ...ecting to DEVICE event information will be downloaded automatically The download progress bar will be shown 3 Calendar Search If there is an event in the selected date the date is highlighted Select a...

Page 81: ...ect 2 Recording Directory Decide the recording directory to backup 3 System Recording Info Displays the start and end time of the recorded data in the system 4 Backup Setting Setup the start and end t...

Page 82: ...Firmware File Directory Decide the firmware file directory to upgrade 3 DEVICE Name Current Version Displays the current DEVICE Name and Firmware Version 4 New Version to upgrade Displays the new DEV...

Page 83: ...83 Chapter 2 ACS Client Software User Manual 6 5 4 DeInterlace User can set DeInterlace function on or off Default is off...

Page 84: ...and other options 6 6 1 DVR Registration Add Modify Import Export or Remove DEVICE site information Ex Adding a new DVIECE site In order to add a DVR click Add button and put right information DVRs o...

Page 85: ...te 8 Channel Number of channel of the site for example 16ch DEVICE 1 16 or specifically 1 3 5 7 9 9 Model Select a DEVICE or DEVICE s model name 10 Aspect Ratio Select the displayed Aspect Ratio Custo...

Page 86: ...authority can be changed by Administrator admin is the built in account for administrating the DEVICE and ACS program Ex User authority change User authority can be changed by Administrator ID cannot...

Page 87: ...itle with the channel number Date Time Able to turn on off the Date Time of the site DEVICE Name Able to turn on off the name of the site Time Format Sync Synchronize the DEVICE time format to ACS Rec...

Page 88: ...ype and popup settings for event No Item Description 1 Port Input the same event port number of DEVICE setting to receive event notification from the DEVICE 2 Filter Select the type of event to receiv...

Page 89: ...d moving images Video is saved as ASF or MP4 2 Language Select a desired language 3 FTP Information In order to have Auto Upgrade input FTP information Once the FTP setup is done ACS will detect the l...

Page 90: ...User s Manual 90 Chapter 3 MAC ACS CLIENT SOFTWARE USER MANUAL...

Page 91: ...91 Chapter 3 MAC ACS Client Software Manual...

Page 92: ...now leopard CPU Built in Intel CPU MAC VGA Recommended More than 128MB RAM Recommended More than 1GB HDD 20MB Free Space Minimum System Requirement OS Mac OS X 10 5 Leopard CPU Built in Intel CPU MAC...

Page 93: ...C ACS Client Software Manual b Select the HDD to be installed Press the Continue button to move to the next screen c Press the Continue button to move to the next screen d Press the Install button to...

Page 94: ...User s Manual 94 e Put in the password and Click OK to begin installation When the installation is complete the message appears as below 7 3 Basic Operation Click on ACS icon on Application Folder...

Page 95: ...Registered DVR Site List Possible to connect by Dragging 3 Live or Search Connect Panel Click Live or Search mode to connect the panel 4 PTZ Panel PTZ Camera Control in Live mode 5 Calendar Panel Sear...

Page 96: ...hannels 5 Print Print out still image 6 JPG Export Save a selected image to the desktop as JPEG format 7 Movie Export Save a selected video clip to the desktop as mov format 8 Split Single Channel 4 S...

Page 97: ...and Zoom Out 3 FOCUS Adjust the focus of PTZ camera 4 PRESET Select the preset location 5 Go to the preset location 7 3 5 Calendar Panel Activated in Search Mode The recorded data will be shown in blu...

Page 98: ...Alarm Orange Color Motion Green Color Click the time or move the time bar to the time you want to playback in the search panel Playback control panel No Button Description 1 Go to first 2 Forward Play...

Page 99: ...99 Chapter 3 MAC ACS Client Software Manual 7 3 7 Site Manager Add or Modify or Remove DVR site information Press to register the DVR as follows The default value is registered...

Page 100: ...to be registered Default 9010 4 User ID Fill in the ID of the DVR to be connected 5 User Password Fill in the PW of the DVR to be connected 6 Ch Fill in channel of the site to be registered ex 16 Ch...

Page 101: ...101 Chapter 3 MAC ACS Client Software Manual...

Page 102: ...User s Manual 102 Chapter 4 MOBILE PHONE SOFTWARE USER MANUAL...

Page 103: ...103 Chapter 4 Mobile Phone Software User Manual...

Page 104: ...User s Manual 104 8 MOBILE PHONE SOFTWARE USER GUIDE 8 1 iPhone application software...

Page 105: ...105 Chapter 4 Mobile Phone Software User Manual...

Page 106: ...User s Manual 106...

Page 107: ...107 Chapter 4 Mobile Phone Software User Manual...

Page 108: ...User s Manual 108...

Page 109: ...109 Chapter 4 Mobile Phone Software User Manual...

Page 110: ...User s Manual 110...

Page 111: ...111 Chapter 4 Mobile Phone Software User Manual...

Page 112: ...User s Manual 112...

Page 113: ...113 Chapter 4 Mobile Phone Software User Manual...

Page 114: ...User s Manual 114 8 2 Android application software...

Page 115: ...115 Chapter 4 Mobile Phone Software User Manual...

Page 116: ...User s Manual 116...

Page 117: ...117 Chapter 4 Mobile Phone Software User Manual...

Page 118: ...User s Manual 118...

Page 119: ...119 Chapter 4 Mobile Phone Software User Manual...

Page 120: ...User s Manual 120...

Page 121: ...121 Chapter 4 Mobile Phone Software User Manual...

Page 122: ...User s Manual 122...

Page 123: ...123 Chapter 4 Mobile Phone Software User Manual...

Page 124: ...User s Manual 124...

Page 125: ...125 Chapter 4 Mobile Phone Software User Manual 8 3 Using WAP 3G Connection...

Page 126: ...User s Manual 126...

Page 127: ...127 Appendix DynDNS Site Registration...

Page 128: ...User s Manual 128 APPENDIX DYNDNS SITE REGISTRATION 1 Go to www dyndns com 2 Log in to the Site after registration 3 Click Add Hostname button on Host Services...

Page 129: ...129 Appendix DynDNS Site Registration 4 Put in the IP address and Host name on the blank 5 Click NEXT Button 6 Click Activate Services button...

Page 130: ...o change the IP address for the DVR to the update request dyndns update by the circumstances that may be late 4 Dyndns domain is registered by the policy If the update occurs frequently it may be bloc...

Page 131: ...131 Appendix Specification...

Page 132: ...480x240 288 240 200 fps 480 400 fps 960x240 288 240 200 fps 480 400 fps 960x480 576 240 200 fps 480 400 fps Recording Resolution NTSC 480x240 960x240 960x480 PAL 480x288 960x288 960x576 Recording Mode...

Page 133: ...Software ACS Client S W CMS Web IE Live Monitoring Playback System Configuration Backup Device Internal Bulti In DVD Optional External Local Backup by USB Memory Stick 2ea Network Backup by CMS Suppo...

Reviews: