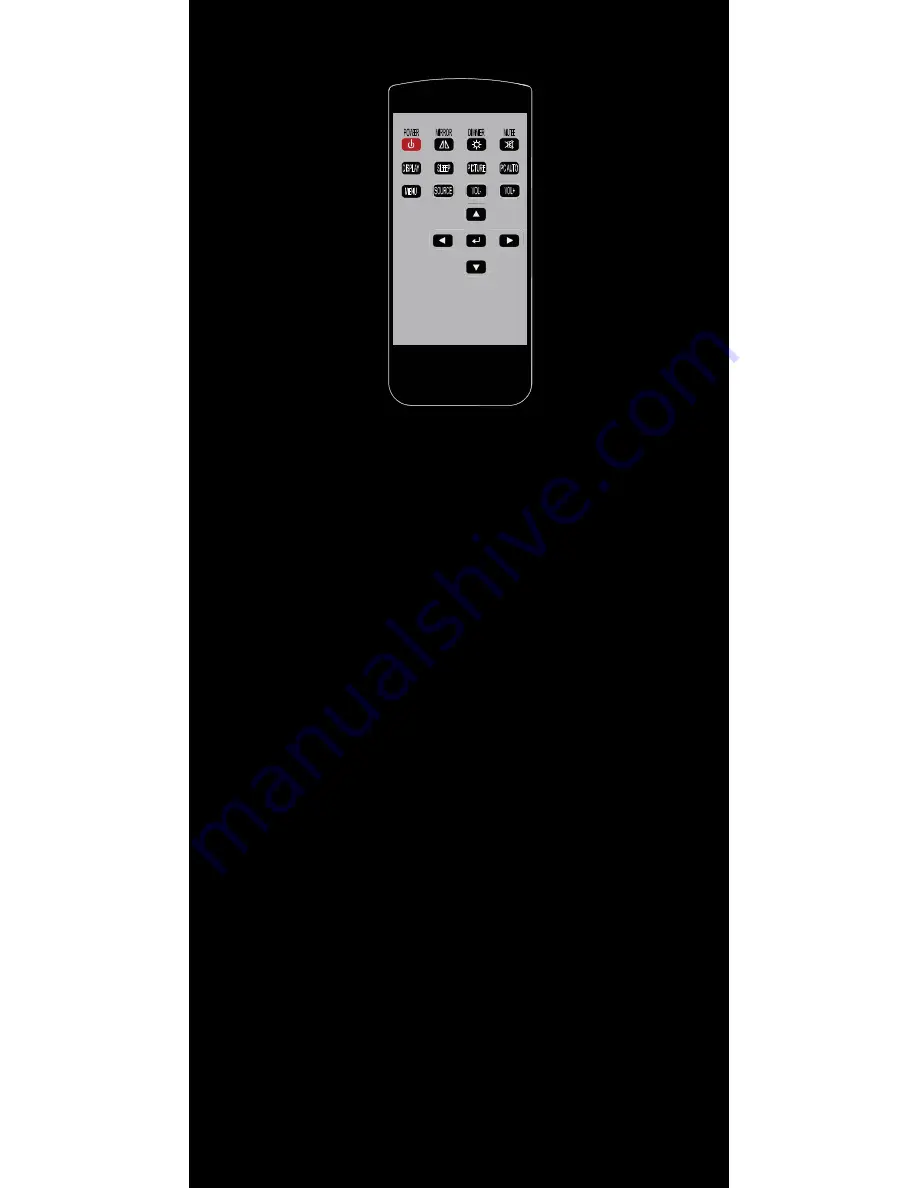
background image

7


│ Remote Control 


1. Power Button : Turn the monitor ON or OFF. 


2. Mirror Button : Enable or Disable the mirroring of the display. 

Continue to press it and choose the mirroring you want. 


3. Dimmer Button : Dim the brightness of the display by pressing this key 

continuously to set the brightness level of the display. 

( Only available when auto sensor is disabled. ) 


4. Mute Button : Mute the speaker. Press again to restore the sound of the 

speaker. 


5. Display Button : Display the current input signal on the screen. 


6. Sleep Button : Enable or Disable the sleep timer. Press this button to 

select and set the time to turn off the monitor automatically. 


7. Picture Button : Enable or select the picture mode you prefer. 

Press this button and then you can select standard, user, bright, 

or soft. 


8. PC auto Button : Enable to adjust the picture automatically, only 

available in VGA mode. 


9. Menu Button : Enable the OSD menu. 

Press this button again to exit. 


10. Source Button : Enable to switch to different source input. 


11. Vol+ / Vol- Button : Increase or Decrease the Volume. 


12. Up / Down Button ( ▲ / ▼ ) : Navigate Up or Down in OSD menu. 


13. Left / Right Button ( ◄ / ► ) : Navigate Left or Right in OSD menu, as 

well as decreasing or increasing the value of setting in OSD. 


14. Enter Button : Confirm the setting or selection. 


Summary of Contents for 700CSH

Page 1: ...700CSH INSTALLATION MANUAL...

Page 2: ...2 Table of Contents Features 03 Specifications 04 Quick Start 05 Remote Control 07 Capacitive touch 10 Hardware Installation 11 700CSH Models Additional Info 15 Ower s Record 16...

Page 3: ...x 1 Built in Speaker NTSC PAL Multi System 16 9 Aspect Ratio High Resolution Display Supports HDMI version 1 1 1 3 Adjustable backlight level for night time use Realtek High Performance Image and Vid...

Page 4: ...e video female connector x 2 HDMI input connector x 1 Audio Source Input RCA audio female connector x 1 DC 3 5 mini stereo plug x 1 HDMI audio x 1 Touch Panel Input Output USB connector x 1 Power Sour...

Page 5: ...tor Attach your Video source one e g VCR Video Game Console to the Yellow RCA connector marked Video 1 Attach your Video source two e g Rear View Camera to the Yellow RCA connector marked CCD Attach y...

Page 6: ...Touchscreen driver for your operating system from our website WWW XENARC COM Attach the USB plug to your USB connector Slide Monitor into optional mounting stand Secure Height position by adjusting kn...

Page 7: ...able the sleep timer Press this button to select and set the time to turn off the monitor automatically 7 Picture Button Enable or select the picture mode you prefer Press this button and then you can...

Page 8: ...matically turn off the monitor The minimum is 15 minutes and the maximum is 120 minutes 3 Picture Set the modes of the picture Enable to select the picture modes you prefer Press this button and then...

Page 9: ...rroring of the display Continue to press it and choose the mirroring mode you wish to display 7 Mute Mute the speaker Press again to restore the sound of the speaker 8 Display Display mode Display the...

Page 10: ...field Other common gestures include Touch hold Touch hold an item on the screen by touching it and not lifting your finger until an action occurs Drag Touch hold an item for a moment and then without...

Page 11: ...e volume or the value of settings inside the OSD menu Ambient Light Sensor Description Ambient light sensor can be enabled or disabled in the OSD by going into the MISC category and selecting the opti...

Page 12: ...ress left to decrease sharpness and right to increase the level of sharpness Color Temp Set the color temp to the desired setting 6500K 9300K and User Backlight Adjust backlight intensity by pressing...

Page 13: ...ally adjust the brightness of the display according to the surrounding environment Please note While auto sensor is enabled the option of dimmer or backlight inside the OSD can not work until auto sen...

Page 14: ...ce Enable Select to Enable or disable the input signal If an input signal is turned off the source will be disabled Touch Controller Switch the power source for touch control board 6 Sound Volume Adju...

Page 15: ...ltage will damage the monitor and void the warranty Please use a fused power source if you decide to wire the monitor directly to your car s electrical system It is also crucial that you check the pol...

Page 16: ...provided below as well as the dealer name address and telephone number Please refer to these records whenever speaking to your dealer regarding this product Model Number Serial Number Dealer Name Str...

Reviews: