background image

13

Memory card/ Transferring files

MEMORY CARD

Using a memory card is required to record video and photos. The camera 

is compatible with microSD memory card, up to 32 GB capacity (Class 4 or 

higher). (sold separately, see “Available accessories”)

Before inserting or removing a card, turn off the camera to prevent damage 

to the files. 

The screen displays “no card” when there is no SD card in the camera and 

“Card Ful” when it is full. In addition, when the memory card is full, the 

screen displays “0000” in PHOTO

 and TIMELAPSE mode and “00:00:00” in 

VIDEO mode for the remaining number of photos and the remaining video 

recording time. If a video is being recorded, the camera automatically stops 

recording and the video will be saved. 

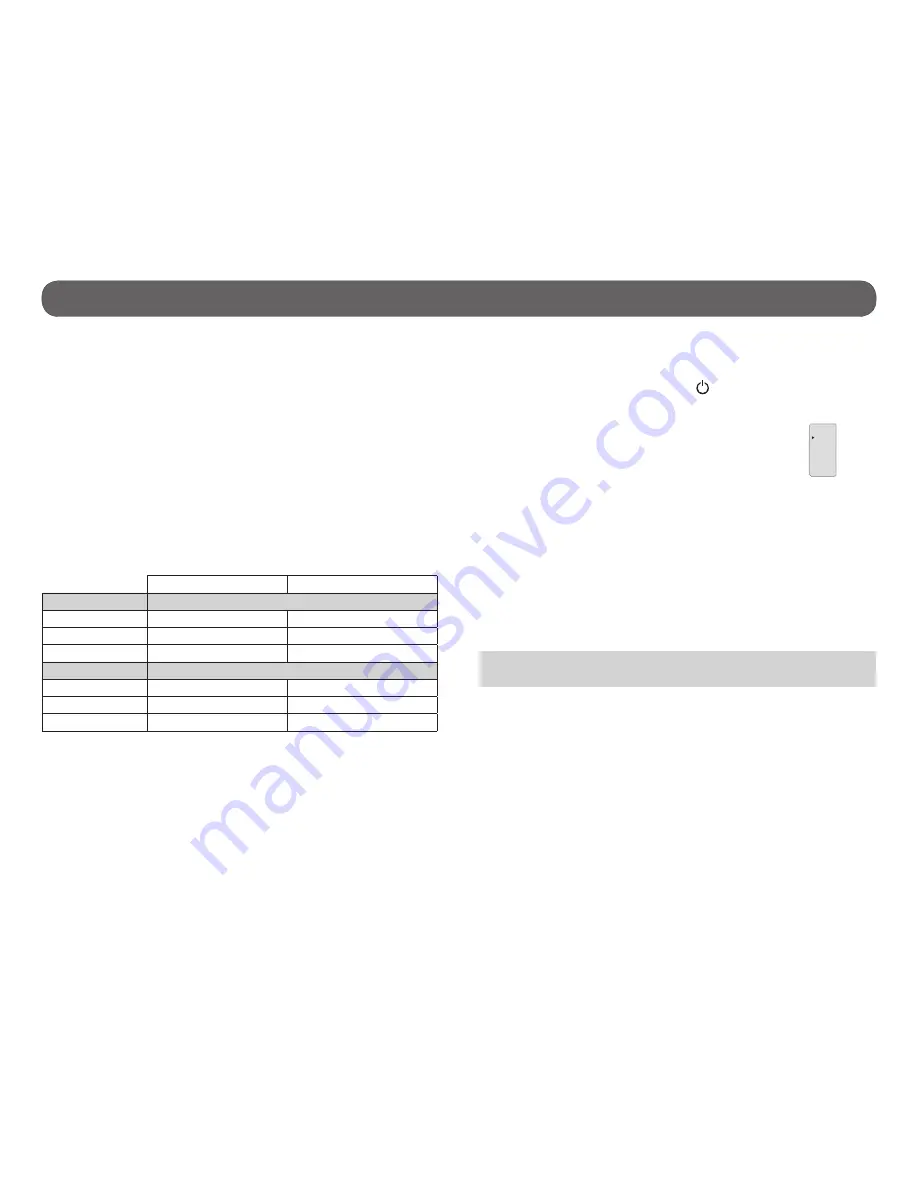
The following data shows the approximate quantity of photos or video length 

that can be taken by the camera depending on the memory card capacity.

16GB

32GB

Photo
1 MP

50900

101800

3 MP

15100

30200

5 MP

9400

18800

Video
WVGA @ 60 fps

5 hours

6 hours and 50 minutes

720p @ 30 fps

3 hours and 50 minutes

5 hours and 20 minutes

1080p @ 30 fps

3 hours

4 hours and 20 minutes

TRANSFERRING FILES

Allows to transfer or to view photos/videos using a computer. 

1.  Turn on the camera by pressing the   button a few seconds until the 

welcome screen appears. 

2.  Connecting the camera to a computer using the included USB cable.

3.  Select “USB TRANSFER” by pressing the OK button. 

4. 

The USB icon appears on the screen to indicate that the file transfer is 

in progress and the battery icon appears on the top right of the screen 

to indicate the battery is charging.

5.  The computer will recognize the camera and install the driver automati-

cally. Click on “My Computer” and select “Removable Disk”. Then click on 

“DCIM” and “100MEDIA” in order to find the photos and videos stored.

6. 

Drag or save the files to the desired location. 

Taking the memory card out of the camera and inserting it into the 


computer slot will achieve the same results. If no SD card slot is built 

into the computer, use a multi-card reader RD25-1 (sold separately, see  

“Available accessories”).

CHARGE

ONLY

USB 

TRANSFER

Note

: Videos in .MP4 format require the use of a compatible video player 

software such as VLC, Windows Media Player or QuickTime.

Summary of Contents for Hunting Edition

Page 1: ...USER MANUAL XCEL TM HD CAMERA Remote control included v1 9 XCELCAM COM...

Page 2: ...unctions 5 Camera modes 6 Settings 9 Remote control 11 Power 12 Memory card 13 Transferring files 13 Maintenance of the camera 14 Troubleshooting 15 Error message 15 Available accessories 16 Notices 1...

Page 3: ...ry Head strap mount Lens protector Lens cleaning cloth Carrying case HDMI and USB cables Camera with slide adaptor Remote control Clear waterproof housing Straight and 90 extender 360 Roll bar mount C...

Page 4: ...wing TV output Micro HDMI Computer output Micro USB Power source Lithium ion battery Rechargeable lithium ion battery Optical viewing field Ultra Wide Wide Dimensions 2 4 W x 1 7 H x 1 6 D Weight 82g...

Page 5: ...camera and allows to use for underwater use The housing is water proof up to 160ft picture camera with XHD OHT housing An access screw for the microphone is located at the back of the housing Remove t...

Page 6: ...sound signal option is enabled the recording time is displayed on the screen and the LED lights flash while recording see Operation of the LED lights and screen depending on selected options section f...

Page 7: ...PSE MODE The TIME LAPSE mode allows to take photos at predefined regular intervals Allows you to see the current configuration of the TIME LAPSE mode 1 Battery level 2 Icon of time lapse mode 3 Time i...

Page 8: ...hen the camera is connected to a television 1 Battery level 2 Icon of VIEW mode 3 Number of recorded pictures 4 Total length of recorded video VIEWING ON A TELEVISION Allows to view photos and videos...

Page 9: ...D lights and screen depending on selected options section for more details Erase Allows to erase the last file or all files Settings Allows to set the advanced settings of the camera Navigating in the...

Page 10: ...the signal from the remote control when the video photo or time lapse mode is shown on the screen The screen turns off after 1 minute of inactivity ENERGY SAVING To return to the screen press the M b...

Page 11: ...tton is used to take a video or photo If multiple cameras are on the remote control automatically synchro nizes to each camera when the START STOP button is used to take a video or photo This means th...

Page 12: ...ry icon shown in the upper right corner of the screen in all camera modes The battery level is shown in the upper right corner of the screen in all camera modes When the battery level is low we strong...

Page 13: ...ours and 50 minutes 5 hours and 20 minutes 1080p 30 fps 3 hours 4 hours and 20 minutes TRANSFERRING FILES Allows to transfer or to view photos videos using a computer 1 Turn on the camera by pressing...

Page 14: ...er error WARNINGS Never place the camera or the battery inside or above a heating device such as a microwave oven a stove or a radiator This could lead to over heating or the deformity of materials or...

Page 15: ...mote control option is disabled the camera turns off after 2 minutes of inactivity Press and hold the button a few seconds to turn on the camera The camera does not respond Remove the battery and rein...

Page 16: ...DM Decoy mount XHD CM Cap mount XHD SM Suction mount XHD SSM Sling stud mount XHD VHM Vented helmet mount MA 360 Mounting arm MEMORY 32 GB M E M O R Y R F N Adapter Adaptateur HIGH SPEED HAUTE VITESS...

Page 17: ...ired operation Industry Canada This device complies with Industry Canada licence exempt RSS standard s Operation is subject to the following Two conditions 1 this device may not cause interference and...

Reviews: