background image

 XBLUE QB Setup Guide 


 13/17  

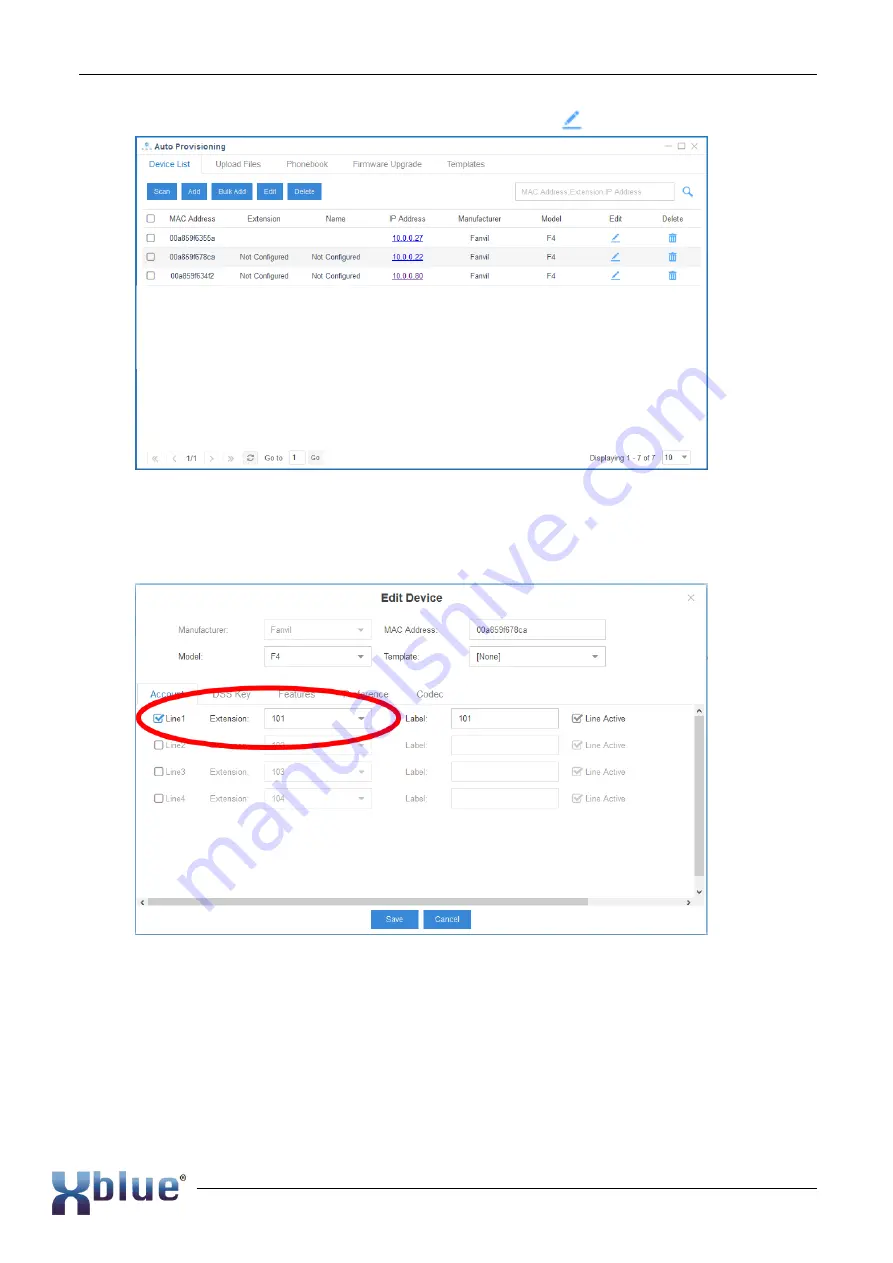
5.  Select the Edit button for the phone you wish to provision. 


6.  In the edit box of the selected phone click on the Model of the phone. The IP7g XBLUE 

telephone is one 

of the “F4” family of telephones. Select “F4” from the list for the IP7g 

telephone. 

7.  Along the left column 

“Accounts there are boxes used to assign the IP Phone an extension 

number. Check the first box in the upper left to assign one extension number to this 
telephone. 


8.  Select Preferences 
9.  In Preferences select: 

a.  Time Zone  
b.  Daylight Savings Time mode  
c.  Location (specific within region) 
d.  Time Format, and 

Summary of Contents for QB

Page 1: ...XBLUE QB Setup Guide 20180406001 QB1 QB2...

Page 2: ...Installation Warnings 7 Module Installation 7 Desktop Installation QB1 8 Connecting the Equipment 8 Configuration of QB and Get Phones Working 9 To find the IP Address of the QB1 9 Access the QB serve...

Page 3: ...th 192 168 x x or 172 16 31 x x or 10 x x x 2 Find the IP Address of your router 3 Connect LAN port of the QB server to the existing network 4 Connect all XBLUE IP7g telephones to the existing network...

Page 4: ...all recordings check voicemail messages and other extension related operations Before You Start Before you begin to install your QB PBX server please check the package contents to verify that you have...

Page 5: ...XBLUE QB Setup Guide 5 17 Hardware Overview Front Panel QB1 Rear Panel QB1 Front Panel QB2 Rear Panel QB2...

Page 6: ...linking Green Data Traffic detected normal Off Off line LAN LAN status Steady Green Linked normally Blinking Green Data Traffic detected normal Off Off line Analog Port Status Analog Extension FXS Gre...

Page 7: ...emperature should be kept below 104 F 40 C o The humidity should be less than 95 and NON Condensing Do NOT install in a moist or wet environment Install in a location where the device is easily access...

Page 8: ...vice Connecting the Equipment STEP 1 Connect one end of a network cable provided to the LAN port of XBLUE QB1 and the other end to any LAN port of your company s LAN data switch or router It must be c...

Page 9: ...B PBX Server Secure the QB Server IP Address on your network Access the QB server Web GUI Configure the QB server Web Desktop To find the IP Address of the QB1 Download a network scan tool We have suc...

Page 10: ...C Address in the list 5 Input the IP Address into the web browser address bar where you input web pages names 6 The first time you access the QB server you will be prompted to validate the connection...

Page 11: ...of the QB server is shown 4 All of the configuration settings of your QB server can be accessed using the Settings icon Additional applications are also available by clicking on the Main Menu dot cub...

Page 12: ...he NETWORK connector is in the center and is connected to the network wall jack b You can use the PC connector to connect your computer to the same network c IP Phones must be connected to the same ne...

Page 13: ...he F4 family of telephones Select F4 from the list for the IP7g telephone 7 Along the left column Accounts there are boxes used to assign the IP Phone an extension number Check the first box in the up...

Page 14: ...be established This is done using Static IP Address assignment or by RESERVING the position in your router that was given by your router This is often the easiest technique since Static IP Address as...

Page 15: ...discovery Once the credentials Username and Password are input the various GUI pages of the router will be seen Find the Connected Devices list in your router If you don t know your router s UN and P...

Page 16: ...etup Guide 16 17 3 This opens the page in your router for the QB PBX device Make appropriate notes about the device on this page of your router and select Reserved IP to secure this IP Address for the...

Page 17: ...n in the upper right of the Desktop since changes you make are simply stored in a file until loaded to the server for use The process invoked with the Apply button at the top right corner makes the ch...

Reviews: