background image


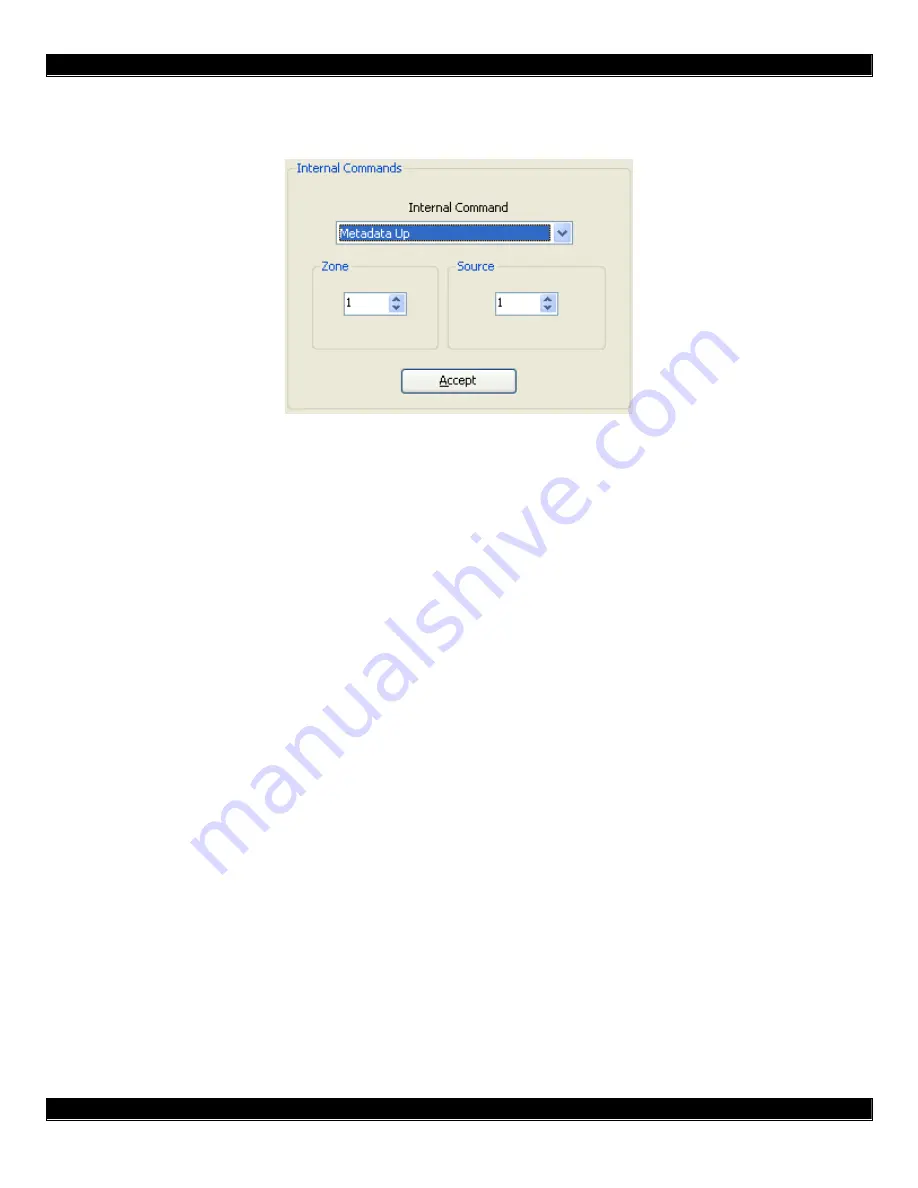
7) In the “Source” box, select “1”, since the XMUSIC output that we want to control is connected to 
Source 1. 


8) Click the “Accept” Button. 
 

You have now successfully programmed the“

Ç

 PAUSE” button in Zone 1 to perform the “Up 

Arrow” function of the XMUSIC.  Continue programming the rest of the MRC88m keypad 
buttons to the other desired XMUSIC functions. 
 
Also, please see Figure 2 at the end of this document to see how the buttons on the SPLCD-
MRC-KP map to the MRC88m Virtual Keypad buttons. 


Summary of Contents for MRC88M

Page 1: ...IC as was previously required You should now be using the internal Metadata commands as described below to control the XMUSIC PHYSICAL CONNECTIONS 1 Connect the RED and WHITE analog stereo outputs from Output 1 of the XMUSIC to the appropriate SOURCE 1 inputs of the MRC88m the outputs of Output 2 to SOURCE 2 etc 2 Connect the RS232 port of the XMUSIC to the COM port of the MRC88m 3 If you are usin...

Page 2: ...ver 5 In the Port field make sure that Com Port is selected This lets the driver know how the XMUSIC is connected to the MRC88m Note If you are using an Imerge S3000 instead of the Xantech XMUSIC you must also manually configure the RS232 settings of the COM port to match the Imerge S3000 Dragon automatically puts in the proper settings for the XMUSIC Please see Appendix A near the end of this doc...

Page 3: ...tem is the XMUSIC Output 1 3 In the Output 2 region click the check box next to the Connect to Source Input text 4 Select Source 2 in the drop down box 5 In the Output 3 region click the check box next to the Connect to Source Input text 6 Select Source 3 in the drop down box 7 In the Output 4 region click the check box next to the Connect to Source Input text 8 Select Source 4 in the drop down bo...

Page 4: ... 4 10 Click OK at the bottom of the dialog box to close the Options dialog At this point you have successfully told the MRC88m that an XMUSIC is connected and how it is connected ...

Page 5: ...ta internal command functions 1 Just above the Virtual Keypad under the Keypad tab select Zone 1 from the drop down box 2 On the Virtual keypad select SRC1 3 On the right hand portion of the Dragon window make sure that the Internal Commands tab near the bottom of the window is selected 4 On the Virtual Keypad select the Ç PAUSE button 5 In the Internal Commands window select the Metadata Up comma...

Page 6: ...e now successfully programmed the Ç PAUSE button in Zone 1 to perform the Up Arrow function of the XMUSIC Continue programming the rest of the MRC88m keypad buttons to the other desired XMUSIC functions Also please see Figure 2 at the end of this document to see how the buttons on the SPLCD MRC KP map to the MRC88m Virtual Keypad buttons ...

Page 7: ... portion of the Dragon window make sure that the Internal Commands tab near the bottom of the window is selected 3 On the Virtual Keypad select the CH button 4 In the Internal Commands window select the Metadata Next Track command 5 In the Zone area select the current zone Zone 1 ...

Page 8: ...ccept Button In the Command List on the left side of the Dragon window you will see the macro You have now successfully programmed the CH button in Zone 1 to perform the Next Track function of the XMUSIC server for Output 2 Continue programming the rest of the MRC88m keypad buttons to the other desired XMUSIC functions ...

Page 9: ...row to expose the drop down menu and select MP3 Music Server This will be used to tell any connected SPLCD s that Source 1 is a MP3 Music Server type of source so that the SPLCD can display the appropriate page for this source 5 Now click on the text box to the right of the Source Name field Type in the name of this source such as XMS 1 This text will be used to label the Source 1 button of the SP...

Page 10: ... Track Stop Metadata Stop Up 25 Metadata Up Fast Navigates Up 25 lines Down 25 Metadata Down Fast Navigates Down 25 lines Random Metadata Shuffle Repeat Metadata Repeat Metadata Menu Top Figure 2 Below Mapping the MP3 Music Server page buttons of the SPLCD MRC KP to the MRC88m Virtual Keypad buttons SPLCD Button Maps To MRC88m Keypad Button TRK Ch TRK Ch Guide Ch Tier 2 Info Ch Tier 2 Up Arrow Pau...

Page 11: ...k with the S3000 In the Project Options dialog File Project Options select the RS232 tab The RS232 settings for the COM port for the XMUSIC will look like the following These are the default settings for the XMUSIC The default settings for the IMERGE though are Baud Rate 57600 Data Bits 8 Parity None and Stop Bits 1 Change the settings for the COM port to match the settings for the S3000 When you ...

Page 12: ...tech Corporation Document 08905221A This document is copyright protected No part of this manual may be copied or reproduced in any form without prior written consent from Xantech Corporation Xantech Corporation shall not be liable for operational technical or editorial errors omissions made in this document ...

Reviews: