


Page9
NOTE: If the on/off switch is left in the ON position for more than 10-15 minutes without
moving, Smart Power will shut itself OFF. To reset, turn the unit OFF, wait a few seconds
and then switch it back ON again.
FOLDING & STORAGE
When you are done riding the scooter you can fold it down for compact storage and
transportation. First remove the seat post and seat, then using one hand, push down on
the folding handle while gently pushing down on the handlebars. BE CAREFUL NOT TO
HIT YOUR HEAD WITH THE HANDLEBAR. Push down until you feel the mechanism
lock into the down position.
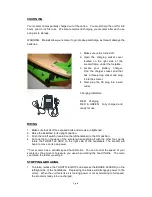
BRAKING SYSTEM
The scooter uses a pinch braking system for the front, They are both activated by a hand
brake lever on the left and right side of the handlebar. Squeezing the hand brake lever
with your left hand activates the rear brake. Squeezing the hand brake lever with your
right hand activates the front brake. Make sure to release the HAND THROTTLE GRIP
when engaging the brakes. Your scooter is equipped with switches on each brake lever
that will disengage power to the motor when the brake levers are depressed.
Practice braking on a smooth, dry surface to get used to the feel of the braking system.
Braking distance is affected by wet conditions and loose and uneven riding surfaces.
Adjusting the Brakes
The Brakes on the scooter should come fully adjusted from the factory.
However, it may be necessary to adjust the brakes from time to time.
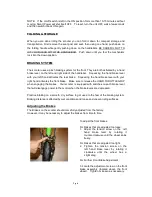
To adjust the front brakes:
For brakes that are adjusted too loose:
1. Adjust the tension screw on the left
hand brake lever by rotating it
counter-clockwise until the wheel spins
freely.
For brakes that are adjusted too tight:
2. Tighten the tension screw on the
left hand brake lever by rotating it
clockwise until the wheel has a
slight drag.
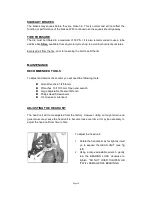
For Further Front Brake Adjustment
3. Locate the adjustment screw on the front
brake assembly (located above the front
wheel). Tighten or loosen as necessary.


