background image


Page8

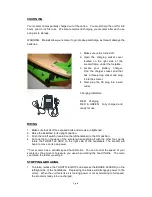
CHARGING 


Your scooter comes partially charged out of the carton.    You must charg the unit for 6-8 

hours  prior  to it’s  first  use.    We  also  recommend  charging  your  scooter  after  each  use 

and prior to storage. 


WARNING:   

Do not 

allow your scooter to go into deep discharge, as this will damage the 

batteries.     


RIDING 

 
1.  Make sure that all of the exposed bolts and screws are tightened. 
2.  Raise the kickstand to its upright position. 
3.  Push the on/off switch (located on the left handlebar) to the ON position. 
4.  Put one foot  on the  deck of the  scooter while pushing off with the other foot,  gently 

rotate  the  THROTTLE  GRIP,  on  the  right  side  of  the  handlebars.  The  scooter  will 
begin to move on its own power. 

 
**Your  scooter  has  a  variable  speed  hand  throttle.    You  can  control  the  speed  of  your 
scooter by  the amount of pressure  you  use  when rotating the  hand throttle.    The more 
you rotate, the faster you will go.     
 

STOPPING & BRAKING 

 
1.  To  brake,  release  the  THROTTLE  GRIP  and  depress  the  BRAKE  LEVERS  (on  the 

left/right  side of the handlebars.    Depressing the brake will disengage power to the 
motor.    When the unit feels like it is loosing power or not accelerating to full speed, 
the scooter is ready to be re-charged.     

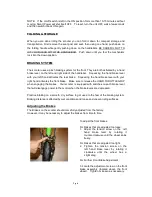
1.  Make sure unit is turned off. 

2.  Open  the  charging  socket  cover 

located  on  the  right  side  of  the 

scooter frame, under the footplate.   

3.  Locate 

your 

Battery 

Charger.     

Find  the  charger  socket  end  that 

has  a  three-prong  socket  and  plug 

it into the scooter. 

4.  Next,  plug  the  AC  plug  into  a  wall 

outlet. 


Charging Indicators: 


RED:    Charging 


RED  &  GREEN:    Fully  charged  and 


ready for use 


Summary of Contents for X-300

Page 1: ...Page1 X 300 Electric Scooter PLEASE BE SAFE WHEN RIDING ALWAYS WEAR A HELMET AND OBEY ALL LAWS X Treme TM Electric Scooters ...

Page 2: ...ours or until the light on the charger turns red green 5 DO NOT allow this unit to deep discharge the battery 6 For safety purposes DO NOT charge for over 8 hours 7 Turn the unit OFF when not in use This PRODUCT IS NOT INTENDED FOR EXTREME or OFF ROAD Use Please take care of your scooter DO NOT JUMP or ABUSE THIS PRODUCT DO NOT RIDE IN WET ICY CONDITIONS Failure to follow these instructions will V...

Page 3: ... this product See Product Handbook for more information This product is recommended for riders 14 YEARS OF AGE and older SAFETY Persons without excellent vision balance coordination reflex muscle and bone strength and good decision making capabilities should not use this product Minors without adult supervision should not use this product Persons unwilling or unable to take responsibility for thei...

Page 4: ...charger if it has been damaged in any way Keep hands face feet and hair away from all moving parts Do not touch the motor or wheels while they are rotating Brakes are designed to control speed as well as stop the scooter Practice braking for proper slowing down and smooth stops Maintain your scooter as recommended in this Product Handbook Use only quality replacement parts as recommended by the ma...

Page 5: ...0 12 TROUBLESHOOTING GUIDE 12 SUPPORT INFORMATION 13 DO NOT RETURN TO STORE Do not use this vehicle for the first time until you have inflated the tires to the correct PSI and completely charged the battery Failure to follow these instructions may damage your vehicle and void your warranty CALL TOLL FREE OR GO ONLINE 1 800 772 3852 www x tremescooters com support For General Information or Parts V...

Page 6: ... handlebars with the other 3 Fully extend the handlebars to their upright position until you feel the mechanism lock into place 4 Attach the handlebars by first loosening the 4 Allen head bolts and removing the top of the handlebar cap Lay the handlebar on top of the handlebar bracket being sure to orient the bars in the correct riding position with the throttle on the rider s right side Secure th...

Page 7: ...post receiver then attach the clamp to the top of the seat post Pull the upper seat post to the desired position and tighten the clamp securely 8 Attach the seat to the upper seat post and tighten the seat bolts as shown 9 FAILURE TO PROPERLY TIGHTEN AND ALIGN THE SEAT COULD RESULT IN RIDER INJURY DO NOT ATTEMPT TO RIDE WIHTOUT PROPER SEAT ADJUSTMENT AND ENSURING SEAT BOLTS ARE SECURE TIGHT ...

Page 8: ...on its own power Your scooter has a variable speed hand throttle You can control the speed of your scooter by the amount of pressure you use when rotating the hand throttle The more you rotate the faster you will go STOPPING BRAKING 1 To brake release the THROTTLE GRIP and depress the BRAKE LEVERS on the left right side of the handlebars Depressing the brake will disengage power to the motor When ...

Page 9: ...ht hand activates the front brake Make sure to release the HAND THROTTLE GRIP when engaging the brakes Your scooter is equipped with switches on each brake lever that will disengage power to the motor when the brake levers are depressed Practice braking on a smooth dry surface to get used to the feel of the braking system Braking distance is affected by wet conditions and loose and uneven riding s...

Page 10: ...djust and service the scooter you will need the following tools Allen Wrenches 3 4 5 6 mm Wrenches 10 13 13 mm Open end wrench Large Adjustable Crescent Wrench Philips Head Screwdrivers Oil Grease or Lubricant ADJUSTING THE HEAD UNIT The head unit will come adjusted from the factory However riding on rough terrain and general use may cause the head unit to become loose over time It may be necessar...

Page 11: ...be harmful If the chain is making a humming sound when the wheel is turning this is too tight and may cause the chain to snap The correct tension is achieved by adjusting the chain from its loose position to when it becomes lightly tense To tighten the chains Slightly loosen the two axle bolts on both sides of the rear wheel Fig 14 Then slowly adjust the two adjusting screws on each side of the re...

Page 12: ...eries are adequately charged 1 Continue to charge the batteries for 6 8 hours prior to initial use 2 Look for loose or disconnected wire Batteries do not hold a charge Unit does not have specified travel range 1 Batteries have reached the end of their useful life 2 Charger is malfunctioning 1 Replace Batteries 2 Replace Charger Unit Unit moves intermittently or very slow 1 Batteries not fully char...

Page 13: ...Page13 DO NOT RETURN TO STORE IF YOU NEED HELP CALL TOLL FREE OR GO ONLINE 1 800 772 3852 www x tremescooters com support For General Information or Parts Visit www x tremescooters com Revised 3 30 10 ...

Reviews: