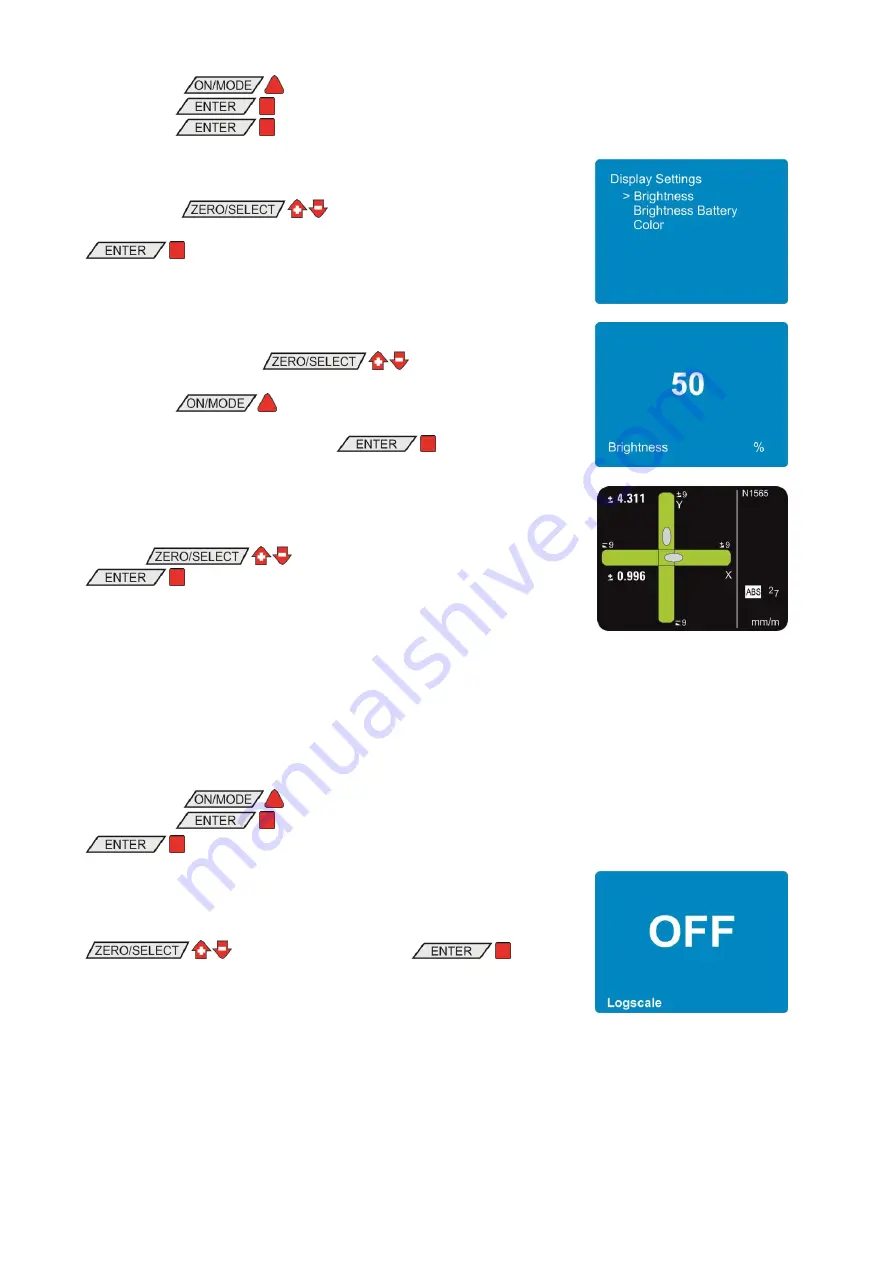
WYLER BlueLEVEL-2D Manual Download Page 30

page 30 of 65 pages 


Using the key 


select the menu point [Options] and 

confirm with 

. Select now [Display Settings] and 

confirm with 


With the keys 

 select the display option you 

would like to change and confirm the selection with the key 


In the brightness adjustments you can increase or reduce the 

brightness using the keys 

. The range is from 

10% to 100%.  

With the key 

 the default value of 50% will be 

recalled. 

Confirm the new value with the key 


In the colour adjustments you can select the colour preferred using 

the keys 

. Confirm your choice with the key 

.  


The measuring instrument will return to the measuring mode.   


4.3 

L

OGSCALE


With this option the logarithmic scaling can be switched on or off.   
 

Using the key 


select the menu point [Options] and 

confirm with 

. Select now [Logscale] and confirm with 


Switch the logarithmic scaling ON or OFF using the keys 

 and confirm with the key 


The measuring instrument will return to the measuring mode.  


Summary of Contents for BlueLEVEL-2D

Page 1: ...WYLER AG Im H lderli CH 8405 WINTERTHUR Switzerland Tel 0041 0 52 233 66 66 Fax 0041 0 52 233 20 53 Homepage http www wylerag com E Mail wyler wylerag com MANUAL BlueLEVEL 2D...

Page 2: ......

Page 3: ...ELECTION OF THE FILTER UNDER DIFFERENT MEASURING CONDITIONS FILTER 22 3 5 ABSOLUTE MEASUREMENT RELATIVE MEASUREMENT 22 3 5 1 ABSOLUTE MEASUREMENT 22 3 5 2 RELATIVE MEASUREMENT REL ZERO 23 3 6 MEASURIN...

Page 4: ...RSION FIRMWARE 59 B11 RESET TO FACTORY SETTINGS FACTORY RESET 60 B12 FUNCTION CHECK DEVICE CHECK 61 C Error Messages 62 D MAINTENANCE 62 D 1 GENERAL 62 D 2 STORAGE CARE AND HANDLING OF THE BATTERIES 6...

Page 5: ...S B 50 FUNCTION CHECK 4 12 36 FUNCTION CHECK DEVICE CHECK B11 60 FUNCTION CHECK DEVICE CHECK B12 61 FUNCTION HOLD 3 3 21 FUNCTIONS ON OFF 4 5 32 G GENERAL D1 62 GRAVITATION 4 8 33 GROUPING IN THE WIRE...

Page 6: ...ON OF THE FILTER UNDER DIFFERENT MEASURING CONDITIONS FILTER 3 4 22 SELECTION OF THE MEASURING UNIT UNIT 3 2 20 SERVICE AND REPAIR F 63 SET ABSOLUTE ZERO WITH A REVERSAL MEASUREMENT 3 1 1 18 SET PIN C...

Page 7: ...log measuring principle The analog measuring principle is optimized for the measurement of straightness flatness etc with handheld instruments because this measurement principle provides a stable valu...

Page 8: ...ste You can dispose of your used batteries accumulators free of charge at the collecting points of your community our distribution partners or at each location selling batteries accumulators You thus...

Page 9: ...ents are powered from the USB ports A BlueLEVEL 2D connected via Bluetooth to a BlueTC and to a laptop Two BlueLEVEL 2D connected via Bluetooth to a BlueTC and to a laptop Two BlueLEVEL 2D connected v...

Page 10: ...AND DISPLAY Colour display ZOOM OUT or previous option ZOOM IN or next option ON OFF or select menu accept selection or save entry to print measuring value or unfreeze and print transmit HOLD inclina...

Page 11: ...ut 3 seconds All settings are kept and will be reloaded again next time the instrument is switched on 2 1 3 KEYS FUNCTIONS SHORT DESCRIPTIONS OF EACH SINGLE KEY ON MODE Key Function 1 To switch the Bl...

Page 12: ...or similar output device through the RS485 port Data format OUT port sss xxxxxtt sn nnnnnn xxxxxtt sn nnnnnn cr sss 0 255 sequence number xxxxxtt Sensor Serial Number and Type e g N2473Dx BlueLEVEL 2D...

Page 13: ...ive Zero 2 2 DISPLAY The BlueLEVEL 2D features various graphic displays which can be scaled according to the requirements of the measuring task Also the background colour and the brightness of the dis...

Page 14: ...the measuring mode If the logarithmic scaling is enabled the symbol LOG will appear below the graph 2 2 2 DISPLAY TYPES The display type can be selected in the menu display Using the key select the m...

Page 15: ...strument the background colour can be selected Depending on the brightness of the colour selected the colour of the fonts and the symbols will change between black and white Using the key select the m...

Page 16: ...l power supply Using the key on mode select the menu point Options and confirm with Select now Display Settings and confirm with Using the keys select Brightness for the adjustment when using an exter...

Page 17: ...ected displaying range The displaying range can be adjusted using the keys provided that this function is enabled in the options scale division 5 Angle between two tick marks Scale division LOG Indica...

Page 18: ...the measuring object support and the BlueLEVEL 2D have the same temperature and that the instrument is in operation for several minutes before starting a measurement The surface needs to have a very g...

Page 19: ...surement the display will graphically show the current measurement Confirm the second measurement with the key or with the zapper After 15 seconds the value will automatically be read After terminatio...

Page 20: ...s xx xxxx REL inches in relation to the relative base 4 decimals xxxx xx A o artillerie permille xxxx xx o permille xxx xxx DEG degrees 3 decimals xxx xx DEG degrees minutes xx xx xx DEG degrees minut...

Page 21: ...nts As it is practically impossible to obtain a valid measuring value during manipulation the instrument can be set to the final position even after activating the key Complete the measurement with th...

Page 22: ...ting the floating average With a considerable change the number of values will be reduced with minute fluctuations the number will be increased Filter type 3 is the factory setting when leaving WYLER...

Page 23: ...L ZERO OFFSET Abbreviated procedure with the key Put the measuring instrument on the reference surface The display shows the values X 0 996mm m and Y 2 311mm m This corresponds to the absolute inclina...

Page 24: ...e the displayed value means that the upper limit has been exceeded If the blinking bar is below the l ower limit has been under passed Through the RS485 port a message will be sent Using the key selec...

Page 25: ...o set the lower limit above the upper limit In this case a respective message will be sent via the RS485 port continuously Data format at the RS 485 interface Upper Limit sss xxxxxtt UL sn nnnnnn sm m...

Page 26: ...d replaced by empty zeroes until after successful connection the measuring values will be displayed again 6 After successful connection the blue LED LINK will be lighting on all the instruments connec...

Page 27: ...use the mode LEAVE to cancel the existing connection 3 7 4 UNHINGE AN INSTRUMENT FROM A GROUP USING THE FUNTION LEAVE LEAVE Each instrument may be unhinged individually from an existing measuring grou...

Page 28: ...O SELECT and the functions of the key ON OFF on or off Option Functions ON OFF With this option specific functions can be switched on or off Functions switched off will no longer appear in the main me...

Page 29: ...g the PIN code The value can be adjusted using the keys With the key the standard value 00000 will be recalled Confirm your entry with the key As a factory setting the PIN code is deactivated The defa...

Page 30: ...e default value of 50 will be recalled Confirm the new value with the key In the colour adjustments you can select the colour preferred using the keys Confirm your choice with the key The measuring in...

Page 31: ...ing the keys and confirm your choice with the key With the keys you can switch the selected key ON or OFF In the display the selected status will be shown ON means activated OFF means deactivated Conf...

Page 32: ...functions will be shown again For switching another function on or off repeat the procedure as described above In order to store the settings select Ok and confirm with the key The measuring instrumen...

Page 33: ...fferent places the displayed value must be corrected If the correction of the local gravity is switched on the inclination measured will be corrected accordingly before the value is displayed The corr...

Page 34: ...MWARE With this option information about the firmware installed and the configuration can be displayed Using the key select the menu point Options and confirm your selection with Select now Version an...

Page 35: ...ximum range Join not joined Pin Code OFF Code 00000 Display Settings Colour Blue Saturation 100 Saturation Power Save 50 Logscale OFF Programmable Keys all keys enabled Functions all functions enabled...

Page 36: ...he display a simplified design of the front foil of the BlueLEVEL 2D will be shown If any key or the IR zapper is pressed the real LEDs as well as those on the display will lit In addition the key pre...

Page 37: ...page 37 of 65 pages APPENDICES A FLOAT CHARTS GENERAL A1 START THE INSTRUMENT ON OFF...

Page 38: ...page 38 of 65 pages A2 KEY REL ZERO...

Page 39: ...page 39 of 65 pages A3 KEY HOLD FREEZING OF A MEASURING VALUE HOLD...

Page 40: ...page 40 of 65 pages A4 MENU SELECTION...

Page 41: ...page 41 of 65 pages A5 ADJUSTMENT OF THE DISPLAY DISPLAY...

Page 42: ...page 42 of 65 pages A6 MEASUREMENT ABSOLUTE MODE ABSOLUTE...

Page 43: ...page 43 of 65 pages A7 MEASURING ABSOLUTE CONSIDERING THE ZERO OFFSET MODE ABSOLUTE ZERO...

Page 44: ...page 44 of 65 pages A8 MEASURING RELATIVE MODE REL ZERO...

Page 45: ...page 45 of 65 pages A9 ADJUSTMENT OF THE MEASURING UNIT UNIT...

Page 46: ...page 46 of 65 pages A10 SETTING OF LIMITS LIMITS...

Page 47: ...page 47 of 65 pages A11 ADJUSTMENT OF FILTER TYPES FILTER...

Page 48: ...page 48 of 65 pages A12 GROUPING OF INSTRUMENTS WITH WIRELESS TRANSMISSION JOIN...

Page 49: ...page 49 of 65 pages A13 LEAVING A GROUP OF INSTRUMETNS LEAVE...

Page 50: ...page 50 of 65 pages B FLOAT CHARTS OPTIONS B1 PIN CODE QUERY FOR ACCESS TO THE OPTIONS...

Page 51: ...page 51 of 65 pages B2 SET PIN CODE...

Page 52: ...page 52 of 65 pages B3 DISPLAY SETTINGS...

Page 53: ...page 53 of 65 pages B4 LOGARITHMIC SCALE ON OFF LOGSCALE ON OFF...

Page 54: ...page 54 of 65 pages B5 PROGRAMMABLE KEYS REL ZERO AND ZERO SELECT PROGRAMMABLE KEYS...

Page 55: ...page 55 of 65 pages B6 SWITCHING FUNCTIONS ON OR OFF FUNCTIONS ON OFF...

Page 56: ...page 56 of 65 pages B7 SWITCHING THE HIDING OF DISABLED FUNCTIONS ON OR OFF HIDE DISABLED FUNCTIONS ON OFF...

Page 57: ...page 57 of 65 pages B8 SWITCH THE WIRELESS TRANSMISSION ON OR OFF RADIO ON OFF...

Page 58: ...page 58 of 65 pages B9 SWITCH THE COMPENSATION OF GRAVITY ON OR OFF GRAVITATION COMPENSATION...

Page 59: ...page 59 of 65 pages B10 DISPLAY THE FIRMWARE VERSION VERSION FIRMWARE...

Page 60: ...page 60 of 65 pages B11 RESET TO FACTORY SETTINGS FACTORY RESET...

Page 61: ...page 61 of 65 pages B12 FUNCTION CHECK DEVICE CHECK...

Page 62: ...pright position Read the instructions in your manual before installing batteries Make sure to insert the batteries properly following the symbols showing you the correct way to position the positive a...

Page 63: ...ountry The WYLER partner will inform the customer about the possibility of the ERS service outlining the advantages and consequences of this service such as e g o reduced total repair time o required...

Page 64: ...ed and will be quoted separately Technical enhancements and modifications published by WYLER if considered suitable Costs for packing and transport of the instrument s from the customer to WYLER and b...

Page 65: ...WYLER AG Im H lderli CH 8405 WINTERTHUR Switzerland Tel 0041 0 52 233 66 66 Fax 0041 0 52 233 20 53 Homepage http www wylerag com E Mail wyler wylerag com...

Reviews: