background image

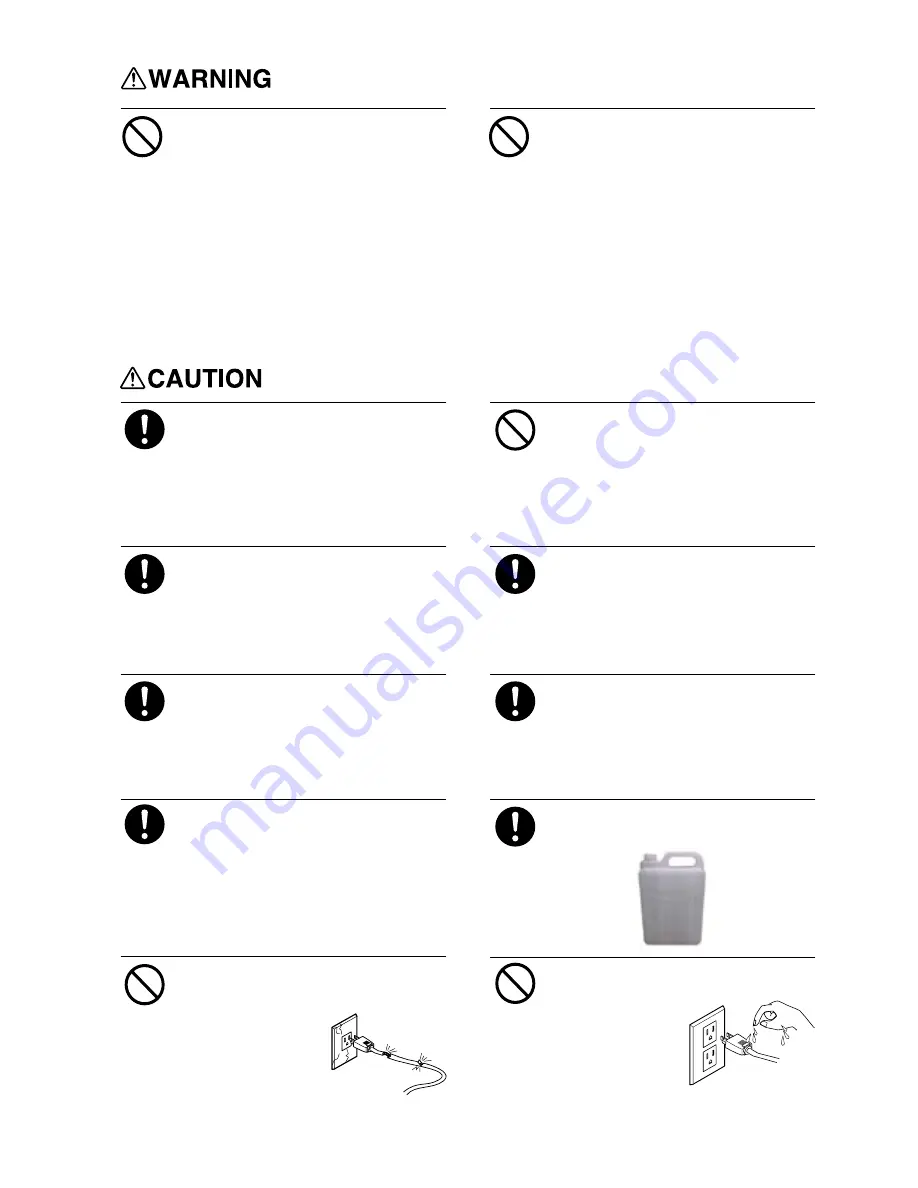
D o   n o t   u s e   t h i s   p r i n t e r   u n d e r 
the following environment: open 
f i r e s , e l e c t r i c   s p a r k ,   s t a t i c 
electricity,high temperature or any 
place close to heat.

Otherwise it may cause fire.

Do not put cartridge, cleaning solution 
or waste inks under the following 
environment: 

·

 close to open fires

·


high temperature                       

   or any place close to heat

·


close to bleacher, chemicals or 

inflammable and explosive materials

Otherwise  it may cause fire.

Keep your working environment well 
ventilated. 

Otherwise it may affect your health 
or cause fire.

Do not drop any ink or cleaning solution 
on your skin or eyes. Do not eat, drink, 
smell the ink and cleaning solution. 

All these behavior are harmful to your 
health.

If the ink or cleaning solution is 
splashed into your eyes, wash your eyes 
immediately with plenty of water at 
least 15 minutes and get 
medical attention.

If ink or cleaning solution is splashed 
into your skin, please wash your skin 
with water or soap immediately and get 
medical attention.

Get medical attention immediately if 
you have any ink or cleaning solution 
by mistake.

If you feel bad while smell the ink or 


solution, please go to the place where 
is well ventilated. If feel dizzy or 
blurred, please get medical attention 
immediately.

Collect the waste ink via our waste-
ink-collecting container.

Keep the cartridge away from children.

The fire or illness may caused if 
waste ink leak or evaporate.

Do not use broken or loose plug or 
power supply.

O t h e r w i s e   m a y 
c a u s e   f i r e   o r 
electric shock.

Do not pull in or pull out the plug 
while your hands are wet.

Otherwise fire or 
electric shock may 
occur.

3

Summary of Contents for R180E Series

Page 1: ...is manual so if you find anything wrong or being omitted please contact us immediately and we wi l l be very appreciate company shal l not be l iable for any errors or for direct or indirect incidenta...

Page 2: ...ting 18 6 Menu Bar Main Function 18 7 Print Quality 19 8 Print Head Cleaning 20 9 Print Head Physical Calibration 21 10 Print Head Bidirectional Calibration 24 11 Double Heads Printing Position Calibr...

Page 3: ...H print mode standard production model Eco solvent ink UV color 4 colors 6 colors 8 colors Temperature 18 32 Humidity 46 65 RH Auto cleaning system with anti clogged flash spray moisturizing function...

Page 4: ...concrete meaning depends on the figure in it the mark on the left means plug must be pulled out from the socket Can not be disassembled repaired or refitted Otherwise it may cause fire or other damage...

Page 5: ...ning solution is splashed into your eyes wash your eyes immediately with plenty of water at least 15 minutes and get medical attention If ink or cleaning solution is splashed into your skin please was...

Page 6: ...re or electric shock may occur Suggest at least 4 people should take part in the process of tearing off package assembling or moving the printer Otherwise the printer mightl fell off or broken When pu...

Page 7: ...Instruction of hoisting 1 USB cable 1 Keys 2 Bellows tube 1 1 Accessories checking O rings 4 Cartridge 8 Funnel 4 Pump tube 1 M a n u a l H C m o d e l feeding left 1 M a n u a l H C m o d e l feeding...

Page 8: ...cating oil regularly Do not put into hand 6 Parts name 4 Carriage adjust the height automatically 6 Cleaning station 8 Drying system 7 feet cup 10 Suction control valve could adjust the suction separa...

Page 9: ...al noise please contact your local agent or log in our company website for consultation Do not try to handle it by yourself or you must suffer the consequences 13 Back guide device guide the plate mov...

Page 10: ...are installation 1 Double click software installation package and installation interface pops up 2 Click browse to choose installation location and then click next 8 Please do not install printer driv...

Page 11: ...3 If selected shortcut installation location then just click next 4 Choose whether to create a shortcut 9 5 Installation interface pops up and click install...

Page 12: ...nstallation progress displays 7 Click finish 10 Before printing please install print driver and USB3 0 driver and then the machine can be used USB3 0 driver installation steps please refer to page 11...

Page 13: ...device manager 3 Right click YiLi USBboard and select update driver software 11 USB3 0 installation windows 7 system USB3 0 driver installation must require that the machine is switched on and connect...

Page 14: ...4 Select browse computer to find driver software 5 Select browse 6 Select x86 folder in print software installation location 12 Brouse computerto finddriver software Brouse x86 folder...

Page 15: ...7 Click next 8 Security alert dialog box pops up and select install this driver software anyway 9 Click close to finish USB3 0 installation 13 Next Install thisdriver software anyway Close...

Page 16: ...tware then driver update dialog box pops up select yes install this driver anyway then click next 2 In device manger and under other device to find YiLi USB3 0 1 Right click my computer and select dev...

Page 17: ...0 1 under the subfolder driver select X86 and click ok 5 Click browse 4 Installation dialog box pops up select install from a list or specific location and click next 15 Install froma listor specificl...

Page 18: ...7 Click next 9 Security software will pops up select allow load 8 Installation progress displays 10 Finish USB3 0 installation 16 Next Allowload Finish...

Page 19: ...ription display panel Display variety of information cancel button pause button base point button enter button p r i n t q u a l i t y button cleaning button menu button t e s t button h e i g h t adj...

Page 20: ...POINT to set start position Left Right BASE POINT Height value Media type Height Media type R ROLL B BOARD When turn on screen will display interface 6 Menu bar main function MEDIA TYPE Media type ROL...

Page 21: ...etween the 2 pictures 1 Press PRINT QUALITY QUALITY ECLOSION NONE PRINT QUALITY ENTER PRINT QUALITY BI_DIRECTION ENTER QUALITY PICSPACE 0mm ENTER 5 Press to enter MEDIA menu press and to select media...

Page 22: ...show START TEST PRINT INKFILL START press ENTER to confirm press back to previous menu 8 Printhead cleaning START Start cleaning TEST PRINT INKFILL START INKFILL STOP HEAD CLEANING START HEAD CLEANIN...

Page 23: ...is not adjusted bandings or other problem will appear when printing which will lower the print quality 1 2 Loosen the 8pcs of screws on the sliding block up and down move the carriage to make the lef...

Page 24: ...t the back of side plate 3 Print the test graph until the printhead vertical adjustment result is good 5 Print horizontal test print graph and observe the test graph check if the black and red lines a...

Page 25: ...ont and back knob of right printhead to make the test graph which separately printed by the 2 sets of printhead appeared without overlap or gap Overlaped Gap 23 front and back knob Through adjusting t...

Page 26: ...BIDIRECTION submenu 3 Press ENTER to start print test BIDIRECTION 1 TEST PRINT B MENU BIDIRECTION TEST PRINT is print mode choose B mode is for verticle print C mode is for horizental print Current v...

Page 27: ...f step 8 and press ENTER to confirm BIDIRECTION 1 L_ADJUST 0 8 ENTER Current value No deviation value 7 6 5 4 3 2 1 0 10 9 8 7 6 5 4 3 2 1 0 1 2 3 4 5 6 7 8 9 10 6 Press to add step 4 selected value t...

Page 28: ...e to choose print modes printing from left to right or from right to left 2 Press to select printing mode from right to left press to enter RIGHT_LEFT submenu press ENTER to start test printing 3 Pres...

Page 29: ...adjusment methord is the same as RIGHT_ LEFT adjustment 10 Press to select OVERLAP press enter OVERLAP submenu Current value No deviation value 7 6 5 4 3 2 1 0 10 9 8 7 6 5 4 3 2 1 0 1 2 3 4 5 6 7 8 9...

Page 30: ...ults 12 Check test printing result choose the value of line without overlap in this case the value without overlap is 1 13 Use to select ADJUST use and to change the value of step 11 and press ENTER t...

Page 31: ...tion is used for distance calibration of two groups of head nozzles with the same print color To ensure that all in the same vertical position when printing According to the finest line s value printe...

Page 32: ...olor calibration software parameters View state diagram state and make the appropriate adjustment in the software Right click driver icon xenons in the bottom right of computer print colored calibrati...

Page 33: ...tting press test to increase carrier height push the carrier on top of print media slowly then fine tuning the carrier height the height between carrier and print media 1 7 2 0mm will be better Print...

Page 34: ...vior are harmful to your health Keep the cartridge away from children Only use the ink supplied by us Do not try to fill ink into the empty cartridge NOTICE Except for transport please do not take off...

Page 35: ...Only use the water based ink NOTICE 1 Unplug the cartridge 2 Insert a new cartridge 33 Cartidge slot Cartridge...

Page 36: ...ste ink collecting container The fire or illness may caused if waste ink leak or evaporate Waste ink can not be reused and it contains poisonous compositions So do not burn or handle it as a general r...

Page 37: ...thinner Do not touch print head by hand or any other material Clean print head with our special cleaning cloth or cleaning rod and cleaning solution Cleaning printer body Cleaning printer body carefu...

Page 38: ...avoid scratching the surface of print head Ink cartridges should be well covered after adding ink to prevent dust or other foreign matter fall into it and cause ink blocking Eco solvent ink can t be m...

Page 39: ...emergency stop switch in both sides 3 Switch on the air switch inside 4 Test if the external power AC220 input voltage is normal by multimeter 1 Switch on the machine double click the USB driver file...

Page 40: ......

Reviews: