Warner Shelter Systems Limited
PAGE 4
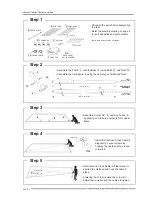
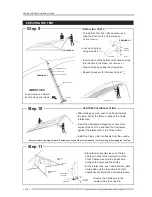
Step 1
• Check all the parts before assembling
the tent.
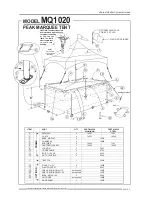
• Refer to assembly drawing on page 4
for part quantities and part numbers.
Step 2
Step 4
Step 3
• Install second Cross Cable. Lift last corner to
shorten the distance and hook the cable in
place.
• Lowering the corner causes the corners to
adjust their position and the cables to tighten.
• Assemble Corner 90° 4 and Eve Tubes 6
by slipping one tube to another to form upper
frame.
• Install first (bottom) Cross Cable 5
diagonally in square frame by
hooking the cable end loop to the
corner pin.
Corner Pin
Cross
Cables
5
2
6
5
CORNER 90°
2
MIDJOINT
6
EVE TUBE
10
CROSS CABLE
4
POST BASE
8
CENTREPOLE
1
TENT TOP
3
POST 8’
• Assemble the Post 8’ 3 with the Base 4 using Bolts 11 and Nuts 12 .
• Assemble the Centrepole 8 using the same type of Bolts and Nuts.
11
STEEL
(PART# 10595)
ALUMINUM
(PART# 10963)
CENTRE POLE
ASSEMBLY
1.935 m (6’-41/2”)
1.941 m (6’-41/2”)
1.935 m (6’-4”)
4
12
3
*Bolts, Nuts and Lock-pins not shown.
AKE
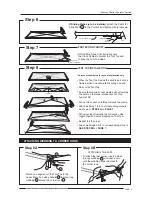
Step 5
Top Cable
Bottom Cable
5
DROP SHEET
..\graphicshome\Marquee\Manuals\MQ1020\MQ1020 Manual 2007.FH11
8
8’
E
T
T 8
KE
8’
KE
E
O
OST
A
ST
AK
8
AK
PO
POS
S
A
3
3
P
P
NT
T
3
3
(NOT INCLUDED)


