Warner Shelter Systems Limited
PAGE 10
Summary
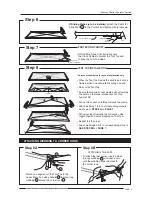
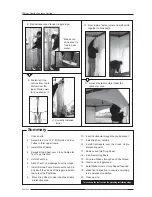
11. Joiner should smoothly follow the
catenary curve.
10. From inside, fasten joiner and wall velcro
together to hide posts.
8. Fix downspout and tension toggle rope.
9. Fasten tent top
velcros from top to
bottom over the
lapel. Flatten well
for a neat seal. =>
* Make sure
downspout is
free to pass
water.
<= Correctly installed
joiner.
10. Insert Centrepole through the centre socket.
11. Install flag from outside.
12. Install Centrepole over the Cross Cable
intersecting point.
13. Remove and fold Drop Sheet.
14. Install remaining Posts.
15. Drive two Stakes through each Post Base.
16. Tension each toggle rope.
17. Install Walls, Joiners or Guy Ropes if needed.
18. Make final inspection to ensure everything
is in operational condition.
19. Clean up site.
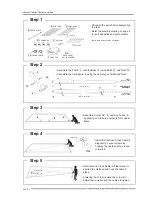
1.
Check parts.
2.
Assemble Corner 90°, Midjoints and Eve
Tubes to form upper frame.
3.
Install Cross Cables.
4.
Spread Drop Sheet over Cross Cables for
Tent Top protection.
5.
Unfold Tent Top.
6.
Attach Tent Top webbings to corner loops.
7.
Install first two Posts. Secure with Lock-Pin
and insert the s-hook of the toggle rope into
the hole at the Post Base.
9.
Move Drop Sheet to clear the Cross Cable
intersection area.
To take down the tent, reverse the preceding installation steps.
..\graphicshome\Marquee\Manuals\MQ1020\MQ1020 Manual 2007.FH11


