background image

10

Cordless Lawn Mower 

WG773E


than 90%, the charger will automatically


recharge to make sure the capacity stays


above 90%.

NoTe: If the battery is defective, the red
light will flash.

BATTERY CARE

The battery in your cordless lawnmower is a 24-volt 
sealed lead acid system. The mower can be stored in 
any position without fear of leakage.

• 

For optimal battery life and performance the 

battery should be fully charged every 2 months 
during storage

• 

For optimal battery life and performance the 

battery should be fully charged after each use

• 

Store the battery in a cool dry location.

• 

The battery can be safely stored down to 14°F 

(-10°C).

• 

The battery does not need to be fully discharged 

before recharging.

• 

Initially 2 to 3 charging cycles may be required 

after purchase to achieve maximum run time 
capacity.

ADDITIONAL BATTERIES can be obtained from the 
Customer Helpline.

ASSEMBLY

IMPoRTANT! 

Before you assemble the lawn 

mower, check the accessories according above 

information, make sure the accessories are completed.

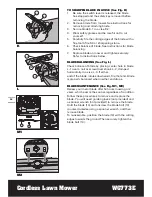
1. fITTING The hANdle (See fig. b1, b2, b3)

1)  Remove  the screws(x 2) on the both side of deck. 

(See Fig. B1)

2)  Insert the lower handle (8) into the holes on the 

deck provided.

3)  Secure with the screws provided.(See Fig. B1) 
4)  Attach the upper handle (1) with the bolts and 

Handle knobs (7) to the lower handle (8). (See Fig. 
B2)

5)  Screw on the two Handle knobs. Check that the 

handle is FULLY secured.

NoTe: 

Ensure the bolts are fully inserted through the 

handles before fitting the handle knobs.
6)  Attach the cable clips (3) provided, to the upper 

and lower handle. Insert the cable into the clips 
ensuring there is enough cable slack .(See Fig. B3)

12

A

B1

B2

B3

Summary of Contents for WG773E

Page 1: ...Cordless Lawn Mower WG773E SAFETY AND OPERATING MANUAL ...

Page 2: ...o see that the blades blade bolts and cutter assembly are not worn or damaged Replace worn or damaged blades and bolts in sets to preserve balance d On multi bladed machines take care as rotating one blade can cause other blades to rotate Operation a Mow only in daylight or in good artificial light b Avoid operating the equipment in wet grass where feasible c Always be sure of your footing on slop...

Page 3: ... the battery connection 3 Do not charge a leaking battery 4 Do not use chargers for works other than those for which they are designed 5 Before charging ensure your charger is matching the local AC supply 6 For indoor use or do not expose to rain 7 The charging device must be protected from moisture 8 Do not use the charging device in the open 9 Do not short out the contacts of battery or charger ...

Page 4: ... pack several times to obtain maximum performance l Battery pack gives its best performance when it is operated at normal room temperature 20 C 5 C m When disposing of battery packs keep battery packs of different electrochemical systems separate from each other n Recharge only with the charger specified by WORX Do not use any charger other than that specifically provided for use with the equipmen...

Page 5: ...fuse with rated current of 2 A The output plug is with positive center pole and negative outer pole Lead acid batteryThis product has been marked with a symbol relating to separate collection for all battery packs and battery pack It will then be recycled or dismantled in order to reduce the impact on the environment Battery packs can be hazardous for the environment and for human health since the...

Page 6: ...6 Cordless Lawn Mower WG773E 1 2 3 4 5 6 7 8 9 10 11 ...

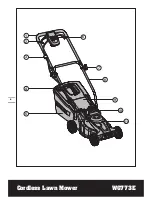
Page 7: ...bag filling indicator 5 Grass collection bag 6 Safety key 7 Handle knobs 8 Lower handle 9 Safety flap 10 Battery pack 11 Motor cover 12 Charger see Fig A 13 Blade bolt see Fig M1 14 Blade see Fig M1 Not all the accessories illustrated or described are included in standard delivery ...

Page 8: ... WA3216 Charging time 5 7hrs Charger model WA3749 Charger rating Input AC 110 240V 50 60Hz Machine weight 14kg ACCESSORIES Battery pack 1 Charger 1 Grass collection bag 1 We recommend that you purchase your accessories from the same store that sold you the tool Use good quality accessories marked with a well known brand name Choose the type according to the work you intend to undertake Refer to th...

Page 9: ...rger to rain Do not charge in wet locations Do not charge mower when temperature is above 104 F 40 C or below 41 F 5 C 6 Keep the mower and charger away from water heat sources Such as radiators heaters stoves etc flames or chemicals Be careful not to damage the charger cord by keeping cord away from sharp edges CHARGING PROCEDURE 1 Charging can be carried out only with the battery REMOVED from th...

Page 10: ...ging cycles may be required after purchase to achieve maximum run time capacity ADDITIONAL BATTERIES can be obtained from the Customer Helpline ASSEMBLY Important Before you assemble the lawn mower check the accessories according above information make sure the accessories are completed 1 FITTING THE HANDLE See Fig B1 B2 B3 1 Remove the screws x 2 on the both side of deck See Fig B1 2 Insert the l...

Page 11: ...tep 1 Press the front of the handle briefly See Fig C2 Step 2 Then push it forward See Fig C2 Step 3 Push down the back of the handle See Fig C2 Step 4 Clip the plastic clips over the metal frame See Fig C3 Warning Don t fit the handle in reversed direction Fit the handle as shown in Fig C1 Front Part Back Part 1 2 3 C1 C2 C3 C4 ...

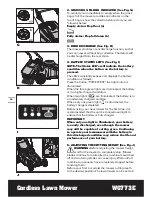
Page 12: ...oks a on the mower deck See Fig D2 4 Release the safety guard to lock the grass bag into position Ensure the grass bag is installed securely See Fig D3 NOTE Depress the grass bag slightly to ensure that it is completely installed 4 REMOVING EMPTYING Hold the grass bag lift the safety flap 9 and hold up Remove grass bag 5 Warning Always check the safety flap can close the discharge outlet tightly b...

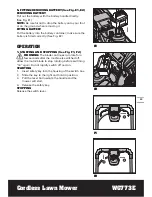
Page 13: ... is fitted correctly See Fig E2 OPERATION 1 STARTING AND STOPPING See Fig F1 F2 Warning The blade continues to rotate for a few seconds after the machine is switched off Allow the motor blade to stop rotating before switching on again Do not rapidly switch off and on STARTING 1 Insert safety key into the housing of the switch box 2 Slide the key to the right and hold in position 3 Pull the lever b...

Page 14: ... condition When two lights are illuminated the battery is in a moderately charged condition When only one green light is illuminated the battery charge is depleted Before using your new mower for the first time it is recommended that the unit be charged overnight to ensure that the battery is fully charged IMPORTANT When only one light is illuminated your battery is overly discharged even though t...

Page 15: ...mediately for cause Vibration is a warning of trouble Do not operate mower until a service check has been made 6 ALWAYS RELEASE SWITCH LEVER TO TURN MOWER OFF AND REMOVE SAFETY KEY WHEN LEAVING IT UNATTENDED EVEN FOR A SHORT PERIOD OF TIME MAINTENANCE WARNING Stop the mower and remove the safety key before removing the grass bag NOTE To ensure long and reliable service perform the following mainte...

Page 16: ...ig L Check balance of blade by placing center hole in blade L 1 over a nail or screwdriver shank L 2 clamped horizontally in a vise L 3 If either end of the blade rotates downward file that end Blade is properly balanced when neither end drops BLADE MAINTENANCE See Fig M1 M2 Renew your metal blade after 50 hours mowing or 2 years which ever is the sooner regardless of condition Follow these proced...

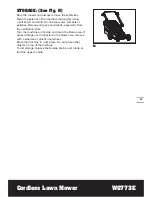
Page 17: ...vents or polishes Remove all grass and debris especially from the ventilation slots Turn the machine on its side and clean the blade area If grass cuttings are compacted in the blade area remove with a wooden or plastic implement Store the machine in a dry place Do not place other objects on top of the machine To aid storage release the Handle knobs and rotate or fold the upper handle M2 N ...

Page 18: ......

Page 19: ......

Page 20: ...Copyright 2014 Positec All Rights Reserved 2CLM03GPK11001A0 ...

Reviews: