background image

Cordless chain saw 

EN

18

•   Stand slightly to the left side of saw. This 

keeps your body from being in direct line 
with chain.

•   Do not let guide bar nose touch anything 

when chain is moving.

•   Never try cutting through two logs at same 

time. Only cut one log at a time.

•   Do not bury the guide bar nose or try plunge 

cut (boring into wood using guide bar nose).

•   Watch for shifting of wood or other forces 

that may pinch chain.

•   Use extreme caution when reentering a 

previous cut.

•   Use only the low-kickback chain and guide 

bar (6) that were supplied with this chain 
saw or recommended. 

•   Never use a dull or loose chain. Keep chain 

sharp with proper tension.

How to use Saw Safely

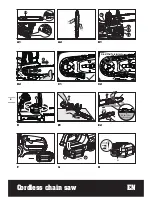
1.  Use the chain saw only with secure footing.
2.  Hold the chain saw at the right-hand side of 

your body (See Fig. K).

3.  The chain (7) must be running at full speed 

before it makes contact with the wood.

4.  Use the bumper spikes (13) to secure the 

saw onto the wood before starting to cut.

5.  Use the bumper spikes as a leverage point 

while cutting. (See Fig. L)

6.  Do not operate the chain saw with arms 

fully extended, attempt to saw areas which 
are difficult to reach, or stand on a ladder 
while sawing (See Fig. M).

Never use the chain saw above shoulder 

height

CUTTING WOOD UNDER TENSION (See 

fig. N)

WARNING: When cutting a limb 

that is under tension, use extreme 

caution. Be alert for wood springing 

back. When wood tension is released, 

limb could spring back and strike 

operator causing severe injury or death.

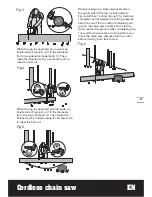
When sawing logs supported on both ends, 
start the cut from above(Y) about 1/3 of the 
diameter into the log (overbuck) and then 
finish the cut (Z) from below, in order to avoid 
contact of the chain saw with the ground. 
When sawing logs supported on only one end, 
start the cut from below (Y) about 1/3 of the 

diameter into the log (underbuck) and finish 
the cut from above (Z) in order to avoid log 
splitting or jamming of the chain saw.

SAW MAINTENANCE

WARNING: Remove the battery 

pack from the tool before carrying 

out any adjustment, servicing or 

maintenance.

Follow maintenance instructions in this manual. 
Proper cleaning of saw and chain and guide bar 
maintenance can reduce chances of kickback. 
Inspect and maintain saw after each use. This 
will increase the service life of your saw. 

NOTE: 

Even with proper sharpening, risk of 

kickback can increase with each sharpening.

MAINTENANCE AND 

STORAGE OF CHAIN SAW

1. Remove the battery pack

•   When not in use

•  Before moving from one place to another

•  Before servicing

•  Before changing accessories or 

attachments, such as saw chain and guard

2. Inspect chain saw before and after 

each use.

 Check saw closely if guard or 

other part has been damaged. Check for 

any damage that may affect operator safety 

or operation of saw. Check for alignment or 

binding of moving parts. Check for broken 

or damaged parts. Do not use chain saw if 

damage affects safety or operation. Have 

damage repaired by authorized service 

center. To locate an authorized service 

center, visit www.worx.com

3. Maintain chain saw with care.

•   Never expose saw to rain or direct 

moisture.

•   Keep chain sharp, clean, and lubricated for 

better and safer performance.

•   Follow steps outlined in this manual to 

sharpen chain.

•   Keep handles dry, clean, and free of oil and 

grease.

•   Keep all screws and nuts tight.

•   Keep battery pack from heat, oil, and sharp edges.

4. When servicing, use only identical 

Summary of Contents for WG380

Page 1: ...WG380 WG380 9 Cordless chain saw Tronçonneuse sans fil Sierra de cadena inalámbrica EN F ES P07 P22 P38 ...

Page 2: ......

Page 3: ...18 12 16 17 19 21 20 22 11 1 2 4 5 3 6 7 9 8 10 13 14 15 ...

Page 4: ...TERY PACK RELEASE BUTTON 12 REAR HAND GUARD 13 BUMPER SPIKE 14 OIL LEVEL WINDOW 15 LOCK OUT BUTTON 16 DRIVE SPROCKET 17 CHAIN DIRECTION SYMBOL 18 OIL OUTLET 19 BAR PAD 20 FASTENING BAR HOLE 21 BAR LOCATING TABS 22 BAR AND CHAIN STORAGE TRANSPORTATION COVER SHEATH 23 BAR TENSIONING PLATE SEE FIG A1 Not all the accessories illustrated or described are included in standard delivery ...

Page 5: ...43SR T OREGON 124MLEA041 Charging time 8hrs Weight chain bar included 7 9 lbs 6 4 lbs Voltage measured without workload Initial battery voltage reaches maximum of 40 volts Nominal voltage is 36 volts ACCESSORIES WG380 WG380 9 Chain 1 1 Bar 1 1 Blade protection cover 1 1 Charger 1 WA3747 Battery pack 1 WA3580 Only use the appropriate accessories intended for this tool Accessory information can be f...

Page 6: ...Cordless chain saw EN 6 23 21 19 20 16 8 Kink Plis Torcimiento EN Bar F Bar ES Barra de guía 9 2 1 1 2 1 100 0 a 1 2 B1 B2 C1 C2 D E1 E2 F 1 G H A1 A2 ...

Page 7: ...Cordless chain saw EN 7 EN Injecting grease to lubricate ES Inyectando grasa para lubricar F Injectez la graisse pour lubrifier Z Y kg Z Y 13 a 2 1 14 I 1 N O P Q J1 J2 K L M ...

Page 8: ...b Do not operate power tools in explosive atmospheres such as in the presence of flammable liquids gases or dust Power tools create sparks which may ignite the dust or fumes c Keep children and bystanders away while operating a power tool Distractions can cause you to lose control 2 Electrical safety a Power tool plugs must match the outlet Never modify the plug in any way Do not use any adapter p...

Page 9: ...sories or storing power tools Such preventive safety measures reduce the risk of starting the power tool accidentally d Store idle power tools out of the reach of children and do not allow persons unfamiliar with the power tool or these instructions to operate the power tool Power tools are dangerous in the hands of untrained users e Maintain power tools Check for misalignment or binding of moving...

Page 10: ...be alert for spring back When the tension in the wood fibers is released the spring loaded limb may strike the operator and or throw the chain saw out of control 8 Use extreme caution when cutting brush and saplings The slender material may catch the saw chain and be whipped toward you or pull you off balance 9 Carry the chain saw by the front handle with the chain saw switched off and away from y...

Page 11: ...r appliance as applicable 7 WARNING Do not modify or attempt to repair the appliance or the battery pack as applicable 8 BATTERY MUST BE RECYCLED 9 Do not short circuit a cell or battery Do not store cells or batteries haphazardly in a box or drawer where they may short circuit each other or be short circuited by conductive materials 10 Do not subject cells or batteries to mechanical shock 11 Keep...

Page 12: ...t 2 higher than the horizontal notching cut as illustrated in Figure 2 Keep the felling back cut parallel to the horizontal notching cut Make the felling back cut so enough wood is left to act as a hinge The hinge wood keeps the tree from twisting and falling in the wrong direction Do not cut through the hinge As the felling gets close to the hinge the tree should begin to fall If there is any cha...

Page 13: ...m the top overbuck 1 Then make the finished cut by underbucking 2 the lower 2 3 to meet the first cut 2 2 3 1 1 3 1 2 2 3 1 3 Fig 3 Fig 4 Fig 5 Fig 6 When bucking on a slope always stand on the uphill side of the log as illustrated in Figure 6 When cutting through to maintain complete control release the cutting pressure near the end of the cut without relaxing your grip on the chain saw handles D...

Page 14: ...led Tip contact can cause the guide bar to move suddenly upward and backward which can cause serious injury Always use two hands when operating the chain saw POSITEC Inc has established a partnership with the RBRC Corporation to recycle any Positec batteries with the RBRC call2recycle seal For environmental protection please do not discard batteries in the trash After the batteries life cycle is e...

Page 15: ...ing the chain applies as described under TENSIONING CHAIN The chain now needs to be inspected to make sure it is properly tensioned TENSIONING CHAIN See Fig E1 E2 NOTE New saw chains will stretch Check the chain tension frequently when first used and tighten when the chain 7 becomes loose around the guide bar 6 WARNING Removing the battery pack before adjusting saw chain tension Cutting edges on c...

Page 16: ...e away from heat or open flame CHECKING THE AUTOMATIC OILER Proper functioning of the automatic oiler can be checked by running the chain saw and pointing the tip of the guide chain bar 6 towards a piece of cardboard or paper on the ground If an increasing oil pattern develops on the cardboard the automatic oiler is operating fine If there is no oil pattern despite a full oil reservoir contact WOR...

Page 17: ...e chain is moving is dangerous and will dull the chain 3 Use both hands to grip saw Always use left hand to grip front handle 4 and right hand to grip rear handle 1 Use a firm grip Thumbs and fingers must wrap around saw handles See Fig J2 4 Make sure your footing is firm Keep feet shoulder width apart Distribute your weight evenly on both feet 5 When ready to make a cut push the lock out button 1...

Page 18: ...log overbuck and then finish the cut Z from below in order to avoid contact of the chain saw with the ground When sawing logs supported on only one end start the cut from below Y about 1 3 of the diameter into the log underbuck and finish the cut from above Z in order to avoid log splitting or jamming of the chain saw SAW MAINTENANCE WARNING Remove the battery pack from the tool before carrying ou...

Page 19: ... specified for your saw in the repair parts list or on the decal located on the chain saw Replacing Bar Chain Replace chain when cutters are too worn to sharpen or when chain stops Only use replacement chain noted in this manual Inspect guide bar before sharpening chain A worn or damaged guide bar is unsafe A worn or damaged guide bar will damage chain It will also make cutting harder Fit the bar ...

Page 20: ...ff switch defective Place the machine in a cool ventilated place to cool it down Applying relatively less pressure while cutting Contact service agent 1 866 354 WORX 9679 Dry chain No oil in reservoir Vent in oil filler cap clogged Oil passage clogged Refill oil Clean cap Clean oil passage outlet Chain chain bar over heats No oil in reservoir Vent in oil filler cap clogged Oil passage clogged Chai...

Reviews: