20
EN
NOW ROLL YOUR SLEEVES UP. YOU’RE READY FOR INSTALLATION!
Now that you have planned out your installation, you are ready to begin!. Before starting, you may want to use your old mower for the last
time to clean up your lawn and make the installation easier.
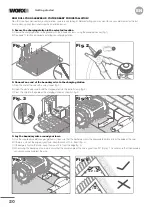
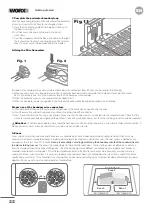
1. Secure the charging station in the selected location
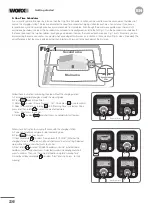
A. Secure the charging station to the ground with the included screws, using the provided hex key (fig. 1)
B. See page 17 for tips on correctly installing your charging station.
2. Connect one end of the boundary wire to the charging station
A. Strip the end of the wire with a wire stripper (fig. 2).
B. Open the plastic door and insert the stripped end into the red left clamp (fig. 3).
C. Press the wire into the guide of the charging station as shown in fig. 3.
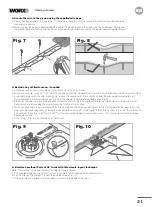
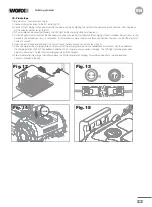
3. Lay the boundary wire around your lawn
A. Use the supplied wire distance gauge (item K) to ensure that the boundary wire is the appropriate distance from the edge of the yard.
B. If there is a step at the edge of your lawn, keep the wire at 10 in. from it (fig. 4).
C. If the edge is flush to the lawn, keep the wire at 4 in. from the edge (fig. 5).
D. When laying the boundary at corners, ensure that the corner angle of the wire is great than 90° (Fig. 6). This will ensure that the boundary
sensor can properly detect the wire.
Fig. 1
Fig. 3
Fig. 2
Fig. 3
Fig. 2
4 in.
10 in.
26 cm
10 cm
10,2 inch.
4 cm
26 cm
10 cm
10,2 inch.
4 cm
Fig. 4
Fig. 5
Fig. 4
Fig. 5
4 in.
10 in.
26 cm
10 cm
10,2 inch.
4 cm
26 cm
10 cm
10,2 inch.
4 cm
Fig. 4
Fig. 5
Fig. 4
Fig. 5
Getting started
<90
o
>90
o
>90
o
Fig. 6
Summary of Contents for Landroid WR147
Page 1: ...Owner s manual WR165 WR147 WR155 ...
Page 2: ......
Page 3: ...Owner s manual Manuel utilisateur Instrucciones de usuario P04 P37 P70 EN F ES ...
Page 103: ......
Page 104: ......

