11
Cordless Backpack Blower
EN
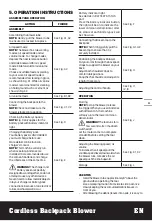
5. OPERATION INSTRUCTIONS
ASSEMBLY AND OPERATION
ACTION
FIGURE
ASSEMBLY
Assembling the blower tube
NOTE:
Gently pull the blower tube
to ensure it is locked into place.
See Fig. A1, A2
Air speed mode
NOTE:
The blower has two working
modes: air speed mode and air
volume mode. To change modes,
depress the nozzle release button
and slide backward for air speed
mode. Slide forward for air volume
mode.
Choose a suitable mode according
to your work. Air speed mode is
recommended for cleaning in grass,
as shown in Fig. K1. While air volume
mode is recommended for cleaning
on hard ground such as cement, as
shown in Fig. K2.
See Fig. A2
Air volume mode
See Fig. B1, B2
Connecting the backpack to the
blower
NOTE:
Check and make sure the
blower is locked into position.
See Fig. C1, C2
Checking the battery capacity
NOTE:
Fig. D only applies for the
battery pack with battery indicator
light.
See Fig. D
Charging the battery pack
Your battery pack is UNCHARGED,
you must charge before use.
More details can be found in
charger’s manual.
NOTE:
This machine will only run
when separate-batteries are
installed. It is recommended to use
the same Ah batteries and charge
the 4 batteries at the same time.
WARNING!
The charger and
battery pack are specially
designed to work together, so do not
attempt to use any other devices.
Never insert or allow metallic objects
into your charger or battery pack
connections because of an electrical
failure and hazard will occur.
See Fig. E
Battery indicator light
See details in BATTERY STATUS
part
Press the battery indicator button,
the light will be on to indicate the
lower common denominator, after
3s, status of each battery pack will
be shown on.
See Fig. F
Connecting the Basecamp to the
backpack
NOTE:
When fitting, gently pull the
basecamp to ensure that it is
securely installed.
See Fig. G1, G2
Positioning the backpack blower
Put your arms through the backpack
straps to support the blower on your
back.
Adjust both shoulder straps to
comfortable positions.
Snap the chest buckle and adjust its
length if necessary.
See Fig. H
Adjusting the control handle
See Fig. I1,
I2, I3
OPERATION
Starting
NOTE:
To stop the blower, release
the trigger. When you use 4 batteries
with different Ah, the machine
will only run to the lower common
denominator.
WARNING!
The tool runs for a
few seconds after it has been
switched off.
Let the motor come to a complete
standstill before setting the tool
down.
See Fig. J
Adjusting the blowing speed / air
volume
To increase the air speed, pull the
variable-speed lever downward when
the blower runs; to reduce the air
speed, push the knob upward.
See Fig. K1, K2
Storage
See Fig. L
USER TIPS
- Hold the blower tube approximately 8” above the
ground when operating the tool.
Use a sweeping motion from side to side. Advance
slowly keeping the accumulated debris/leaves in
front of you.
- After blowing the debris/leaves into a pile, it is easy to
Summary of Contents for WG572
Page 2: ...1 2 5 7 12 6 15 13 10 9 8 11 3 4 14...
Page 4: ...G2 H D E G1 F 1 2 3 1 2 100 0...
Page 5: ...L I1 I2 J K1 1 2 3 I3 H Turbo Air speed mode Mode de vitesse d air Modo de velocidad de aire...
Page 6: ...K2 L H Turbo L Air volume mode Mode volume d air Modo de volumen de aire...
Page 27: ......


