background image

Page 5 

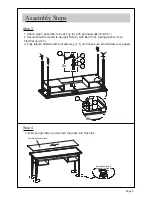
Assembly Steps

Step 3

Step 4

1. Attach step 3 assembly to Desk Top (A) with pan head allen bolt (H-1).

2. Secure Shelf frame (B) to Support Rail (C) with Bolt (H-2), Spring washer (H-4), 

Flat Washer (H-5).

Turn Desk right side up and insert the glass into Desk top

3. Fully tighten all Bolts with ball allen key (T-1) and make sure all hardware is engaged.


T-1

H-1

16x

2x

Adjust levelers if

needed for stability.

Tempered clear glass

T-1

H-2

H-4

H-5

Summary of Contents for 556231

Page 1: ...YOUR PURCHASE IF YOU HAVE ANY QUESTIONS PERTAINING TO THE ASSEMBLY OF THIS FURNITURE PIECE PLEASE CONTACT THE NEAREST COST PLUS WORLD MARKET STORE IF YOU ARE NOT NEAR A STORE PLEASE CALL OUR CUSTOMER...

Page 2: ...H 4 H 5 6 4 Bolt M6x40mm Bolt M6x30mm QTY Spring Washer 6x 11x2mm 10 10 Flat Washer 6x 18x2mm Support rail Leg I Leg II H 6 1 TIPPING KIT CHECK LIST CODE COMPONENT QTY 01 PLASTIC STRAP 2 02 SCREW 4 03...

Page 3: ...assembly Save all packaging until Assemble on a clean non marring surface packing foam Do not assemble on ooring or carpet In case of missing parts contact your nearest Cost Plus World Market store o...

Page 4: ...Spring Washer H 4 Flat Washer H 5 with ball allen key T 1 as shown Do Not fully tighten any hardware yet 1 Take the glass out of the Desk Top 2 Attach Support Rail C to Desk Top A Secure with Bolt H 3...

Page 5: ...lf frame B to Support Rail C with Bolt H 2 Spring washer H 4 Flat Washer H 5 Turn Desk right side up and insert the glass into Desk top 3 Fully tighten all Bolts with ball allen key T 1 and make sure...

Page 6: ...furniture Drill a starter hole into the wall stud If wall stud is not available drill a hole into the wall and insert plastic anchor Gently tap anchor until the flange of the anchor is flush with the...

Page 7: ...ace furniture in direct sunlight Do not place furniture near Do not write on furniture without a padded barrier to protect the surface Do not place furniture outside For indoor use only Dust and pick...

Reviews: