


6
3
Page 15
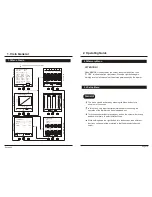
2. Operating Guide
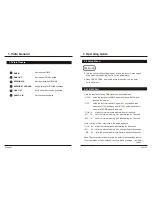
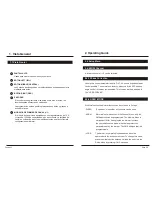
2.2 Channel Menu
OPERATION
9 Control curve "linear"
10 Touch the left button and turn the encoder simultaneously, the cursor
moves horizontally. Then DMX, Curve, Limit and the like will be
selected.
11 Menu button leads to the 3rd menu(Memory menu).
Exception: When the Dimmer is just working in " normal user " mode,
the button switches back to the Top menu.
12 Holding down the right button and simultaneously turn the encoder set
DMX address, types of Curves and the like.
13 One of 12 channels can be selected by turning the encoder without
touching any button.
14 When no load is connected, an " " is indicated.
15 Shows that load is connected.
16 Small rectangle denotes that load check is switched off.
This menu always appears after the Top Menu when the middle button is
pressed.
For each channel in this menu, the DMX address, a control curve,
the limitation,the preheat of the lamps and the load check is programmed.
Procedure: The encoder selects one channel (1...12). In the LCD display,
the cursor is moving up and down vertically.
While holding down the left button, turn the encoder, the cursor will move
in the horizontal direction. Now "DMX address", "Curve", "Limit" ,etc.,can
be selected.
Press the right button and turn the encoder simultaneously,the actual value
can be changed.
Additional
L1
L2
L3
1 2 3 4 5 6 7 8 9 10 11 12
MANUAL
Value
CHA.
1
- - %
DMX
SET
%
237
225
241
CHA.1
Value
25%
20
MEN U
MEN U
1
2
3
5
4
6
7
8
9
10
MEMORY 1
11
Menu Top
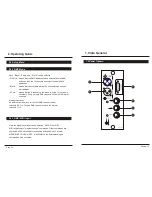
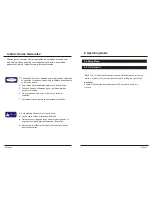
FUNCIONAMIENTO
6
3
1 Medida de voltage de las tres fases L1, L2 y L3.
2 Monitor de entrada del canal 1 (ejem: externo 80%)
3 Monitor de entrada del canal 1 (ejem: interno 50%)
4 Chequeo de carga: carga desconectada
5 Chequeo de carga: carga conectada
6 El chequeo de la carga no está activado.
2. Guia de Funcionamiento
2.1 Menu Top
7 Mantenga pulsado el botón izquierdo, gire el encoder a la vez, entonces
el valor correspondiente del canal variará.
Pagina 39