background image

                                            PAGE 5

User Manual      PA 60/2

Aux Connection

PA 60/2

 provides two auxiliary inputs 

(18)

 & 

(19)

 which may be used for connecting other signal sources 

such as a Radio Tuner, CD or Cassette player (LINE level).  
Turn the front potentiometers 

(5) 

&

 (6)

 clockwise to increase the volume or anticlockwise to reduce the volume.

The Aux input sockets are standard RCA phonos; two sockets are supplied and these are linked together 
internally in parallel, this allows a stereo signal source to be used without the need to obtain a special lead, 
however you may wish to check with the manufacturer of the signal source to ensure that no damage will result 
if the left and right output channels are connected together in parallel.


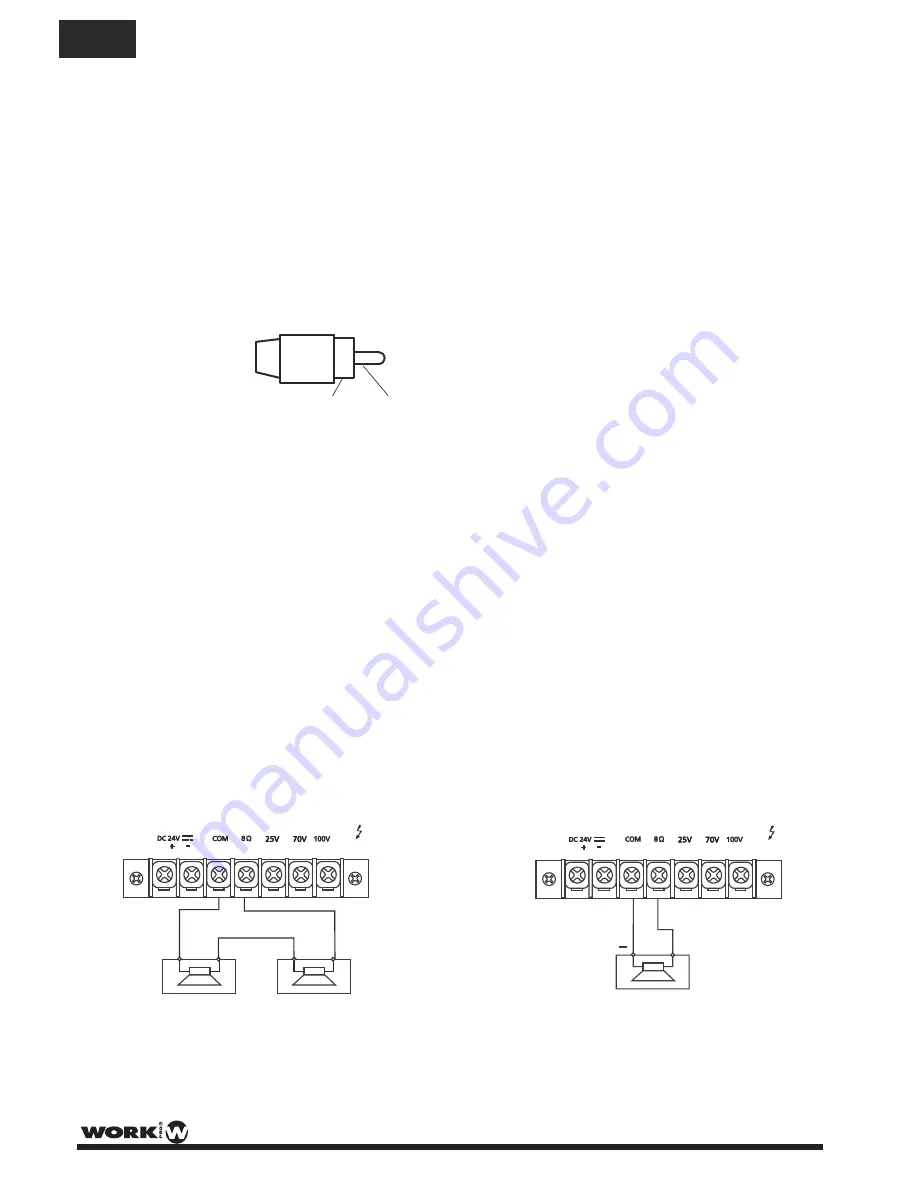
RCA Phono plug connections


Sleeve - Screen

Pin - Signal

Tape Output Connection (17)

These standard RCA phono sockets provide a mixed output suitable for connection to a recorder such as cassette,
MP3 or computer.

Power In & Pre Out (15) 

&

 (16)

These sockets connect the mixer/preamplifier stage to the power amplifier stage. The connecting link must be 
plugged in for normal operation as a mixer/amplifier. If a compressor/limiter, equalizer, or other external signal 
processor is used in the sound system, connect the “PRE OUT”  to the  input of the external processor 
and the output of the processor to “POWER IN”. In the signal chain, “PRE OUT” is after the tone controls 
and the master volume control.

Loudspeaker Connection

This device provides two different types of loudspeaker outputs: 
High impedance line (25/70/100V) and low impedance (8 ohm), you can only use one of these outputs at any one 
time, any attempt to use two or more of these may result in damage to the amplifier.
These outputs give an output at all times, reproducing any input signal into the amplifier (Inputs 1-3, AUX 1-2). 
The chime and priority functions affect these outputs.

SLEEVE            PIN

Connecting a single speaker to the 8 ohm output

+

8 ohm

Connecting two speakers in series 

to the 8 ohm output

4 ohm

4 ohm

-

+

-

+

EN

4 A

4 A

Summary of Contents for PA 60/2

Page 1: ...User Manual PA 60 2 Rev 1 15...

Page 2: ...ce from a registered electrician Do not Remove Any Cover Within the product are areas where high voltages may bepresent To reduce the risk of electric shock do not remove any covers unless the AC main...

Page 3: ...inals 12 AC fuse holder 13 Mains voltage 115 230V selector switch 14 Mains input socket 16 Pre output RCA phono 4 Mic3 Line Mic selector switch 5 Input 3 XLR balanced 6 Input 3 JACK balanced 7 Mic2 in...

Page 4: ...connections have to be accomplished before it is permissible to connect the amplifier to the main supply Before connecting the appliance to the mains supply once again make certain that all connectio...

Page 5: ...CONNECTIONS Base sockets Front view NOTE MIC inputs incorporate phantom power which is ON by default If you need to disable the phantom power look for the S 102 jumper on the main PCB The default posi...

Page 6: ...cassette MP3 or computer Power In Pre Out 15 16 These sockets connect the mixer preamplifier stage to the power amplifier stage The connecting link must be plugged in for normal operation as a mixer...

Page 7: ...n be set by the tel paging volume control 21 The terminals allow connection of a telephone paging system interface NOTE The Telephone Emergency input has the highest priority all other units will be o...

Page 8: ...edance Line Low Impedance 25 70 100 V 8ohm Tape 4k7ohm 350 mV Pre out 600ohm 1 V FrequencyResponse 50 Hz 20kHz 3dB EQControl Bass 10dB 31 Hz 180Hz Centre requency 80Hz f EQControl Treble 10dB 2k5Hz 20...

Page 9: ...consulte a un electricista especializado No retire ninguna cubierta Dentro del producto hay zonas con tensiones altas presentes Para reducir el riesgo de descargas el ctricas no quite las tapas a meno...

Page 10: ...les salida de altavoz 12 Portafusible AC 13 Selector alimentaci n 115 230V 14 Toma de alimentaci n 16 Salida Pre RCA 4 Mic3 Line Mic selector 5 Entrada 3 XLR balanceado 6 Entrada 3 JACK balanceado 7 E...

Page 11: ...las conexiones tienen que realizarse antes de conectar el amplificador a la alimentaci n principal Aseg rese que todas las conexiones se realizan correctamente y que no existen cortocircuitos La insta...

Page 12: ...D CONEXIONES Conector Base Vista Frontal NOTA Las entradas MIC incorporan alimentaci n phantom que est activada de forma predeterminada Si necesita desactivar la alimentaci n phantom busque el jumper...

Page 13: ...e Out 15 y 16 Estas tomas conectan el mezclador preamplificador al amplificador de potencia La conexi n debe ser configurada para el funcionamiento normal como un mezclador amplificador Si se utiliza...

Page 14: ...1 Los terminales permiten la conexi n de una interfaz de sistema de tel fono paginaci n NOTA La entrada Tel Emer tiene la m s alta prioridad todas las dem s entradas se anular n GND Conectando m ltipl...

Page 15: ...8 Tape 4k7 350 mV Pre out 600 1 V Respuesta en Frecuencia 50 Hz 20 kHz 3dB Control EQ Bass 10 dB 31 Hz 180 Hz Frecuencia Central 80 Hz Control EQ Treble 10 dB 2k5 Hz 20 kHz Frecuencia Central 10 kHz...

Page 16: ...equences for the environment and human health which could otherwise be caused by inappropriate waste handling of this product The recycling of materials will help to conserve natural resources For mor...

Reviews: