background image


ASSEMBLY (Fig. 3

Fig.4, Fig 6) 

Unpacking 

Carefully remove the tool and all loose items from the outer 
carton. 
Retain all packing materials until after you have inspected and 
satisfactorily operated the machine. 

Before setting up, repair or maintenance of the 

appliance you must always turn off the operating switch and pull 
out the mains plug!  

1.  Rotate the foldable pole and lock two part together, 

referring to fig.3.  

2.  Insert extention pole into the main pole, meanwhile press 


the lock button (14). After the pole insert for long 
distance, release the lock button and let it free. Then 
move the extentioon pole forward and backward 
slowly. After heard a click sound, stop moving. 
Rotate the locking lever (16) upside to fasten. Please 
referring fig 4. 

3.  Mount the dust hose onto the dust port on the rear of 

handle ,and mount the other port onto the vaccum 
cleaner. 

4.  Mounting the sanding sheet onto the sanding pad. 

OPERATION (Fig 7~ Fig 12) 

Electronic control (Fig 7) 

This machine has the characteristics as below: 
▪ Lock-on switch (5) 
▪ Adjustable Speed (4) 
▪ LED light belt (13) 
▪ ON/OFF LED switch (12) 
To start the tool, just press the switch knob (11) and meanwhile 
press down the locking knob 5. 
To stop the tool, just press the swtich knob (11). 
 

Adjusting the rotation speed (Fig. 8)  

The speed of the machine is variable to suit different tasks. It 
can be adjusted from 800 min

-1

 up to 1600 min

-1

 by using the 

thumb wheel. Turn in the counter clockwise direction to 
increase the speed and in the clockwise direction to decrease 
the speed. Generally, you should use the higher speed for fast 
stock removal and the lower speed for more precise control.  

 
Light on LED working light (Fig. 9) 

Before operation, turn on the LED switch to “I” position to light 
on.  


Switch the LE

D swtich to “0” position to turn off. 

 
Suction power adjustment (Fig. 10) 


Reduce the suction power by turning the wheel to the 
left, and increase by turning it to the right.  

 
Working on vertical wall and ceilings(Fig 11 & 12) 

When working vertical wall, the spring sets free status. 
While sanding ceilings, the spring should connect the 
hook on the gear box head. 


Working advice 


▪  Begin  sanding  and  carefully  contact  the  work  surface 
as  lightly  as  possible-just  enough  to  keep  the  sanding 
head flat against the surface. 
▪ The joist in the sanding head allow the sanding disc to 
follow the contours of the work surface. 
▪  The  best  technique  is  to  use  overlapping  sweeps  and 
keep the head in constant motion. Never stop too long in 
any  one  place  or  there  will  be  swirl  marks.  With 
experience it will be very easy to create excellent results. 

MAINTENANCE 

Periodically blow out all air passages with dry compressed air. All plastic parts should be cleaned with a soft damp cloth. NEVER 
use solvents to clean plastic pats. They could possibly dissolve or otherwise damage the material. 
Wear safety glasses while using compressed air. 
Clean the vacuum swivel connector as too much dust will keep it from turning freely.. 

ENVIRONMENT PROTECTION 

In  order  to  prevent  the  machine  from  damage  during  transport,  it  is  delivered  in  a  sturdy  packaging.  Most  of  the  packaging 
materials  can  be  recycled.  Take  these  materials  to  the  appropriate  recycling  locations.  Take  your  unwanted  machines  to  your 
local dealer. Here they will be disposed of in an environmentally safe way.  

Li-ion batteries can be recycled. Deliver them to a disposal site for chemical waste so that they can be recycled or 
disposed of in an environmentally friendly manner. 
 
Discarded  electric  appliances  are  recyclable  and  should  not  be  discarded  in  the  domestic  waste!  Please  actively 
support  us  in  conserving  resources  and  protecting  the  environment  by  returning  this  appliance  to  the  collection 
centres (if available). 

DECLARATION OF CONFORMITY 


We declare under our sole responsibility that this product is in conformity with the following standards or standardized documents: 
EN60745-1:2009+A11:2010; 

EN60745-2-3:2011+A2:2013+A11:2014+A12:2014+A13:2015; 

EN55014-1:2006/+A1

2009/+A2:2011; EN55014-2:2015; EN61000-3-3:2013; in accordance with the regulations 200

6/42/ЕС, 2014/30/ЕU. 

NOISE/VIBRATION  Measured  in  accordance  with  EN60745  the  sound  pressure  level  of  this  tool  is  <74dB(A)  and  the  sound 
power level is <85dB(A) (standard deviation: 3 dB), and the vibration is <4,34 m/s

2


Summary of Contents for DS07-215

Page 1: ...Br ska na sadrokart n Bruska na s drokarton SK CZ Gipszkarton csiszol Ma in de lefuit pere i HU RO Drywall sander EN N vod na pou ite L225 CL DS07 215...

Page 2: ......

Page 3: ......

Page 4: ......

Page 5: ......

Page 6: ...A E 800 1700 min PRIEMER BR SENIA 215 mm PRIEMER V SEKU 225 mm PRIEMER ODS VACEJ TRUBICE 32 mm funkcia SOFT tart prenosn ta ka 2 ks popruhy 7 W LED osvetlenie ASTI V ROBKU 1 Br sny papier 2 Imbusov k...

Page 7: ...e va e telo spojen zo zemou Nevystavujte elektrick n radie da u vlhku alebo vode Elektrick ho n radia sa nikdy nedot kajte mokr mi rukami Elektrick n radie nikdy neum vajte pod te cou vodou ani ho nep...

Page 8: ...d el siete v pr pade ak hoko vek probl mu pri pr ci pred ka d m isten m alebo dr bou pri ka dom presune a pri ukon en innosti Nikdy nepracujte s el n rad m ak je ak mko vek sp sobom po koden Ak za ne...

Page 9: ...elektrick ho n radia skontrolujte i nie s pracovn n stroje ako napr br sne kot e vy trben alebo vylomen i nemaj br sne taniere vylomen miesta trhliny alebo miesta intenz vneho potrebovania i nie s na...

Page 10: ...z je n sledkom nespr vneho a chybn ho pou vania ru n ho elektrick ho n radia V nasleduj com texte uv dzame vhodn prevent vnymi opatrenia Ru n elektrick n radie v dy uchopte pevne a svoje telo a ruky...

Page 11: ...ovaciu n ru s kapacitou 16 A PO AS PR CE Nedot kajte sa pohybliv ho br sneho papiera Nepou vajte opotrebovan potrhan alebo silne zne isten br sne papiere V pr pade po kodenia sie ov n ra alebo jej pr...

Page 12: ...ariadenia stla te prep na 11 a s asne stla te uzamykacie tla idlo prep na a 5 Pre vypnutie zariadenia stla te prep na 11 NASTAVITE N R CHLOS OBR 8 Pomocou regul tora ot ok je mo n nastavi r chlos od 8...

Page 13: ...plastov asti v robku V pr pade ak d jde k poruche v robku napr klad opotrebovan m ast je potrebn kontaktova miestneho servisn ho technika OCHRANA IVOTN HO PROSTREDIA Aby sa zariadenie nepo kodilo po...

Page 14: ...l relevant directives Bruska na sadrokarton Disc type sander with pole 710W 215 220 240V M6 Class II Typ Type L225 CL Model DS07 215 Brand Worcraft bola navrhnut a vyroben v zhode s nasleduj cimi norm...

Page 15: ......

Page 16: ...U N SERVIS VYKON VA SPLNOMOCNEN Z STUPCA V ROBCU Splnomocnen z stupca v robcu Slovakia Trend Export Import s r o Michalovsk 87 1414 073 01 Sobrance Fax 056 652 2329 Tel 0915 392 687 E mail servis slov...

Page 17: ...Z Z T E 800 1700 min PR M R BROU EN 215 mm PR M R V SEKY 225 mm PR M R V KUOV TRUBICE 32 mm funkce SOFT start p enosn ta ka 2 ks popruhy 7 W LED osv tlen STI V ROBKU 1 Br sny pap r 2 Imbusov kl 3 P en...

Page 18: ...n ad nikdy nemyjte pod tekouc vodou ani jej nepono ujte do vody Kabel se nesm nadm rn zat ovat Kabel nikdy nepou vejte k p en en tah n nebo vytahov n vidlice elektrick ho n ad Kabel nesm b t vystaven...

Page 19: ...yd vat abnorm ln zvuk nebo z pach okam it ukon ete pr ci Elektrick n ad nep et ujte Elektrick n ad bude pracovat l pe a bezpe n ji jestli e s n m budete pracovat v ot k ch pro kter bylo navr eno Pou v...

Page 20: ...stroje ani se tam nenach zely dn jin osoby kter jsou v bl zkosti Va eho pracovi t a nechte elektron ad b et jednu minutu na maxim ln obr tky Po kozen pracovn n stroje se obvykle za tento as testov n z...

Page 21: ...acujte v oblasti roh ostr ch hran apod Zabra te zablokov n pracovn ho n stroje v obrobku nebo vymr t n obrobku proti V m Rotuj c pracovn n stroj se m e zablokovat v roz ch nebo na ostr ch hran ch co z...

Page 22: ...ntrolujte zda nen po kozeno V p pad po kozen za zen nepou vejte a kontaktujte prodejce Nenech vejte sti obalu v dosahu d t MONT OBR 3 UPOZORN N V dy p ed prov d n m jak koliv kontroly zm ny nastaven o...

Page 23: ...povrchu kter budete brousit povrch zkontrolujte a odstra te ne douc p edm ty nap H eb ky kter by mohly zp sobit po kozen kotou e ztr tu kontroly nad bruskou zda vymr tit ne douc p edm t do okol a zran...

Page 24: ......

Page 25: ...A POZ RU N SERVIS PROV D Z STUPCE V ROBCE Zplnomocn n z stupce v robce Slovakia Trend Export Import s r o Michalovsk 87 1414 073 01 Sobrance Fax 056 652 2329 Tel 0915 392 687 E mail servis slovakia tr...

Page 26: ...230 V 50 Hz TELJES TM NY 710 W FORDULATOK MEGTERHEL S N LK L 800 1700 perc CSISZOL S TM R JE 215 mm A KIV G S TM R JE 225 mm AZ ELSZ V CS RM R JE 32 mm SOFT start funkci hordoszhat t ska 2 db heveder...

Page 27: ...el p ld ul cs vekkel f t ssel t zhellyel h t szekr nnyel Az ram t s fokozott kock zata ll fenn ha teste f ldelt Es t l nedvess gt l v zt l tartsa t vol az elektromos szersz mokat Az elektromos szersz...

Page 28: ...EZEL SE H zza ki az Elektromos szersz m h l zati csatlakoz dug j t a csatlakoz aljzatb l a szalagcsiszol b rmilyen meghib sod sa eset n a munka befelyez se ut n vagy b rmilyen tiszt t s karbantart si...

Page 29: ...dt vezet kek Ha k zi elektromos k ziszersz mok vagy munkaeszk z k esnek a padl ra ellen rizze a s r l seket vagy haszn ljon s rtetlen munk t Ha ellen rizni s chuck munkaeszk z gy z dj n meg r la hogy...

Page 30: ...isszal k s a szersz mot a t rcsa mozg si ir ny val ellent tes ir nyban mozgatja az sszekapcsol si ponton K l n s gondoss ggal j rjon el kanyarod skor les sz lekkel s hasonl kkal Ker lje a jumping s a...

Page 31: ...et s l pjen kapcsolatba az elad val Ne hagyja a csomagol son l v r szeket gyermekek sz m ra SZEREL S FIGYELMESZTET S A k sz l k minden ellen rz s t be ll t s t jav t s t vagy karbantart s t megel z en...

Page 32: ...yt s n velje a jobb sz v teljes tm nyt BE LL T S A FAL S A PLAFON MUNK LATOKN L BRA 11 12 Ha a falon a gipszkartonon dolgozik ll tsa a rug t a szabad helyzetbe A mennyezeten t rt n munkav gz skor a ru...

Page 33: ...si tart lyokba Az eldobott eszk z ket a boltban dobja ki A bolt k rnyezetbar t m don biztos tja az rtalmatlan t st Az elhelyezett elektromos berendez sek jrahasznos that ak s nem szabad a h ztart si...

Page 34: ...Elad s d tuma Garancialev l Warranty Elad al r sa s pecs tje Az gyf l az al r s val meger s ti hogy a k sz l ket bemutatt k s elmagyar zt k neki hogy ismeri a g p zemeltet s re s haszn lat ra vonatko...

Page 35: ...s sorban ojan alkatr szek kop sa rthet mind minden forg s mozg alkatr sz v g r sz s burkolat kapcsok s kek fogaskerekek s ksz jak l ncos fogaskerekek s rl d s s tengelykapcsol s rl d fel letek gumiabr...

Page 36: ...sau t iat Deconecta i ntotdeauna fi a din priz nainte de a interveni asupra dispozitivului Citi i manualul Purta i ochelari de protec ie Purta i m nu i Purta i o masc n condi ii de praf Aparatele elec...

Page 37: ...struc iuni lu nd n considerare condi iile de lucru i lucr rile care trebuie efectuate Utilizarea sculei electrice pentru opera iuni diferite de cele pentru care a fost conceput poate duce la o situa i...

Page 38: ...onecteze c rligul de pe capul cutiei de viteze Recomand ri de lucru ncepe i lefuirea i contacta i cu aten ie suprafa a de lucru c t mai u or posibil doar suficient pentru a men ine capul de lefuire pl...

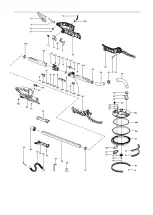
Page 39: ...Descriere detaliat DS07 215...

Page 40: ......

Page 41: ...ie de viteze 1 74 Inductan 2 26 Amortizor corn 2 75 Plac de presiune cablu 1 27 Man on flexibil 1 75A Inel de praf 1 28 Roat din at mic 1 76 Man on de cablu 1 29 10 aib plat 1 77 Cablu 1 30 Capac mijl...

Page 42: ......

Page 43: ...FECTUAT DE C TRE REPREZENTANTUL AUTORIZAT AL PRODUC TORULUI Reprezentantul mputernicit al produc torului Slovakia Trend Export Import s r o Michalovsk 87 1414 073 01 Sobrance Fax 056 652 2329 Tel 0915...

Page 44: ...warm organisation of work patterns EXPLANATION OF SYMBOLS Attention Pull out mains plug immediately if the mains cable is damaged entangled or severed Always remove the mains plug before working on t...

Page 45: ...bits etc in accordance with these instructions taking into account the working conditions and the work to be performed Use of the power tool for operations different from those intended could result i...

Page 46: ...g ceilings the spring should connect the hook on the gear box head Working advice Begin sanding and carefully contact the work surface as lightly as possible just enough to keep the sanding head flat...

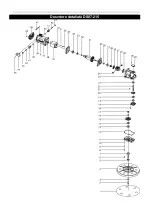
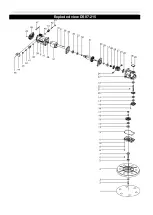
Page 47: ...Exploded view DS07 215...

Page 48: ......

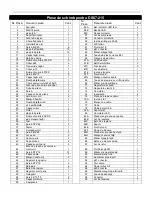
Page 49: ...amping 2 75 cable pressing plate 1 27 flexible sleeve 1 75A The dust ring 1 28 Small bevel gear 1 76 cable sleeve 1 29 10 flat washer 1 77 cable 1 30 middle cover 1 78 Eccentric wrench 1 31 rotor 1 78...

Reviews: