background image


inside  and  outside  of  the  sprayer  and  examine  the 
components  before  each  use.  Check  for  cracked  and 
deteriorated  hoses,  leaks,  clogged  nozzles,  and  missing  or 
damaged parts. If damaged, have the product repaired before 
use. 

Many accidents are caused by poorly maintained products. 

Disconnect  the  battery  from  the  unit  before  draining, 

cleaning,  or  storing  the  sprayer. 

Such  preventive  safety 

measures reduce the risk of accidental starting. 

Always  wear  eye  protection  with  side  shields  or  goggles 

marked to comply with ANSI Z87.1.

 Failure to do so could result 

in fluids entering your eyes resulting in possible serious injury. 

Protect  your  lungs.  Wear  a  face  or  dust  mask  when  using 

the  sprayer. 

Following  this  rule  will  reduce  the  risk  of  serious 

personal injury. 

Battery  tools  do  not  have  to  be  plugged  into  an  electrical 

outlet;  therefore,  they  are  always  in  operating  condition.  Be 
aware  of  possible  hazards  when  not  using  your  battery  tool 
or  when  changing  accessories.  Remove  battery  pack  when 
tool  is  not  in  use. 

Following  this  rule  will  reduce  the  risk  of 

electric shock, fire, or serious personal injury. 

Do not place battery tools or their batteries near fire or heat.


This will reduce the risk of explosion and possibly injury. 

Do  not  crush,  drop  or  damage  battery  pack.  Do  not  use  a 

battery pack or charger that has been dropped or received a 
sharp  blow.

 A damaged battery is subject to explosion. Properly 

dispose of a dropped or damaged battery immediately. 

Batteries  can  explode  in  the  presence  of  a  source  of 

ignition,  such  as  a  pilot  light

.  To  reduce  the  risk  of  serious 

personal injury, never use any cordless product in the presence of 
open flame. An exploded battery can propel debris and chemicals. 
If exposed, flush with water immediately. 

Do  not  charge  battery  tool  in  a  damp  or  wet  location

Following this rule will reduce the risk of electric shock. 

For  best  results,  your  battery  tool  should  be  charged  in  a 

location  where  the  temperature  is  more  than  50°F  but  less 
than  100°F

.  To  reduce  the  risk  of  serious  personal  injury,  do  not 

store outside or in vehicles. 

Under  extreme  usage  or  temperature  conditions,  battery 

leakage may occur. If liquid comes in contact with your skin, 
wash immediately with soap and water. If liquid gets into 


your eyes, flush them with clean water for at least 10 
minutes,  then  seek  immediate  medical  attention.


Following this rule will reduce the risk of serious personal 
injury. 

Do not use battery-operated appliance in rain.


Exercise  care  in  handling  batteries  in  order  not  to 

short  the  battery  with  conducting  materials  such  as 
rings,  bracelets,  and  keys. 

The  battery  or  conductor 

may overheat and cause burns 

Do  not  dispose of  the  battery(ies)  in  a  fire.

 The cell 

may explode. Check with local codes for possible special 
disposal instructions. 

Do  not  open  or  mutilate  the  battery(ies).

  Released 

electrolyte  is  corrosive  and  may  cause  damage  to  the 
eyes or skin. It may be toxic if swallowed. 

Avoid 

Dangerous 

Environment 

Don’t  use 

appliances in damp or wet locations. 

Use  Right  Appliance 

-  Do  not  use  appliance  for  any 

job except that for which it is intended. 

Don’t  Force  Appliance

  -  It  will  do  the  job  better  and 

with less likelihood of a risk of injury at the rate for which 
it was designed. 

Store  Idle  Appliances  Indoors

  -  When  not  in  use, 

appliances  should  be  stored  indoors  in  dry,  and  high  or 
locked-up place - out of reach of children. 

Maintain  Appliance  With  Care

  -  Keep  clean  for  best 

performance  and  to  reduce  the  risk  of  injury.  Follow 
instructions  for  changing  accessories.  Inspect  appliance 
cord, and if  damaged,  have  it  repaired  by  an  authorized 
service facility. Keep handles dry, clean, and free from oil 
and grease. 

Check  Damaged  Parts

  -  Before  further  use  of  the 

appliance,  a  guard or other  part  that  is  damaged  should 
be  carefully  checked  to  determine  that  it  will  operate 
properly  and  perform  its  intended  function.  Check  for 
alignment  of  moving  parts,  binding  of  moving  parts, 
breakage of parts, mounting, and any other condition that 
may  affect  its  operation.  A  guard  or  other  part  that  is 
damaged  should  be  properly repaired  or  replaced by an 
authorized  service  center  unless  indicated  elsewhere  in 
this manual.


OPERATION 

Mounting the plastic spray head and spray lance(Fig. 2) 

The  machine  has  four  different  spray  heads  supplied  in  the 
accessories (15,16,17,18). 
To  mount  the  spray  head  onto  the  lance,  align  the  axis  of  spray 
head  and  lance, slide  the  nut  onto  the  thread coupling  and  hand 
tighten securely. Do not overtighten. 
To mount the spray lance onto the switch trigger handle,insert the 
spray lance into the switch trigger handle, then slide the nut onto 
the thread coupling and hand tighten securely. 
 

Mounting and adjust the metal spray lance(Fig. 3 &4) 

To mount the metal spray lance, align the axis of spray lance and 
spray handle, then turn the screw of the clockwise and fasten.(see 
fig.3) 
The metal spray lance is a telescopic one, which can be extended 
up to 1m long. To adjust the length, just do as follows(see fig.4): 
1.  Loosen the middle screw nut. 
2.  Grasp the head then pull it outerforward. 
3.  After get your desire length, trun the middle screw to fasten it. 
 

ATTACHING THE HOSE 

The  hose  comes  preassembled  to  the  trigger  handle.  If  it 
becomes loose, follow the instructions below. 
1.  Slide the nut on the hose away from the hose end. 


2.

  Insert  the  hose  end  into  the  hose  connector.  Make 

sure the connection is secure.


3.

  Slide the nut over the opening and hose end. Hand 

tighten. Do not overtighten.


FIILING THE TANK (See fig. 5 & 6) 
Warning!


Before  filling  the  tank,  always  remove  the 

battery pack and ensure the battery cover is closed. 
Wipe up any spills before inserting the battery pack. 
Following  this  rule  will  reduce  the  risk  of  electric 
shock  and  corrosive  liquids  entering  the  battery 
pack, which can cause battery pack failure including 
short  circuit  resulting  in  smoke,  fire,  and/or  serious 
personal injury. 
Warning!


Always follow the chemical manufacturer’s 

instructions  printed  on  their  product  labeling  for 
use,  cleaning,  and  storage.  Clean  thoroughly  after 
each  use,  following  the  instructions  in  the 
Maintenance  section  of  this  manual.  Chemicals 
should be stored out of the reach of children. Failure 
to do so may result in serious personal injury. 
Warning!


Do not allow conductive or corrosive fluids 

to  get  inside  the  battery  pack.  If  conductive  or 
corrosive fluids are spilled on the battery, refer to  

Summary of Contents for CBS-S20Li

Page 1: ...Akumul toros h permetez Pulverizator portabil HU RO EN CBS S20Li Preklad origin ln ho n vodu na pou itie P eklad origin ln m n vodu k pou it Az eredeti haszn lati tmutat ford t sa Traducerea manualul...

Page 2: ......

Page 3: ......

Page 4: ......

Page 5: ...CK PARAMETRE NAPATIE 20 V KAPACITA 2 alebo 4 Ah OBJEM N DOBY 12 l TLAK 0 35 bar 0 5 bar D KA PLASTOVEJ TY E 60 cm D KA TELESKOPICKEJ KOVOVEJ TY E 57 100 cm PRACOVN AS 2 3 5 h PRIETOK 1 2 1 4 l min HMO...

Page 6: ...rad vznikaj iskry ktor m u zap li prach alebo v pary Pri pou van elektrick ho n radia zabr te v pr stupe de om a al m osob m Ak budete ru en m ete strati kontrolu nad vykon vanou innos ou 2 ELEKTRICK...

Page 7: ...ajte el n radie ktor je pripojen k elektrickej sieti s prstom na vyp na i alebo na sp ti Pred pripojen m k elektrick mu nap tiu sa uistite i vyp na alebo sp s v polohe vypnut Pren anie el n radia s p...

Page 8: ...pr ca s nimi sa lep ie kontroluje Pou itie in ho pr slu enstva ne toho ktor je uveden v n vode na obsluhu alebo doporu en dovozcom m e sp sobi po kodenie n radia a by pr inou razu Elektrick n radie pr...

Page 9: ...u akumul tora V pr pade vniknutia materi lu do priestoru pre akumul tor m e d js k skratu akumul tora ktor ho n sledkom je dym vych dzaj ci zo zariadenia po iar zariadenia a alebo v ne poranenie pou v...

Page 10: ...dosiahli na miesto nab jania akumul tora 3 Nenab jajte akumul tor ke je teplota pod 10 C alebo nad 40 C Nab janie akumul tora pri extr mnych teplot ch m e zn i jeho ivotnos 4 S po koden m akumul torom...

Page 11: ...ch kovov ch h ikov upevnite popruhy na n dobu obr 5 D ka popruhov sa d nastavi pomocou pos vac ch sp n obr 6 Popruhy m ete n sledne zaisti pomocou pracky obr 7 NAPLNENIE N DOBY OBR 8 A 9 UPOZORNENIE P...

Page 12: ...vyberte zo zariadenia potiahnut m smerom dozadu Obr 10 ZAPNUTIE VYPNUTIE POSTREKOVA A OBR 12 Postrekova umo uje prev dzku v 2 pracovn ch re imoch I n zky tlak 0 35 bar a II vysok tlak 0 5 bar Pre zapn...

Page 13: ...e V dy zosta te na doh ad od in ch os b ktor by V m v pr pade n dze mohli poskytn pomoc DR BA Pred za at m akejko vek kontroly alebo dr by zariadenie vypnite a vytiahnite akumul tor zo zariadenia Akum...

Page 14: ...ie pop san ch pokynov m e ma za n sledok podr denie poko ky alebo in v ne zranenie pou vate a V priebehu asu m u tesnenia stvrdn a praskn a sp sobi nik postreku z postrekova a V pr pade potreby jedno...

Page 15: ...CBS S20Li 12 lit Class III TYP SPL12 MODEL CBS S20Li bola navrhnut a vyroben v zhode s nasleduj cimi normami was constructed and produced in compliance with following standards EN 55014 1 2017 EN 5501...

Page 16: ......

Page 17: ...U N SERVIS VYKON VA SPLNOMOCNEN Z STUPCA V ROBCU Splnomocnen z stupca v robcu Slovakia Trend Export Import s r o Michalovsk 87 1414 073 01 Sobrance Fax 056 652 2329 Tel 0915 392 687 E mail servis slov...

Page 18: ...CK PARAMETRY NAP T 20 V KAPACITA 2 alebo 4 Ah OBJEM N DOBY 12 l TLAK 0 35 bar 0 5 bar D LKA PLASTOV TY E 60 cm D LKA TELESKOPICK KOVOV TY E 57 100 cm PRACOVN DOBA 2 3 5 h PR TOK 1 2 1 4 l min HMOTNOST...

Page 19: ...v pary P i pou v n elektrick ho n ad zamezte p stupu d tem a dal m osob m Pokud budete ru eni m ete ztratit kontrolu nad prov d nou innost 2 ELEKTRICK BEZPE NOST Vidlice nap jec ho kabelu elektrick h...

Page 20: ...en el n ad s prstem na vyp na i nebo p ipojov n vidlice el n ad do z suvky ze zapnut m vyp na em m e b t p inou v n ch raz P ed zapnut m el n ad odstra te v echny se izovac kl e a n stroje Nastavovac...

Page 21: ...m e zp sobit po kozen n ad a b t p inou razu Elektrick n ad p slu enstv pracovn n stroje atd pou vejte v souladu s t mito pokyny a takov m zp sobem kter je p edeps n pro konkr tn elektrick n ad a to...

Page 22: ...en m baterie do post ikova i Sn te t m riziko razu elektrick m proudem a zabr n te mo n mu vniknut materi lu do prestory akumul toru V p pad vniknut materi lu do prostoru pro akumul tor m e doj t ke z...

Page 23: ...toru 2 Nedovolte aby vlhkost d i st kaj c voda dos hly na m sto nab jen akumul toru 3 Nenab jejte akumul tor kdy je teplota pod 10 C nebo nad 40 C Nab jen akumul toru p i extr mn ch teplot ch m e sn...

Page 24: ...PRUHU OBR 5 6 A 7 Pomoc ty kovov ch h k upevn te popruhy na n dobu obr 5 D lka popruh lze nastavit pomoc proch zen spon obr 6 Popruhy m ete n sledn zajistit pomoc p ezky obr 7 NAPLN N N DOBY OBR 8 A 9...

Page 25: ...ul tor vyjm te ze za zen zata en m sm rem dozadu Obr 10 ZAPNUT VYPNUT POST IKOVA E OBR 12 Post ikova umo uje provoz v 2 pracovn ch re imech I n zk tlak 0 35 bar a II vysok tlak 0 5 bar Pro zapnut post...

Page 26: ...jin ch osob kter by V m v p pad nouze mohli poskytnout pomoc DR BA P ed zah jen m jak koliv kontroly nebo dr by za zen vypn te a vyt hn te akumul tor ze za zen Akumul torov z dov post ikova d kladn v...

Page 27: ...t za n sledek podr d n poko ky nebo jin v n zran n u ivatele V pr b hu asu mohou t sn n ztvrdnout a prasknout a zp sobit nik post iku z post ikova e V p pad pot eby jednotliv t sn n vym te abyste zab...

Page 28: ......

Page 29: ...A POZ RU N SERVIS PROV D Z STUPCE V ROBCE Zplnomocn n z stupce v robce Slovakia Trend Export Import s r o Michalovsk 87 1414 073 01 Sobrance Fax 056 652 2329 Tel 0915 392 687 E mail servis slovakia tr...

Page 30: ...ja TECHNIKAI PARAM TEREK FESZ LTS G 20 V KAPACIT S 2 vagy 4 Ah AZ ED NY K BTARTALMA 12 l NYOM S 0 35 bar 0 5 bar A M ANYAG R D HOSSZAS GA 60 cm A TELESZK POS F M R D HOSSZAS GA 57 100 cm MUNKA ID 2 3...

Page 31: ...s szem ly Ha elterelik a figyelm t elvesz theti a szalagcsiszol feletti ir ny t st 2 ELEKTROMOS BISZTONS G Az elektromos szersz m csatlakoz dug ja illeszkedjen a dugaszol aljzathoz A csatlakoz t semm...

Page 32: ...doskodjon r la hogy stabilan lljon s ne vesz tse el az egyens ly t Soha ne becs lje t l saj t erej t Ne haszn lja az elektromos szersz mot ha f radt Viseljen megfelel ruh zatot Ne viseljen b ruh zatot...

Page 33: ...k r lm nyekhez vezethet 5 AZ AKUMUL TOROS SZERSZ M HASZN LATA Miel tt behelyezi az akkumul tort bizonyosodjon meg r la hogy a kapcsol a 0 kikapcsolt poz ci ban van Az akkumul tor behelyez se a bekapcs...

Page 34: ...j k a t ml t s a tart lyt Minden haszn lat el tt alaposan ellen rizze a permetez g pet Ellen rizze hogy a t ml nem szakadt e meg vagy nem s r lt e nincs e sziv rg s a f v k k eldugultak e s hogy a g p...

Page 35: ...ndez s jav t sa el tt 8 Fedje le az akkumul tor p lusait r vidz r elker l si c lokat szolg l 9 Ker lje a robban svesz lyt 10 Ne Doh nyozzon az akkumul tor t lt se k zben vagy egy t rol sa helysz n n A...

Page 36: ...az elemtart fedele z rva van e miel tt a tart lyt megt lti Miel tt behelyezi az akkumul tort a g pbe t r lje le a szennyez d st s a ki ml tt spray t a permetez tart lyt l A fent le rt elj r s v greha...

Page 37: ...m s 0 35 bar s II magas nyom s 0 5 bar A permetez bekapcsol s hoz ford tsa az ON OFF kapcsol t 10 I vagy II ll sba A permetez g p kikapcsol s hoz ford tsa az ON OFF kapcsol t 10 O helyzetbe AKKUMUL TO...

Page 38: ...e el tt kapcsolja ki az eszk zt s vegye ki az akkumul tort Minden haszn lat ut n alaposan tiszt tsa meg a vezet k n lk li permetez g pet Ha a szennyez d st nem lehet elt vol tani haszn ljon szappanos...

Page 39: ...vagy egy b s lyos s r l s t okozhatja Az id m l s val a t m t sek megkem nyedhetnek s repedhetnek s permet kifolyhat a permetez b l Sziv rg s elker l se rdek ben cser lje ki az egyes t m t seket T ROL...

Page 40: ...Elad s d tuma Garancialev l Warranty Elad al r sa s pecs tje Az gyf l az al r s val meger s ti hogy a k sz l ket bemutatt k s elmagyar zt k neki hogy ismeri a g p zemeltet s re s haszn lat ra vonatko...

Page 41: ...s sorban ojan alkatr szek kop sa rthet mind minden forg s mozg alkatr sz v g r sz s burkolat kapcsok s kek fogaskerekek s ksz jak l ncos fogaskerekek s rl d s s tengelykapcsol s rl d fel letek gumiabr...

Page 42: ...ea de perioadele n care scula este oprit sau c nd este n func iune dar nu execut efectiv lucrarea Aceasta poate reduce semnificativ nivelul de expunere pe perioada total de lucru Identifica i m suri s...

Page 43: ...a ntre inere din acest manual Utilizarea pieselor neautorizate sau nerespectarea instruc iunilor de ntre inere poate crea un risc de oc sau v t mare REGULI SPECIFICE DE SIGURAN pentru pulverizatoare R...

Page 44: ...nire la rata pentru care a fost proiectat Depozita i aparate cu regim de mers n gol n interior c nd nu sunt utilizate aparatele trebuie depozitate n interior n locuri uscate i nalte sau nchise nu la n...

Page 45: ...at de la flux la un jet conic 1 Scoate i acumulatorul din aparat 2 Sl bi i capul pentru jet 3 Str nge i duza pentru un jet sub form de evantai Pentru capul de pulverizare metalic tija metalic 14 se po...

Page 46: ...zatorul s prezinte scurgeri Un set de garnituri de nlocuire este inclus Consulta i imaginea afi at pentru loca ia fiec ruia dintre garnituri apoi nlocui i dup cum este necesar pentru a rezolva eventua...

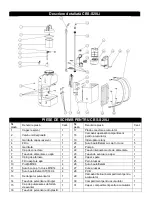
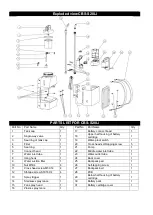
Page 47: ...re 1 22 eav interioar medie de alimentare 1 7 eav de alimentare cu ap 1 23 eav de evacuare a apei 1 8 C rlig de at rnare 1 24 Capac spate 1 9 Filtru aspirare ap 1 25 Pern rucsac 1 10 Piuli M5X4 4 26 u...

Page 48: ......

Page 49: ...FECTUAT DE C TRE REPREZENTANTUL AUTORIZAT AL PRODUC TORULUI Reprezentantul mputernicit al produc torului Slovakia Trend Export Import s r o Michalovsk 87 1414 073 01 Sobrance Fax 056 652 2329 Tel 0915...

Page 50: ...e total working period An estimation of the level of exposure to vibration should also take into account the times when the tool is switched off or when it is running but not actually doing the job Th...

Page 51: ...When servicing the product use only identical replacement parts Follow instructions in the Maintenance section of this manual Use of unauthorized parts or failure to follow maintenance instructions m...

Page 52: ...ich it is intended Don t Force Appliance It will do the job better and with less likelihood of a risk of injury at the rate for which it was designed Store Idle Appliances Indoors When not in use appl...

Page 53: ...a stream to a cone spray 1 Remove the battery pack from the tool 2 Loosen the head for a tream 3 Tighten the nozzle for a fan spray For the metal spray head of the metal lance 14 can be adjust from a...

Page 54: ...included Refer to the image shown for the location of each of the seals then replace as needed to address any leaks that develop Additional sets of replacement seals can be ordered by contacting custo...

Page 55: ...5 Seal ring 1 21 Pump 1 6 Connect head 1 22 Middle water inlet tube 1 7 Water inlet tube 1 23 Water outlet tube 1 8 Hang hook 1 24 Back cover 1 9 Water suction filter 1 25 Backpack pad 1 10 Nut M5X4...

Reviews: