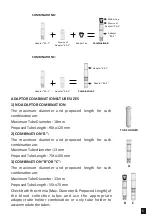
9. ROTOR INSTALLATION
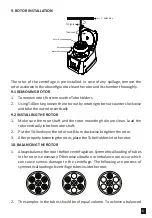
The rotor of the centrifuge is pre-installed. In case of any spillage, remove the
rotor as shown in the above figure to clean the rotor and its chamber thoroughly.
9.1 REMOVING ROTOR
1. To remove rotor, first remove the Tube Holders.
2. Using T-Allen key, loosen the rotor nut by rota ng rotor nut counter clockwise
and take the out rotor ver cally
9.2 INSTALLING THE ROTOR
1. Make sure the rotor sha and the rotor moun ng hole are clean. Load the
rotor ver cally into the motor sha .
2. Put the T-Allen key in the rotor nut & turn clockwise to ghten the rotor.
3. A er properly fastening the rotor, place the Tube Holders into the rotor.
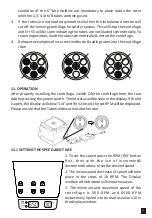
10. BALANCING THE ROTOR
1. Always balance the rotor before centrifuga on. Symmetrical loading of tubes
in the rotor is necessary. Otherwise vibra on or imbalance can occur which
can cause serious damage to the centrifuge. The following are process of
symmetrical loading of centrifuge tubes inside the rotor.
2. The samples in the tubes should be of equal volume. To achieve a balanced
To Tighten
T - Allen Key
Rotor Nut
Rotor
Motor Shaft
To Loosen
6


