background image

LOG SET

3

1

Summary of Contents for MONTEREY-N-E

Page 1: ...RNING FIRE OR EXPLOSION HAZARD Failure to follow safety warnings exactly could result in serious injury death or property damage Do not touch any electrical switch do not use any phone in your building Do not try to light any appliance phone Follow the gas supplier s instructions If you cannot reach your gas supplier call the fire WARNING Improper installation adjustment alteration services or mai...

Page 2: ...heck Gas Type 25 Installing Gas Piping to Fireplace Burner System Location 25 Checking Gas Pressure 27 Electrical Installation 28 Glass Removal 29 Final Installation 30 Media Tray Placement Replacement Parts 41 Vent Components 41 Firebox Components 42 Troubleshooting 45 Warranty Back Cover IMPORTANT This fireplace is designed for a minimum 1 foot of vertical vent pipe rise before any horizontal ve...

Page 3: ...ed and sealed If this unit is not properly installed by a qualified service person with glass panel properly seated and sealed combustion leakage can occur CARBON MONOXIDE POISONING Early signs of carbon monoxide poisoning are similar to the flu with headaches diz ziness and or nausea If you have these signs the fireplace may not have been installed properly Get fresh air at once Have the fireplac...

Page 4: ...ded that you burn your fireplace for at least ten 10 hours the first time you use it Place the fan switch in the OFF position during this time A manufactured home USA only or mobile home OEM installation must conform with the Manufactured Home Construction and Safety Standard Tile 24 CFR Part 3280 or when such a standard is not applicable the Standard for Manufactured Home Installations ANSI NCSBC...

Page 5: ...CSA B149 1 in Canada Gas and Propane Installation Code NFPA54 in U S A or the Natural Fuel Gas Code ANSI Z223 1 of local codes with the National with local codes or in the absence The installation must conform TESTED TO ANSI Z21 88 2014 CSA 2 33 2014 CGA 2 17 M91 R2009 CSA P 4 1 09 STANDARDS LISTED VENTED GAS FIREPLACE HEATER Direct Vent type appliances draw all combustion air from outside of the ...

Page 6: ...ping damage and immediately inform the distributor if any damage is found Do not install any unit with damaged incomplete or substitute parts Check your packing list to verify that all listed parts have been received ITEMS REQUIRED FOR INSTALLATION Tools Building Supplies Phillips Screwdriver Framing Materials Hammer Wall Finishing Materials Saw and or saber saw Caulking Material Noncombustible Le...

Page 7: ...erial over the facing are 60 x 34 1 2 see Figure 2 3 The inner opening in covering material must be minimum 49 1 4 wide 14 1 4 tall and centered over the fireplace opening to allow for or glass door removal A 1 4 reveal must be provided all the way around the fireplace opening 4 The cover should maintain an air gap of at least 1 8 between covering material and fireplace to allow for metal fireplac...

Page 8: ...ORMATION Figure 3 Fireplace Dimensions Right side view Front view Top view Flue collar Electric access both sides Gas line access both sides 28 34 25 23 25 48 75 13 75 59 25 34 25 28 7 125 7 125 8 5 22 25 57 25 1 1 1 1 57 25 ...

Page 9: ...ct the front opening of the fireplace Do not install in the vicinity where gasoline or other flammable liquids may be stored Vent pipe routing See Venting section found in this manual for allowable venting configurations These units can be installed in a bedroom or bathroom See National Fuel Gas Code ANSI Z233 1 NFPA 54 current edition the Uniform Mechanical Code current edition and Local Building...

Page 10: ... 4 screws to attach fireplace to framing The side brackets are adjustable from 1 2 to 5 8 to accommodate different thickness of material SECURING FIREPLACE TO FLOOR OR FRAMING Figure 5 Securing Fireplace to Floor and Framing Studs Framing Screws Side adjustable bracket Screws Side adjustable bracket Screws NOTE If installed in mobile home fireplace must be bolted securely to floor ...

Page 11: ...yl flooring the appliance shall be installed on a metal wood or noncombustible material panel extending full width and depth of the appliance WARNING The fireplace face may be covered with any non combustible material Allow clearance for removal of front air panel and glass door 6 6 6 6 6 6 6 6 14 min 48 min Minimum 7 from both side walls 12 maximum depth COMBUSTIBLE MANTEL to ceiling Clearance to...

Page 12: ...em Installation of any component part not manufactured or approved by Woodbridge Fireplace Inc Installation other than permitted by these instructions FINISHING MATERIAL NOTE Any remote wiring i e remote control wall switch must be done prior to final finishing to avoid costly reconstruction INSTALLATION INFORMATION VENT INSTALLATION Never obstruct or modify the air inlet or outlet This may create...

Page 13: ...R be attached to a chimney serving a separate solid fuel burning appliance Each gas appliance must use a separate vent system Do not use common vent systems WARNING Horizontal sections of this vent system require a minimum clearance of 3 from the top of the pipe and 1 minimum to the sides and bottom Vertical sections of this system require a minimum of 1 clearance to combustible materials on all s...

Page 14: ...ns firestops are required at each floor level If an offset is needed in the attic additional pipe and elbows will be required You may use a chase with a vent termination with exposed pipe on the exterior of the house See Installing Vent System in a Chase below If pipe is enclosed in chase it is not exposed It is very important that the venting system maintain its balance between the combustion air...

Page 15: ...on air inlet to any other appliance 12 305mm minimum K Clearance to a mechanical air supply inlet 6 1829mm minimum L Clearance above a paved sidewalk or paved driveway located on public property 7 2133mm minimum M Clearance under veranda porch deck or balcony 12 305mm minimum N Clearance above a roof shall extend a minimum of 24 610mm above the highest point when it passes through the roof surface...

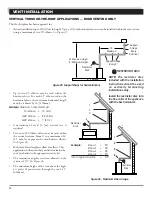
Page 16: ...ical line to the bottom of the graph 3 Select the indicated dimension and position the fireplace in accordance with same Example If the vertical dimension from the floor of the fireplace is 11 3 4m the horizontal run to the face of the outer wall must not exceed 18 5 5m Example If the vertical dimension from the floor of the unit is 7 2 14m the horizontal run to the face of the outer wall must not...

Page 17: ... desired combination of pipe and elbows to the appliance adaptor with pipe seams oriented towards the wall or floor Twist lock Procedure The female ends of the pipes and fittings have three locking lugs indentations These lugs will slide straight into matching slots on the male end of adjacent pipes and fittings Push the pipe sections together and twist one section clockwise approximately one quar...

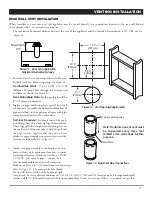
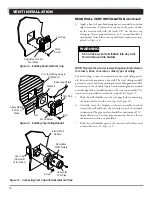
Page 18: ...ure 15 5 Slide the wall thimble over the vent pipe before connecting the horizontal run to the vent cap See Figure 16 6 Carefully move the fireplace with vent assembly attached toward the wall and insert the vent pipe into the horizontal termination The pipe overlap should be a minimum of 11 4 Apply silicone to the outer pipe connection Fasten all vent connections with screws provided 7 Slide the ...

Page 19: ...ndations less than 20 below siding outcrop the vent pipe must flush up with the sid ing It is best to locate the fireplace in such a way that minimizes the number of offsets and horizontal vent length The horizontal vent run refers to the total length of vent pipe from the flue collar of the fireplace or the top of the Transition Elbow to the face of the outer wall Figure 18 Maximum Three 3 90 Elb...

Page 20: ...elbows permitted per side wall installation is two 2 These elbows can be installed in either the vertical or horizontal run For each 45 elbow installed in the horizontal run the length of the horizontal run MUST be reduced by 18 45cm This does not apply if the 45 elbows are installed on the vertical part of the vent system The maximum number of elbow degrees in a system is 270 See Figure 22 Figure...

Page 21: ... leaving a clearance of approximately 4 below snorkel See Figure 21 3 Install vent system 4 Ensure a watertight seal is made around the vent pipe coming through the wall 5 Apply high temperature sealant caulking supplied around the 4 and 7 snorkel collars 6 Slide the snorkel into the vent pipes and secure to the wall 7 Level the soil so as to maintain a 4 clearance below snorkel See Figure 23 Figu...

Page 22: ...rethatyoufirstdeterminethe roof pitch and use the appropriate starter kit The maximum angular variation allowed in the system is 270 See Figure 26 The minimum height of the vent above the high est point of penetration through the roof is 2 610mm 8 Minimum Height 10 Maximum 1 2 3 4 Support Straps Every 3 Example Elbow 1 90 Elbow 2 45 Elbow 3 45 Elbow 4 90 Total Angular Variation 270 Support Straps ...

Page 23: ...2 x101 2 267mm x 267mm inside dimensions as shown in Figure 12 page 17 using framing lumber the same size as the ceiling joist If the area above the ceiling is an insulated ceiling or a room nail firestop from the top side This prevents loose insulation from falling into the required clearance space See Figure 28 Otherwise install firestop below the framed hole The firestop should be installed wit...

Page 24: ... Ceiling Support Box Installation Figure 31 Installed Cathedral Ceiling Support Box CATHEDRAL CEILING INSTALLATION IMPORTANT Review all information on previous page before planning this installation Cathedral ceiling installations can be very tricky 1 Remove shingles or other roof covering as necessary to cut the rectangular hole for the support box Mark the outline of the cathedral ceiling suppor...

Page 25: ...al regulator will reduce incoming gas pressure You must reduce incoming gas pressure to between 11 and 13 inches of water If you do not reduce incoming gas pressure burner system regulator damage could occur Install external regulator with the vent pointing down as shown in Figure 32 Pointing the vent down protects it from freezing rain or sleet External Regulator 100 lb min Propane LP Supply Tank...

Page 26: ...traps moisture and contaminants This keeps them from going into the burner system gas controls If sediment trap drip leg is not installed or is installed wrong burner system may not run properly Figure 33 Gas Connection Tee Joint Pipe Nipple Cap Approved Flexible Gas Line CSA Design Certified Equipment Shutoff Valve with 1 8 NPT Tap Sediment Trap Drip Leg Natural Gas From Gas Meter 5 W C to 10 5 W...

Page 27: ...ity FRONT BACK see page 5 BLOWER FAN LOCATION Outlet Pressure Tap Pilot Adjustment Inlet Pressure Tap lower right outside wall as shown on page 5 Velcro 2 T o ease installation a 30 flex line with manual shut off valve has been provided with on this appliance Install and attach To check gas pressures at valve turn captured screw counter clockwise 2 or 3 turns and then place tubing to pressure gaug...

Page 28: ...ition and Canadian Electrical Code CSA C22 1 WARNING Label all wires before disconnecting when servicing controls Wiring errors can cause improper and dangerous operation CAUTION This fireplace requires 110V AC electrical supply for normal operation in order to power up blower and 7V DC adapter which is required to operate Remote Control However during power outage situation its electronic system ...

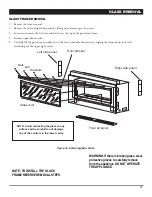
Page 29: ... lifting up and moving to the center Figure 36 Removing Glass Frame and tilting out the upper right corner Front air panel Right side panel 4 Remove upper door bracket NOTE Avoid contacting the glass to any surface and be carefull to not damage Glass door any of the controls in the lower cavity Left side panel Door bracket Nuts and Washers WARNING If there is broken glass wear protective gloves to...

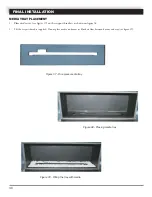
Page 30: ... 37 on the support brackets as shown on figure 38 2 Fill the tray with media supplied Do not place media on burner or block air flow between burner and tray see figure 39 Figure 37 One piece media tray Figure 38 Placing media tray Figure 39 Filling the tray with media 30 ...

Page 31: ...LOG SET 31 ...

Page 32: ...LOG SET contunue 32 ...

Page 33: ... the screen in place Using the nuts provided attach the screen firmly 33 WARNING A barrier safety screen designed to reduce the risk of burns from the hot viewing glass is provided with this appliance and shall be installed for the protection of children and other at risk individuals IMPORTANT Safety Screen must be in place when the fireplace is in operation If the barrier becomes damaged the barr...

Page 34: ...lots in the face and slide downward Make sure the side panel is secured properly Repeat Steps 5 and 6 for the Left Side Panel STEP 7 Angle the Air Front Panel beneath the bottom of the screen Support the Air panel on the left and right Side Panels STEP 8 Tilt the Panel down to rest on the face support 34 NOTE TO INSTALL THE SAFETY SCREEN REVERSE REMOVAL STEPS ...

Page 35: ...supply to the DFC board please verify that the electrical connections illustrated parts list or mounted in adjacent wall Make sure that the remote receiver switch is in REMOTE middle position Initializing the System for the First Time 1 Set the remote receiver switch to the OFF position WARNING If you do not follow these instructions exactly a fire or explosion may result causing property damage p...

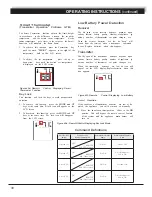
Page 36: ...y Note the polarity of the batteries and insert into the battery bay as indicated on the battery covel 2 Place the 3 posilion slider switch in the REMOTE position 3 Insert the end of a paper clip into the hole marked PRG on the receiver front cover The receiver will beep three times to indicate that it is ready to syn chronize with a transmitter 4 Install the 3AAA batteries in the transmitter batt...

Page 37: ...ignite A single beep from the receiver will confirm the command Turning OFF the Appliance 1 Press the ON OFF button 011 the transmitter The A single beep from the receiver will confirm the command the receiver will confirm the command Note If you press the up arrow key while the remote system is ON but the flame is OFF the flame will come on in the high position A single beep from Flame Height Con...

Page 38: ... changes etc Manual Override If the receiver or transmitter batteries are low or de pleted the appliance can still be turned on manually 1 Move the receivers three position slider to the ON position This will bypass the remote control feature of the system and the appliance main burner will turn on Command Definitions Pilot IPI CPI switch Position of the receiver slider switch Command reference na...

Page 39: ...ck ups at the beginning of each heating season WARNING BURNER FLAME The flames from the burner should be visually checked as soon as the heater is installed and periodically during normal operation In normal operation at full rate and after operat ing for about 15 to 30 minutes the flame should be yellow and up to 6 inches high See Figure 46 If the flame is blue and only in the center turn off uni...

Page 40: ...ld cleaning solution Simply apply an adequate amount to the glass and wipe off with a damp cloth After all maintenance has been completed re install glass door BLOWER FAN ASSEMBLY The fan assembly has an automatic temperature control which will turn the fan on as the fireplace heats up The fan will turn off as the fireplace cools down The control knob can be used to turn the fan off or control the...

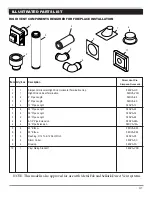
Page 41: ... 9 Pipe Length 58DVA 09 3 4 12 Pipe Length 58DVA 12 3 4 24 Pipe Length 58DVA 24 3 4 36 Pipe Length 58DVA 36 3 4 48 Pipe Length 58DVA 48 4 4 8 1 2 Pipe Extension 58DVA 08A 4 4 16 Pipe Extension 58DVA 16A 5 4 45 Elbow 58DVA E45 6 4 90 Elbow 58DVA E90 7 6 Flashing 0 12 To 6 12 Roof Pitch 58DVA F6 8 4 Storm Collar 58DVA SC 9 4 Firestop 58DVA FS 10 1 Vinyl Siding Standoff 58DVA VSS Simpson Duravent NOT...

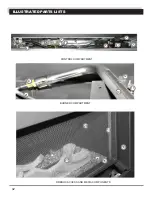
Page 42: ...ILLUSTRATED PARTS LISTS CONTROL COMPARTMENT BURNER COMPARTMENT 1 2 3 4 5 6 7 9 10 11 12 21 13 14 18 FIREBOX ACCESS AND MEDIA COMPONENTS 8 15 26 19 20 27 42 ...

Page 43: ...rts used in your fireplace 43 REMOTE REMOTE Receiver 14 Pin Connector Pilot CPI IPI MODE 120 Vac INPUT 7 Vdc STABILIZED SUPPLY OUTPUT MOTOR IPI CPI RECEIVER DC SUPPLY SPLIT FLOW ON OFF TPTH TH DFC SUPPLY DC SUPPLY GROUND 885 PROFLAME Orange Green Chassis connection Remote control GTM 11 25 24 22 23 1 5 6 ...

Page 44: ...VER 1 4 F200065 F200065 FLEX CONNECTOR WITH SHUTOFF VALVE 1 5 C200001 C200002 MAIN GAS VALVE 1 6 H100142 H100142 ELECTRONIC CONTROL DFC BOARD 1 8 D200020 D200020 VALVE BRACKET 1 21 C100019 C100019 BURNER CONNECTOR 1 3 C100020 C100020 DUPLEX OUTLET 1 2 D100027 D100027 FAN CONTROL FACE PLATE 1 This list contains replaceable parts used in your fireplace All replacement parts should be ordered from you...

Page 45: ...ombustion chamber Ensure that the glass is properly secure and latch Frequent pilot outage A Pilot flame may be too high or A Clean and adjust the pilot flame for maximum flame impingement The pilot and main A Inner vent pipe leaking exhaust A Check for flue product leak Replace defective pipe section Flame burn blue and A Insufficient oxygen being supplied A Ensure that the vent cap is installed ...

Page 46: ...NOTES ...

Page 47: ...Elbows Quantity 45 Elbows ALTITUDE Feet Above Sea Level Was Stove Derated Yes No If Yes To What Orifice Size Unusual Structure Near Vent Inside Corner Trees Shrubs Other Termination Please Describe Prevalent Wind Conditions Other Installation Notes The installer should complete the form below that describes the details of the installation Having this written record of installation information avai...

Page 48: ...nsportation of defective parts on the appliance or 3 incidental or consequential damage All service work must be performed by an authorized service representative This warranty is expressly in lieu of other warranties express or implied including the warranty of merchantability of fitness for purpose and of all other obligations or liabilities Woodbridge Fireplace Inc does not assume for it any ot...

Reviews: