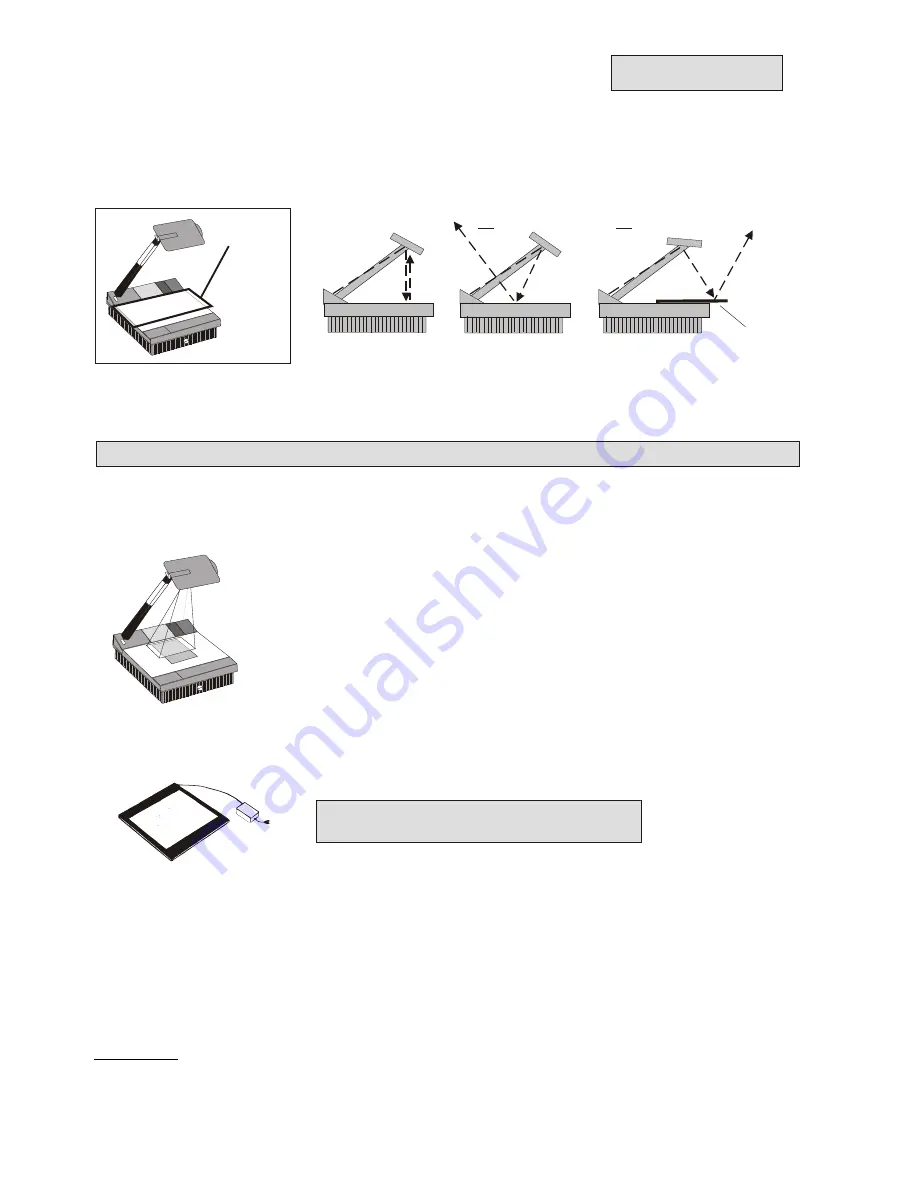
REFLECTIONS / GLARE
(all Visualizers)
IMPORTANT
Reflections can appear only in the bottom half of the working surface, where the light is reflected directly into the
camera. In this case, move the object upwards and tilt the reflector head slightly.
If this is not possbile (e.g. with very big objects), pull the working plate to the front of the unit (as shown below)
and tilt the reflector head accordingly.
Reflection:
No reflection:
No reflection:
Working plate (#5)
Light reflected directly
into camera
Light reflected to
the outside
Light reflected to
the outside
Make sure that reflections are not caused by room light or wavy material!
Reflection
free area
88 % of the working surface (the upper part) are a reflection free area, as the light is reflected to the outside
and not into the camera. In this area reflections can only appear if the transparencies are very wavy or if
the room light causes the reflections!
OPTIONAL LIGHTBOXES FOR SLIDES AND X-RAYS
(all Visualizers)
For transparencies lightboxes are not required as the reproduction quality is better without a lightbox
(see chapter
above)
however for very dark objects like x-rays and slides an optional lightbox is reccommended. WolfVision
offers lightboxes in 3 different sizes. The smaller lightboxes do not require an external power supply as they can
be directly connected to the 12 V DC output (#41) of the Visualizers.
The light of the lightbox (using the Visualizers 12 V DC output) can be switched on by pressing the LIGHT ON
key (#24) twice. This function also switches off the top light of the Visualizer.
While working with a lightbox with external power supply, always switch off the Visualizer's light with the LIGHT
OFF key (#23)!
IMPORTANT:
For true color reproduction it is important to adjust the white balance when you change from the Visualizer's light
to the lightbox and when you change from a lightbox to the Visualizer's light.
(See page 15)
While working with an optional lightbox, the
light of the Visualizer has to be switched off !
WORKING WITH TRANSPARENCIES
(all Visualizers)
One side of the Visualizer's working plate (#5) is a special crystalline white working
surface, which is especially designed for perfect reproduction of transparencies.
As the background is 100% white and the illumination is halogen light, the color
quality is much better than with most bottom light systems.
Just place the transparency in the REFLECTION FREE AREA (=upper part of
the working surface -
see chapter above
). The synchronized lightfield marks the
pickup area of the camera.
If you have to show very wavy transparencies, cover them with a glass plate in
order to avoid reflections.
9


