Installation Considerations
7
wolfappliance.com/specs
Mounting holes will need to be drilled in the back of the
drawer front panel. Holes should be drilled on site to
ensure proper fit and gaps are achieved. A drilling
template is provide with the integrated drawer front.
IMPORTANT NOTE:
Be sure to finish the inside lip of the
opening and the front face of the platform and cleats.
These areas may be visible when the drawer is open.
IMPORTANT NOTE:
Be aware of the location of the
mounting holes on the warming drawer frame to make
sure screws used to attach the cleats do not interfere with
screw holes for mounting the warming drawer.
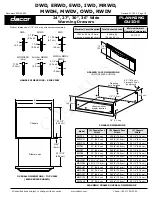
PLATFORM
TOP CLEAT
SIDE CLEAT
CABINETRY
OPENING
CLEATS AND PLATFORM
RECESSED
3
/
16
"
(5)
Recessed application.
Flush inset application.
PLATFORM
TOP CLEAT
SIDE CLEAT
CABINETRY
OPENING
CLEATS AND PLATFORM
RECESSED
3
/
16
"
(5)
PLUS THICKNESS
OF DECORATIVE PANEL
Installation Options
STANDARD, RECESSED OR FLUSH INSET INSTALLATION
The warming drawer with E series drawer front can be
installed in a standard, recessed or flush inset application.
For a standard installation, the drawer collar and front
panel sit proud of the cabinet face frame. A recessed
installation requires the cabinetry be recessed by
3
/
16
"
(5)
so the collar is flush with the cabinet face frame but the
drawer front will sit proud. A flush inset installation
requires the drawer collar and front panel be recessed to
be flush with surrounding cabinetry. Refer to illustrations
on the following pages for minimum cabinet dimensions
for your specific installation.
INSTALL RECESSED CLEATS AND PLATFORM
For a recessed or flush inset application, you will need to
install a recessed platform and cleats into the opening.
Proper recess of the platform and cleats is critical to the
function and esthetics of the warming drawer installation.
The depth of the platform may increase with the cabinet
depth. Be sure to rigidly mount the platform so that it
can support a minimum of 200 lbs
(90 kg)
. Refer to the
illustrations below.