background image

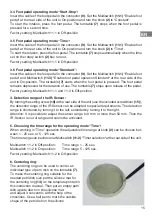
3.4 Foot pedal operating mode “Start-Stop“:

Insert the cable of the foot pedal in the connector 

(9)

. Set the Multiswitch 

(11-1)

 “Enable foot 

pedal“ at the rear side of the unit to On-position and turn the knob 

(2)

 to “Constant“. 

To start the rotation, press the foot pedal. The turntable 

(7)

 stops when the foot pedal is 

pressed for a second time.
Factory setting: Multiswitch 11-1 in Off-position

3.5 Foot pedal operating mode “Time“:

Insert the cable of the foot pedal in the connector 

(9)

. Set the Multiswitch 

(11-1)

 “Enable foot 

pedal“ at the rear side of the unit to On-position and turn the knob 

(2)

 to “Time“. 

To start the rotation, press the foot pedal. The turntable

 (7)

 stops automatically when the time 

set on the rotary switch 

(2) 

has run out.

Factory setting: Multiswitch 11-1 in Off-position

3.6 Foot pedal operating mode “Standard“:

Insert the cable of the foot pedal in the connector

 (9)

. Set the Multiswitch

 (11-1) 

“Enable foot 

pedal“ and Multiswitch

 (11-3)

 “Enable foot pedal operation Standard“ at the rear side of the 

unit to On-position. The turntable 

(7)

 starts when the foot pedal is pressed. The foot pedal 

remains depressed for the duration of use. The turntable 

(7)

 stops upon release of the pedal.

Factory setting: Multiswitch 11-1 and 11-3 in Off-position

4. Detection range of the IR-Sensor:

By turning the setting screw 

(10) 

at the rear side of the unit (use the included screwdriver 

(15)

), 

the detection range of the IR-Sensor can be adapted to special requirements. The detection 
range is shortened by turning it to the left; extended by turning it to the right.
Attention: It is possible to adjust the sensor range to 0 mm or more than 50 mm. Then the 
IR-Sensor is out of range and cannot be activated.

5. Choosing the time range for the operating mode “Time“:

When working in “Time“ operation the adjustable time range at knob

 (2)

 can be chosen bet-

ween 1 - 25 sec. or 5 - 125 sec.
The time range can be chosen at Multiswitch 

(11-2)

 “Timer selection“ at the rear side of the unit.

Multiswitch 11-2 in Off-position:  

Time range 1 - 25 sec.

Multiswitch 11-2 in On-position:  

Time range 5 - 125 sec.

Factory setting: Multiswitch 11-2 in Off-position

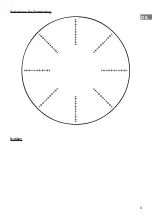
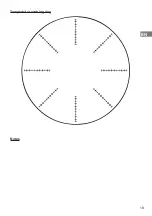
6. Centering ring:

The centering ring can be used to center an 
individual type of petri dish on the turntable 

(7)

.

To make the centering ring suitable for the 
needed petri dish size put the silicone mat for 
the centering ring

 (14) 

on the template printed in 

this instruction manual. Then put an empty petri 
dish upside down on the silicone mat 
and adjust it concentric with the help of the 
crosslines. Use a ball pen to mark the outside 
shape of the petri dish on the silicone 

15

EN

Summary of Contents for 7.002.000

Page 1: ...ngsanleitung DE Sensorgesteuerter Drehtisch f r Petrischalen pro Instruction manual EN Mode d emploi FR Sensor controlled turntable for Petri dishes able tournante command e par capteur pour bo tes de...

Page 2: ...LED Footpedal 7 Drehteller 7a Silikoneinlage 7b Feststellschraube Drehteller 8 Buchse f r Steckernetzteil 9 Buchse f r Fu pedal 10 Trimmerf rIR SensorErfassungs bereich 11 Multischalter Schalter 1 Akt...

Page 3: ...Drehtellers per Handzeichen Der Sensorturn pro ist leistungsstark UV best ndig und abflammbar Warnhinweise BeimAuspackendesGer tesbitteaufevtl Transportsch denachtenundbei sichtbaren Besch digungen n...

Page 4: ...Durch Linksdrehung des Drehschalters 1 schalten Sie das Ger t wieder aus 3 1 LED s f r verschiedene Betriebsarten LED Constant 4 leuchtet Betriebsart IR Sensor Constant LED Time 5 leuchtet Betriebsar...

Page 5: ...ird durch bet tigen des Fu pedals gestartet W hrend des Rotationsvorganges das Fu pedal gedr ckt halten Die Rotation stoppt nach Loslassen des Fu pedals Werkseinstellung Multischalter 11 1 und 11 3 in...

Page 6: ...Wiedereinbau Platzieren Sie den Drehteller 7 auf dem Ger t Halten Sie den Drehteller mit einer Hand fest und schrauben Sie den Drehteller mit der Feststellschraube 7b wieder fest 4 5 Umdrehungen nach...

Page 7: ...strumenten Drehteller Sensorturn pro extra gro Art Nr 7 000 150 f r Petrischalen bis zu 150 mm Durchmesser mit Silikoneinlage Tray Art Nr 8 000 340 rechts und links montierbar 3 Ablagem glichkeiten Ed...

Page 8: ...nen 9V DC 1 3 A Polarit t Gr ne LED 4 5 6 blinkt DiesesSignalerscheintwenndieGer teinnentemperatur70 C berschreitet Beinormaler Bel ftung ist das Ger t f r Dauerbetrieb ausgelegt Ger t abk hlen lassen...

Page 9: ...Notizen Schablone f r Zentrierring 9 DE...

Page 10: ...ervorschrift Specification Zeichnungs Nr Draw No 15 4474 500 01 www friwo de Index Rev Lfd Nr Doc No P002834048 Seite 10 von 10 page 10 of 10 8 CE Konformit tserkl rung Declaration of Conformity Wir d...

Page 11: ...elstahl und Glas UV und l sungsmittelbest Abmessungen B x H x T 109 x 59 x 130 mm Gewicht 860 g Max Belastung 400 g Elektrisch Drehzahlbereich 14 210 U min Erfassungsbereich IR Sensor 5 50 mm einstell...

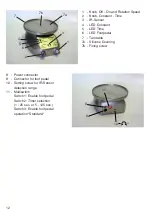
Page 12: ...ED Time 6 LED Footpedal 7 Turntable 7a Silicone Covering 7b Fixing screw 8 Power connector 9 Connector for foot pedal 10 Setting screw for IR Sensor detection range 11 Multiswitch Switch 1 Enable foot...

Page 13: ...sistant and flame sterilizable SAFETY PRECAUTIONS On unpacking the unit check for possible transportation damages If there is any visible damage do not try to operate the device Contact our service re...

Page 14: ...rating mode Switch the unit off by turning the knob 1 counter clockwise to the Off position 3 1 LED s for operating modes LED Constant 4 lights up IR Sensor operating mode Constant LED Time 5 lights u...

Page 15: ...ing Multiswitch 11 1 and 11 3 in Off position 4 Detection range of the IR Sensor By turning the setting screw 10 at the rear side of the unit use the included screwdriver 15 the detection range of the...

Page 16: ...back the silicone covering 7a on the turntable 7 8 Changing the turntable The included turntable for petri dishes up to a diameter of 100 mm can be interchanged with an larger turntable for petri dish...

Page 17: ...nts Turntable Sensorturn pro extra wide Art No 7 000 150 for petri dishes up to 150 mm diameter with silicone covering Tray screw on Art No 8 000 340 for right or left side 3 places Foot pedal made of...

Page 18: ...LED s 4 5 6 is blinking fast This signal indicates a malfunction if the interior temperature has exceeded 70 C At a normal room temperature the unit is suited for continuous operation In case of overt...

Page 19: ...Notes Template for centring ring 19 EN...

Page 20: ...ervorschrift Specification Zeichnungs Nr Draw No 15 4474 500 01 www friwo de Index Rev Lfd Nr Doc No P002834048 Seite 10 von 10 page 10 of 10 8 CE Konformit tserkl rung Declaration of Conformity Wir d...

Page 21: ...ontrols stainless steel glass UV and solvent resistant Measurements B x H x T 109 x 59 x 130 mm Weight 860 g Max load 400 g Electrical Rotary speed range 14 210 rpm Detection range IR Sensor 5 50 mm a...

Page 22: ...7a Rev tement en silicone 7b Vis de blocage du plateau tournant 8 Prise femelle pour le bloc d alimentation 9 Connecteur fem lle pour p dale de commande 10 Trimmer pour la distance de d tection du cap...

Page 23: ...pro est performante r sistante aux UV et au flambage Avertissements En d ballant l appareil veuillez contr ler s il n a pas subi d endommage ment pendant le transport et si vous remarquez des dommage...

Page 24: ...umez l appareil et s lectionnez en m me temps la vitesse de rotation souhait e rotations min Selon le mode de fonctionnement s lectionn une ou plusieurs diodes s allument 4 5 6 En tournant le commutat...

Page 25: ...mmutateur rotatif 2 le plateau tournant 7 s arr te automatiquement R glage d usine l interrupteur 1 est bascul sur la position Off 3 6 Mode p dale de commande Standard Connecter le c ble de raccordeme...

Page 26: ...montage placez le plateau tournant 7 sur l appareil Tenez le fermement avec une main puis refixez le par vissage l aide de la vis de blocage 7b 4 5 tours vers la droite Tournevis cruciforme 26 7b fonc...

Page 27: ...4 5 tours vers la droite Pour finir placez le grand rev tement en silicone dans le plateau tournant contenu dans le volume de livraison du grand plateau tournant num ro d article 7 000 150 9 Garantie...

Page 28: ...DC 1 3 A Polarit La LED verte 4 5 6 clignote Ce signal appara t lorsque la temp rature interne de l appareil d passe 70 C Lorsque la ventilation se fait normalement l appareil peut fonctionner en cont...

Page 29: ...Remarques Gabarit de coupe 29 FR...

Page 30: ...ervorschrift Specification Zeichnungs Nr Draw No 15 4474 500 01 www friwo de Index Rev Lfd Nr Doc No P002834048 Seite 10 von 10 page 10 of 10 8 CE Konformit tserkl rung Declaration of Conformity Wir d...

Page 31: ...verre r sistant aux UV et aux solvants Dimensions L x P x H 109 x 59 x 130 mm Poids 860 g Charge max 400 g Electrique Plage de vitesse de rotation 14 210 T min Distance de d tection Capteur IR 5 50 m...

Page 32: ...lefon 49 0 36081 68940 37318 Arenshausen Telefax 49 0 36081 68942 Deutschland Email sales wld tec com Internet http www wld tec com Halle Kasseler Stra e 49 Phone 49 0 36081 68940 37318 Arenshausen Fa...

Reviews: